


You can apply most loads either on the solid model (on keypoints, lines, and areas) or on the finite element model (on nodes and elements). For example, you can specify forces at a keypoint or a node. Similarly, you can specify convections (and other surface loads) on lines and areas or on nodes and element faces. No matter how you specify the loads, the solver expects all loads to be in terms of the finite element model. Therefore, if you specify loads on the solid model, the program automatically transfers them to the nodes and elements at the beginning of solution.
The following topics related to applying loads are available:
- 3.5.1. Solid-Model Loads
- 3.5.2. Finite-Element Loads
- 3.5.3. Degree-of-Freedom Constraints
- 3.5.4. Applying Symmetry or Antisymmetry Boundary Conditions
- 3.5.5. Transferring Constraints
- 3.5.6. Forces (Concentrated Loads)
- 3.5.7. Surface Loads
- 3.5.8. Applying Body Loads
- 3.5.9. Applying Inertia Loads
- 3.5.10. Including Inertia Relief Calculations
- 3.5.11. Applying Ocean Loads
- 3.5.12. Applying Coupled-Field Loads
- 3.5.13. Axisymmetric Loads and Reactions
- 3.5.14. Loads to Which the Degree of Freedom Offers No Resistance
- 3.5.15. Initial State Loading
- 3.5.16. Applying Loads Using Tabular Input
- 3.5.17. Applying Loads to Components and Assemblies
Solid-model loads are independent of the finite element mesh; that is, you can change the element mesh without affecting the applied loads. This capability enables you to make mesh modifications and conduct mesh sensitivity studies without having to reapply loads each time.
The solid model usually involves fewer entities than the finite element model. Therefore, selecting solid model entities and applying loads on them is much easier, especially with graphical picking.
Elements generated by meshing commands are in the currently active element coordinate system. Nodes generated by meshing commands use the global Cartesian coordinate system. Therefore, the solid model and the finite element model may have different coordinate systems and loading directions.
Applying keypoint constraints requires care, especially when the constraint expansion option is used. (The expansion option enables you to expand a constraint specification to all nodes between two keypoints that are connected by a line.)
You cannot display all solid-model loads.
Solid-model loads are transferred automatically to the finite element model at the beginning of the solution. If you mix solid model loads with finite-element model loads, couplings, or constraint equations, be aware of the following possible conflicts:
Transferred solid loads replace nodal or element loads already present, regardless of the order in which the loads were input. For example, DL,,,UX on a line overwrites any D,,,UX loads on the nodes of that line at transfer time. (DL,,,UX also overwrites D,,,VELX velocity loads and D,,,ACCX acceleration loads.)
Deleting solid model loads also deletes any corresponding finite element loads. For example, SFADELE,,,PRES on an area immediately deletes any SFE,,,PRES loads on the elements in that area.
Line or area symmetry or antisymmetry conditions (DL,,,SYMM, DL,,,ASYM, DA,,,SYMM, or DA,,,ASYM) often introduce nodal rotations that could effect nodal constraints, nodal forces, couplings, or constraint equations on nodes belonging to constrained lines or areas.
With finite element loads, constraint expansion is not a concern. You can select all desired nodes and specify the appropriate constraints.
This table shows the degrees of freedom (DOFs) that can be constrained in each discipline and the corresponding labels:
Table 3.1: DOF Constraints Available in Each Discipline
| Discipline | Degree of Freedom | Label | ||||||||||
|---|---|---|---|---|---|---|---|---|---|---|---|---|
| Structural |
|
| ||||||||||
| Thermal |
|
| ||||||||||
| Magnetic |
|
| ||||||||||
| Electric |
|
| ||||||||||
| Acoustic |
|
| ||||||||||
| Diffusion |
|
|
Any directions implied by the labels (such as UX, ROTZ, AY, etc.) are in the nodal coordinate system.
This table shows the commands for applying, listing, and deleting DOF constraints:
For structural static and transient analyses, velocities and accelerations can be applied as finite element loads on nodes (D). Velocities can be applied in static or transient analyses; accelerations can only be applied in transient analyses. The labels for these loads are:
| VELX, VELY, VELZ - Translational velocities |
| OMGX, OMGY, OMGZ - Rotational velocities |
| ACCX, ACCY, ACCZ - Translational accelerations |
| DMGX, DMGY, DMGZ - Rotational accelerations |
Although these are not strictly degree-of-freedom constraints, they are boundary conditions that act upon the translation and rotation degrees of freedom. See the D command for more information.
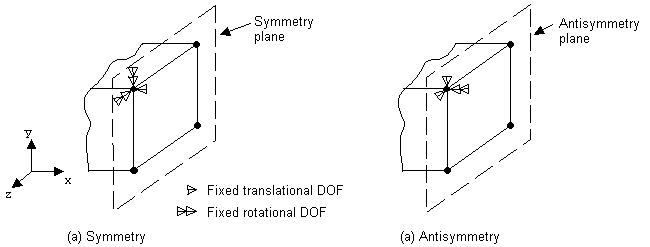
To apply symmetry or antisymmetry boundary conditions on a plane of nodes, issue the DSYM command. The command generates the appropriate DOF constraints.
In a structural analysis, for example, a symmetry boundary condition means that out-of-plane translations and in-plane rotations are set to zero, and an antisymmetry condition means that in-plane translations and out-of-plane rotations are set to zero.
All nodes on the symmetry plane are rotated into the coordinate system via
the KCN argument on the DSYM
command.
The following figure illustrates the use of symmetry and antisymmetry boundary conditions:

The DL and DA commands work in a similar fashion when you apply symmetry or antisymmetry conditions on lines and areas.
If the node rotation angles that exist in the database are different from those used in the solution being postprocessed, POST1 may display incorrect results. This condition typically occurs if you introduce node rotations in a second or later load step by applying symmetry or antisymmetry boundary conditions.
To transfer constraints that have been applied to the solid model to the corresponding finite element model, issue the DTRAN command.
To transfer all solid model boundary conditions, issue the SBCTRAN command.
The following related topics are available:
By default, if you repeat a DOF constraint on the same degree of freedom, the new specification replaces the previous one. You can change this default to add (for accumulation) or ignore with the DCUM command. For example:
NSEL,...          ! Selects a set of nodes
D,ALL,UX,40       ! Sets UX = 40 at all selected nodes
D,ALL,UX,50       ! Changes UX value to 50 (replacement)
DCUM,ADD          ! Subsequent D's to be added
D,ALL,UX,25       ! UX = 50+25 = 75 at all selected nodes
DCUM,IGNORE       ! Subsequent D's to be ignored
D,ALL,UX,1325     ! These UX values are ignored!
DCUM              ! Resets DCUM to default (replacement)
Any DOF constraints set via DCUM remain until another DCUM command is issued. To reset the default setting (replacement), issue the command with no arguments.
You can scale existing DOF constraint values via the DSCALE command.
Both the DSCALE and DCUM commands work on all selected nodes and also on all selected DOF labels. By default, DOF labels that are active are those associated with the element types in the model.
For example, if you want to scale only UX values and not any other DOF label, you can use the following commands:
DOFSEL,S,UX       ! Selects UX label
DSCALE,0.5        ! Scales UX at all selected nodes by 0.5
DOFSEL,ALL        ! Reactivates all DOF labels
DSCALE and DCUM also affect velocity and acceleration loads applied in a structural analysis.
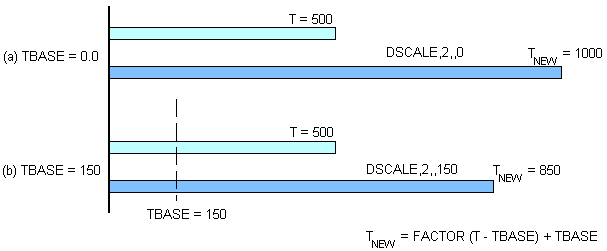
When scaling temperature constraints (TEMP) in a thermal analysis, you can use
the TBASE field on the DSCALE
command to scale the temperature offset from a base temperature (that is, to
scale |TEMP-TBASE|) rather than the actual
temperature values.
Be aware of the possibility of conflicting DK, DL, and DA constraint specifications and how the program handles them. The following conflicts can arise:
A DL specification can conflict with a DL specification on an adjacent line (shared keypoint).
A DL specification can conflict with a DK specification at either keypoint.
A DA specification can conflict with a DA specification on an adjacent area (shared lines/keypoints).
A DA specification can conflict with a DL specification on any of its lines.
A DA specification can conflict with a DK specification on any of its keypoints.
The program transfers constraints that have been applied to the solid model to the corresponding finite element model in the following sequence:
In ascending area number order, DOF DA constraints transfer to nodes on areas (and bounding lines and keypoints).
In ascending area number order, SYMM and ASYM DA constraints transfer to nodes on areas (and bounding lines and keypoints).
In ascending line number order, DOF DL constraints transfer to nodes on lines (and bounding keypoints).
In ascending line number order, SYMM and ASYM DL constraints transfer to nodes on lines (and bounding keypoints).
DK constraints transfer to nodes on keypoints (and on attached lines, areas, and volumes if expansion conditions are met).
Accordingly, for conflicting constraints, DK commands overwrite DL commands and DL commands overwrite DA commands. For conflicting constraints, constraints specified for a higher line number or area number overwrite the constraints specified for a lower line number or area number, respectively. The constraint specification issue order does not matter.
Changing the value of DK, DL, or DA constraints between solutions may produce many of these warnings at the second or later solid BC transfer. These can be prevented by deleting the nodal D constraints between solutions using DADELE, DLDELE, and/or DDELE.
The following table shows the forces available in each discipline and the corresponding labels:
Table 3.3: Forces Available in Each Discipline
| Discipline | Force | Label | ||||||
|---|---|---|---|---|---|---|---|---|
| Structural |
|
| ||||||
| Thermal |
|
| ||||||
| Magnetic |
|
| ||||||
| Electric |
|
| ||||||
| Fluid |
|
| ||||||
| Diffusion |
|
| ||||||
| Acoustic | Volumetric body force | FX, FY, FZ |
Any directions implied by the labels (such as FX, MZ, CSGY, etc.) are in the nodal coordinate system.
This table show the commands to apply, list, and delete forces:
By default, if you repeat a force at the same degree of freedom, the new specification replaces the previous one. You can change this default to add (for accumulation) or ignore via the FCUM command.
Example 3.1: FCUM Command Usage
For example:
F,447,FY,3000    ! Applies FY = 3000 at node 447
F,447,FY,2500    ! Changes FY value to 2500 (replacement)
FCUM,ADD         ! Subsequent F's to be added
F,447,FY,-1000   ! FY = 2500-1000 = 1500 at node 447
FCUM,IGNORE      ! Subsequent F's to be ignored
F,25,FZ,350      ! This force is ignored!
FCUM             ! Resets FCUM to default (replacement)
Any force set via FCUM stays set until another FCUM command is issued. To reset the default setting (replacement), issue the command with no arguments.
Issue the FSCALE command to scale existing force values.
FSCALE and FCUM work on all selected nodes and also on all selected force labels. By default, force labels that are active are those associated with the element types in the model. You can select a subset of force labels via the DOFSEL command.
Example 3.2: DOFSEL Command Usage
DOFSEL,S,FX       ! Selects FX label
FSCALE,0.5        ! Scales FX at all selected nodes by 0.5
DOFSEL,ALL        ! Reactivates all DOF labels
The following table shows surface loads available in each discipline and their corresponding labels:
Table 3.5: Surface Loads Available in Each Discipline
| Discipline | Surface Load | Label |
|---|---|---|
| Structural | Pressure | PRES [1] |
| Thermal | Convection | CONV |
| Heat Flux | HFLUX | |
| Infinite Surface | INF | |
| Magnetic | Maxwell Surface | MXWF |
| Infinite Surface | INF | |
| Electric | Maxwell Surface | MXWF |
| Surface Charge Density | CHRGS | |
| Infinite Surface | INF | |
| Fluid | Fluid-Structure Interface | FSI |
| Impedance | IMPD | |
| All | Superelement Load Vector | SELV |
| Diffusion | Diffusion Load | DFLUX |
| Acoustic | Fluid-structure interaction (FSI) flag | FSI |
| Impedance or admittance coefficient | IMPD | |
| Surface normal velocity or acceleration | SHLD | |
| Maxwell surface flag or equivalent source surface | MXWF | |
| Free surface flag | FREE | |
| Exterior Robin radiation boundary flag | INF | |
| Port number | PORT | |
| Absorption coefficient or transmission loss | ATTN | |
| Viscous-thermal boundary layer surface flag | BLI | |
| Rigid wall flag (Neumann boundary) | RIGW | |
| One way structure-to-acoustic coupling interface number | FSIN | |
| Pressure | PRES | |
| Heat flux | CONV | |
| Viscous impedance | VIMP | |
| Thermal impedance | TIMP |
The following table shows the commands to apply, list, and delete surface loads:
The program stores surface loads specified on nodes internally in terms of elements and element faces; therefore, if you use both nodal and element surface load commands for the same surface, only the last specification is used.
The program applies pressures on axisymmetric shell elements or beam elements on their inner or outer surfaces, as appropriate. In-plane pressure load vectors for layered shells (such as SHELL281) are applied on the nodal plane. The element’s KEYOPT(11) determines the location of the nodal plane within the shell. When using flat elements to represent doubly curved surfaces, values which should be a function of the active radius of the meridian be inaccurate.
To apply pressure loads on the lateral faces and the two ends of beam elements, issue the SFBEAM command.
You can apply lateral pressures, which have units of force per unit length, both in the normal and tangential directions. The pressures may vary linearly along the element length, and can be specified on a portion of the element, as shown in this figure:
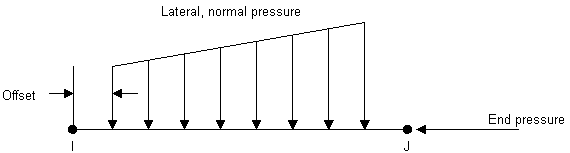
You can also reduce the pressure down to a force (point load) at any location
on a beam element by setting the JOFFST value to -1.
End pressures have units of force.
The SFFUN command specifies a function of node number vs. surface load to be used when applying surface loads on nodes or elements.
Issue the command when you want to apply nodal surface loads calculated elsewhere (by another software package, for instance). First define the function in the form of an array parameter containing the load values. The location of the value in the array parameter implies the node number.
Example 3.3: SFFUN Command Usage
This array parameter specifies four surface load values at nodes 1, 2, 3, and 4, respectively:

Assuming that these are heat flux values, you would apply them as follows:
*DIM,ABC,ARRAY,4              ! Declares dimensions of array parameter ABC
ABC(1)=400,587.2,965.6,740    ! Defines values for ABC
SFFUN,HFLUX,ABC(1)            ! ABC to be used as heat flux function
SF,ALL,HFLUX,100              ! Heat flux of 100 on all selected nodes,
                              !  100 + ABC(i) at node i.
The SF command in the example above specifies a heat flux of 100 on all selected nodes. If nodes 1 through 4 are part of the selected set, those nodes are assigned heat fluxes of 100 + ABC(i): 100 + 400 = 500 at node 1, 100 + 587.2 = 687.2 at node 2, and so on.
What you specify with the SFFUN command stays active for all subsequent SF and SFE commands. To remove the specification, issue the command with no arguments.
Issue the SFGRAD command to specify that a gradient (slope) is to be used for subsequently applied surface loads. You can also use the command to apply a linearly varying surface load, such as hydrostatic pressure on a structure immersed in water.
To create the gradient specification, specify the following:
The type of load to be controlled (the
Labargument)The coordinate system and coordinate direction in which the slope is defined (
SLKCNandSldir, respectively)The coordinate location where the value of the load (as specified on a subsequent surface load command) is in effect (
SLZER)The slope (
SLOPE).
Example 3.4: SFGRAD Command Usage
The hydrostatic pressure (Lab = PRES) shown in
Figure 3.9: Surface Load Gradient is to be applied.
Its slope is specified in the global Cartesian system
(SLKCN = 0) in the Y direction
(Sldir = Y).
The pressure (specified on a subsequent SF command) is
500 at Y = 0 (SLZER = 0), and decreases by 25
units per length in the positive Y direction
(SLOPE = -25).
SFGRAD,PRES,0,Y,0,-25   ! Y slope of -25 in global Cartesian
NSEL,...                ! Select nodes for pressure application
SF,ALL,PRES,500         ! Pressure at all selected nodes:
                        !  500 at Y=0, 250 at Y=10, 0 at Y=20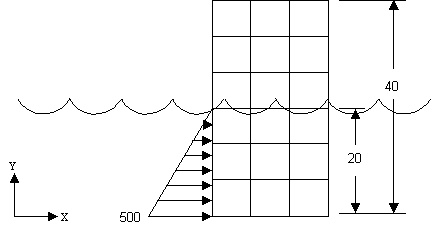
The SFGRAD specification stays active for all subsequent load application commands. To remove the specification, issue SFGRAD without any arguments. Also, if an SFGRAD specification is active when a load step file is read, the program erases the specification before reading the file.
Large-deflection effects can change the node locations significantly. The SFGRAD slope and load value calculations, which are based on node locations, are not updated to account for these changes. If you need this capability, use SURF153 with face 3 loading or SURF154 with face 4 loading.
When specifying the gradient in a cylindrical coordinate system
(SLKCN = 1, for example),
SLZER is in degrees, and
SLOPE is in units of load/degree. Set
CSCIR (for controlling the coordinate system singularity
location) such that the surface to be loaded does not cross the coordinate system singularity. Choose
SLZER to be consistent with the
CSCIR setting (that is, SLZER
should be between +180° if the singularity is at 180°
(CSCIR,KCN,0), and
SLZER should be between 0° and 360° if
the singularity is at 0°
(CSCIR,KCN,1).
Consider a semicircle shell as shown in this figure, located in a local cylindrical system 11:
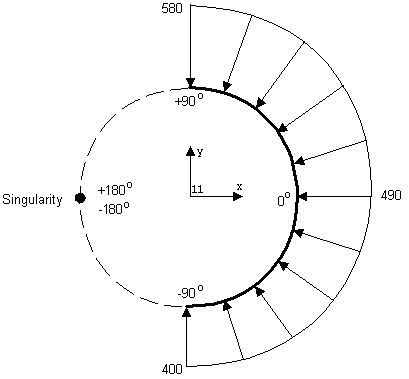
The shell is to be loaded with an external tapered pressure, tapering from 400 at -90° to 580 at +90°. By default, the singularity in the cylindrical system is located at 180°, therefore the θ coordinates of the shell range from -90° to +90°. The following commands apply the desired pressure load:
SFGRAD,PRES,11,Y,-90,1  ! Slope the pressure in the theta direction
                        !   of C.S. 11.  Specified pressure in effect
                        !   at -90°, tapering at 1 unit per degree
SF,ALL,PRES,400         ! Pressure at all selected nodes:
                        !  400 at -90°, 490 at 0°, 580 at +90°.
At -90°, the pressure value is 400 (as specified), increasing as θ increases by a slope of 1 unit per degree, to 490 at 0° and 580 at +90°.
You might think to specify 270° rather than -90° for SLZER, as follows:
SFGRAD,PRES,11,Y,270,1 ! Slope the pressure in the theta direction
                       !   of C.S. 11.  Specified pressure in effect
                       !   at 270°, tapering at 1 unit per degree
SF,ALL,PRES,400        ! Pressure at all selected nodes:
                       !  400 at -90°, 490 at 0°, 580 at +90°
As shown on the left in this figure, however, specifying 270° results in a tapered load much different than the one intended:

This behavior occurs because the singularity is still located at 180°
(the θ coordinates still range from -90° to +90°), but
SLZER is not between -180° and
+180°. As a result, the program uses a load value of 400 at 270°,
and a slope of 1 unit per degree to calculate the applied load values of 220
at +90°, 130 at 0°, and 40 at -90°. Avoid this behavior by
following the second guideline, that is, specifying
SLZER to be a value between ±180°
when the singularity is at 180°, and between 0° and 360° when
the singularity is at 0°.
Suppose that you change the singularity location to 0°, thereby satisfying the second guideline (270° is then between 0° and 360°). But then the θ coordinates of the nodes range from 0° to +90° for the upper half of the shell, and 270° to 360° for the lower half. The surface to be loaded crosses the singularity:
CSCIR,11,1              ! Change singularity to 0°
SFGRAD,PRES,11,Y,270,1  ! Slope the pressure in the theta direction
                        !   of C.S. 11.  Specified pressure in effect
                        !   at 270°, tapering at 1 unit per degree
SF,ALL,PRES,400         ! Pressure at all selected nodes:
                        !  400 at 270°, 490 at 360°, 220 at +90°
                        !  and 130 at 0°
Again, the program uses a load value of 400 at 270° and a slope of 1 unit per degree to calculate the applied load values of 400 at 270°, 490 at 360°, 220 at 90°, and 130 at 0°. Due to node discretization, the actual load applied does not change as abruptly at the singularity as it is shown in the figure. Instead, the node at 0° has the load value of, in the case shown, 130, while the next node clockwise (say, at 358°) has a value of 488.
By default, if you repeat a surface load at the same surface, the new specification replaces the previous one. You can change the default to add (for accumulation) or ignore via the SFCUM command.
Any surface load you set stays set until you issue another
SFCUM command. To reset the default setting
(replacement), issue SFCUM without any arguments. The
SFSCALE command enables you to scale existing surface
load values. Both SFCUM and SFSCALE act
only on the selected set of elements. The Lab field
enables you to choose the surface load label.
To transfer surface loads that have been applied to the solid model to the corresponding finite element model, issue the SFTRAN command.
To transfer all solid model boundary conditions, use the SBCTRAN command. (See Degree-of-Freedom Constraints for a description of DOF constraints.)
Occasionally, you may need to apply a surface load that the element type you are using does not accept. For example, you may need to apply uniform tangential (or any non-normal or directed) pressures on structural solid elements, radiation specifications on thermal solid elements, etc. In such cases, you can overlay the surface where you want to apply the load with surface effect elements and use them as a "conduit" to apply the desired loads. Currently, the following surface effect elements are available: SURF151 and SURF153 for 2D models and SURF152, SURF154, SURF156, and SURF159 for 3D models.
The following table shows all body loads available in each discipline and their corresponding labels:
Table 3.7: Body Loads Available in Each Discipline
| Discipline | Body Load | Label |
|---|---|---|
| Structural | Temperature | TEMP [1] |
| Frequency | FREQ [2] | |
| Fluence | FLUE | |
| Body-force density | FORC | |
| Thermal | Heat Generation Rate | HGEN |
| Magnetic | Temperature | TEMP [1] |
| Current Density | JS | |
| Virtual Displacement | MVDI | |
| Electric | Temperature | TEMP [1] |
| Volume Charge Density | CHRGD | |
| Diffusion | Diffusing Substance Generation Rate | DGEN |
| Temperature | TEMP | |
| Transport velocity | VELO | |
| Acoustic | Mass source; mass source rate; or power source in an energy diffusion solution for room acoustics | MASS |
| Impedance sheet | IMPD | |
| Static pressure | SPRE | |
| Temperature | TEMP | |
| Velocity or acceleration | VELO | |
| Interior acoustics port | PORT | |
| Floquet periodic boundary condition | FPBC | |
| Mean flow velocity | VMEN | |
| Force potential | UFOR | |
| Shear force | SFOR | |
| Volumetric heat source | HFLW |
Body loads specified on nodes are independent of those specified on elements. For a given element, the program determines which loads to use as follows:
It checks to see if you have specified elements for body loads.
If not, it uses body loads specified for nodes.
If no body loads exist for elements or nodes, the body loads specified via the BFUNIF command take effect.
The BFE command specifies body loads on an element-by-element basis. However, you can specify body loads at several locations on an element, requiring multiple load values for one element. The locations used vary from element type to element type. The defaults (for locations where no body loads are specified) also vary between element types; therefore, refer to the documentation for a given element before specifying body loads on elements.
For 2D and 3D solid elements (PLANEnnn and SOLIDnnn), the locations for body loads are usually the corner nodes.
For shell elements (SHELLnnn), the locations for body loads are usually the "pseudo-nodes" at the top and bottom planes, as shown below.
Line elements (BEAMnnn, LINKnnn, PIPEnnn, etc.) are similar to shell elements; the locations for body loads are usually the pseudo-nodes at each end of the element.
In all cases, if degenerate (collapsed) elements are involved, you must specify element loads at all of its locations, including duplicate values at the duplicate (collapsed) nodes. A simple alternative is to specify body loads directly at the nodes, using the BF command.

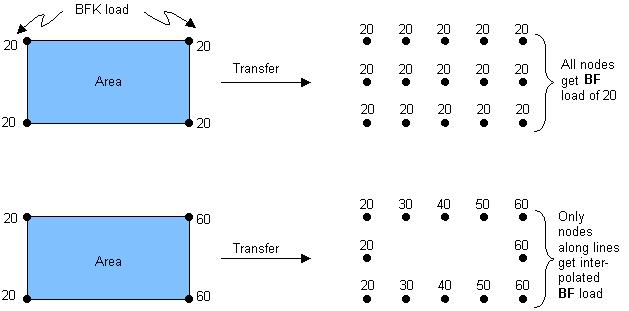
The BFK command applies body loads at keypoints. When specifying loads at the corner keypoints of an area or a volume, all load values must be equal for the loads to be transferred to the interior nodes of the area or volume. Unequal load values are transferred (with linear interpolation) only to the nodes along the lines that connect the keypoints. Figure 3.15: Transfers to BFK Loads to Nodes illustrates this:
The BFK command can also specify table names at keypoints. When specifying table names at corner keypoints of an area or a volume, all table names must be equal for the loads to be transferred to the interior nodes of the area or volume.
The BFL, BFA, and BFV commands specify body loads on lines, areas, and volumes of a solid model, respectively. Body loads on lines of a solid model are transferred to the corresponding nodes of the finite element model. Body loads on areas or volumes of a solid model are transferred to the corresponding elements of the finite element model.
The BFUNIF command specifies a uniform body load at all nodes in the model. Most often, you use this command or path to specify a uniform temperature field; that is, a uniform temperature body load in a structural analysis or a uniform starting temperature in a transient or nonlinear thermal analysis. This is also the default temperature at which the program evaluates temperature-dependent material properties.
By default, if you repeat a body load at the same node or same element, the new specification replaces the previous one. You can change this default to ignore via the BFCUM and BFECUM commands.
The settings you specify with either command or its equivalent GUI paths stay set until they are reuse the command or path. To reset the default setting (replacement), issue the commands or choose the paths without any arguments.
To transfer body loads that have been applied to the solid model to the corresponding finite element model, issue the BFTRAN command.
To transfer all solid model boundary conditions, issue the SBCTRAN command. (For more information, see Degree-of-Freedom Constraints.)
You can scale existing body load values via the BFSCALE and BFESCAL commands
BFCUM and BFSCALE act on the selected set of nodes. BFECUM and BFESCAL act on the selected set of elements.
Be aware of the possibility of conflicting BFK, BFL, BFA, and BFV body load specifications and how the program handles them.
BFV, BFA, and BFL specifications transfer to associated volume, area, and line elements, respectively, where they exist. Where elements do not exist, they transfer to the nodes on the volumes, areas, and lines, including nodes on the region boundaries. The possibility of conflicting specifications depends upon how BFV, BFA, BFL and BFK are used as described by the following cases.
CASE A: There are elements for every BFV, BFA, or BFL, and every element belongs to a volume, area or line having a BFV, BFA, or BFL, respectively.
Every element have its body loads determined by the corresponding solid body load. Any BFK's present have no effect. No conflict is possible.
CASE B: There are elements for every BFV, BFA, or BFL, but some elements do not belong to a volume area or line having a BFV, BFA, or BFL.
Elements not getting a direct BFE transfer from a BFV, BFA, or BFL are unaffected by them, but have their body loads determined by the following: (1 - highest priority) directly defined BFE loads, (2) BFK loads, (3) directly defined BF loads, or (4) BFUNIF loads. No conflict among solid model body loads is possible.
CASE C: At least one BFV, BFA, or BFL cannot transfer to elements.
Elements not getting a direct BFE transfer from a BFV, BFA, or BFL have their body loads determined by the following (in order of priority, with 1 being the highest):
In "Case C" situations, the following conflicts can arise:
A BFL specification can conflict with a BFL specification on an adjacent line (shared keypoint).
A BFL specification can conflict with a BFK specification at either keypoint.
A BFA specification can conflict with a BFA specification on an adjacent area (shared lines/keypoints).
A BFA specification can conflict with a BFL specification on any of its lines.
A BFA specification can conflict with a BFK specification on any of its keypoints.
A BFV specification can conflict with a BFV specification on an adjacent volume (shared areas/lines/keypoints).
A BFV specification can conflict with a BFA specification on any of its areas.
A BFV specification can conflict with a BFL specification on any of its lines.
A BFV specification can conflict with a BFK specification on any of its keypoints.
The program transfers body loads that have been applied to the solid model to the corresponding finite element model in the following sequence:
In ascending volume number order, BFV loads transfer to BFE loads on volume elements, or, if there are none, to BF loads on nodes on volumes (and bounding areas, lines, and keypoints).
In ascending area number order, BFA loads transfer to BFE loads on area elements, or, if there are none, to BF loads on nodes on areas (and bounding lines and keypoints).
In ascending line number order, BFL loads transfer to BFE loads on line elements, or, if there are none, to BF loads on nodes on lines (and bounding keypoints).
BFK loads transfer to BF loads on nodes on keypoints (and on attached lines, areas, and volumes if expansion conditions are met).
Accordingly, for conflicting solid model body loads in "Case C" situations, BFK commands overwrite BFL commands, BFL commands overwrite BFA commands, and BFA commands overwrite BFV commands. For conflicting body loads, a body load specified for a higher line number, area number, or volume number overwrites the body load specified for a lower line number, area number, or volume number, respectively. The body load specification issue order does not matter.
Any conflict detected during solid model body load transfer generates a warning.
Changing the value of BFK, BFL, BFA, or BFV constraints between solutions may produce many of these warnings at the second or later solid BC transfer. These can be prevented by deleting the nodal BF loads between solutions using BFVDELE, BFADELE, BFLDELE, and/or BFDELE.
The following commands are available for applying inertia loads:
Figure 3.16: Inertia Loads Commands
There are no specific commands to list or delete inertia loads. To list them, issue STAT, INRTIA. To remove an inertia load, set the load value to zero. You can set an inertia load to zero, but you cannot delete it. For ramped load steps, inertia loads are ramped to zero. (This is also true when you apply inertia loads.)
The ACEL, OMEGA, and DOMEGA commands specify acceleration, angular velocity, and angular acceleration, respectively, in global Cartesian directions. The CMACEL command is similar to the ACEL command, except that the translational acceleration applies to a component and not the whole structure. (The ACEL command applies an acceleration field [not gravity] to a body; therefore, to apply gravity to act in the negative Y direction, specify a positive Y acceleration.)
Use the CGOMGA and DCGOMG commands to specify angular velocity and angular acceleration of a spinning body which is itself revolving about another reference coordinate system. The CGLOC command specifies the location of the reference system with respect to the global Cartesian origin. You can use these commands, for example, to include Coriolis effects in a static analysis.
You can also issue CMOMEGA and CMDOMEGA commands to specify the rotational velocity and acceleration effects for element components you define. You either specify an axis and the scalar vector quantity, or define the three components of the rotational value and the point in space you are considering. You can use these commands for element components only.
Inertia loads are effective only if your model has some mass, which is usually supplied by a density specification. (You can also supply mass to the model by using mass elements, such as MASS21, but density is more commonly used and is more convenient.) As with all other data, the program requires you to use consistent units for mass. If you are accustomed to the U. S. Customary system of units, you might sometimes wish to use weight density (lb/in3) instead of mass density (lb-sec2/in/in3), for convenience.
Use weight density in place of mass density only under these conditions:
The model only be used in a static analysis.
No angular velocity or angular acceleration is applied.
Gravitational acceleration is unity (g = 1.0).
A method for specifying density so that you can use it readily in either a "convenient," weight-density form or "consistent," mass-density form is to define a parameter g for gravitational acceleration:
Table 3.9: Ways of Specifying Density
| Convenient Form | Consistent Form | Description |
|---|---|---|
| g = 1.0 | g = 386.0 | Parameter definition |
| MP,DENS,1,0.283/g | MP,DENS,1,0.283/g | Density of steel |
| ACEL,,g | ACEL,,g | Gravity load |
You can also use weight density along with system mass matrix scaling to perform your analysis using consistent units. For limitations, see the MASCALE command documentation.
Inertia relief calculations compute the accelerations that counterbalance applied loads to simulate a minimally constrained structure. Inertia relief calculations can be included in the following analyses: static (linear or nonlinear), linear perturbation static, and linear perturbation eigenvalue buckling. For linear static analysis, an automatic inertia relief option is also available.
To include inertia relief in your analysis, your model must meet the following requirements:
The model should not contain axisymmetric or generalized plane strain elements. Models with a mixture of 2D and 3D element types are not recommended.
Models are limited to having only one body (multiple bodies must be totally connected by bonded contacts or other means).
Symmetry (such as cyclic symmetry) models are not valid for inertia relief analysis.
Data required for mass calculations (such as density) must be specified.
In the case of large rotations (NLGEOM,ON), a static analysis with inertia relief is not exactly equivalent to a free body linear transient analysis due to the nonlinearity introduced in the body.
Specify only the minimum number of displacement constraints required to prevent rigid-body motion. Three constraints (or fewer, depending on the element type) are necessary for 2D models and six (or fewer) are necessary for 3D models. Additional constraints, such as those required to impose symmetry conditions, are permitted, but check for zero reaction forces at all the constraints to make sure that the model is not overconstrained for inertia relief.
The loads for which inertia relief calculations are desired should be applied.
You should use consistent mass (LUMPM,OFF) to do inertia relief. If the lumped mass option is used (LUMPM,ON), the inertia relief force calculated will be less accurate.
Automatic Inertia Relief
An automatic inertia relief capability (activated by the AIRL command) is available for linear static analysis. In contrast to manual inertia relief (IRLF), no displacement constraints should be defined, except in the case of a partially constrained model.
In addition to the requirements listed above, the following also apply to automatic inertia relief:
Shared-memory parallel (SMP) processing must be used.
The analysis type must be linear static (ANTYPE,STATIC).
The model must not contain superelements or pretension elements.
u-P formulation models are not supported.
If contact is present, it must be bonded contact (contact element KEYOPT(12) = 5) with small sliding activated (contact element KEYOPT(18) = 1). In addition, the number of equilibrium iterations should be set to one (NEQIT,1,FORCE).
For more information about automatic inertia relief, see AIRL, Inertia Relief in the Theory Reference, and the example shown later in this section.
To implement inertia relief calculations in a static linear or nonlinear analysis, issue the IRLF,1 command before the SOLVE command as part of the inertia load commands. A typical command sequence is shown in the following example.
Example 3.5: Command Input to Include Inertia Relief in a Static Analysis with Geometric Nonlinearity
/solu
antyp,static
!…apply loads and boundary conditions
irlf,1      ! include inertia relief calculation
nlgeom,on   ! include large-deflection effects for geometrically nonlinear analysis
nsub,x,y,z  ! specify the size of the first time step, x, and max and min number of substeps, y and z
solve
Inertia Relief for Substructures
For substructures, inertia relief calculations (MATRIX50) use the equations described in Inertia Relief in the Theory Reference. Mechanical APDL obtains the mass matrix of a substructure via matrix reduction to condense it to the master nodes (MASTER). The inertia relief calculations in a substructure are therefore consistent with the reduced mass contribution at the master nodes.
The IRLF command has no effect in the generation pass of a substructure. If you intend to perform inertia relief calculations on a substructure, do not apply degree-of-freedom constraints (D) on the substructure during its generation pass; instead, apply them during the use pass. (Otherwise, the substructure reduction logic condenses out the mass associated with the constrained degrees of freedom in the generation pass, and the inertia relief calculations in the use pass of the substructure reflect the condensed mass distribution.)
In the expansion pass, precalculation of masses for summary printout (IRLF,-1) occurs only on elements that are part of the substructure.
To activate automatic inertia relief calculations in a linear static analysis,
issue
AIRL,NRB,RIGID_CALC
before the SOLVE command as part of the inertia load
commands.
With no arguments specified, AIRL is equivalent to
AIRL,AUTO,0, meaning the program automatically determines
the number of rigid body modes using an eigensolver. No supports should be
specified when NRB = AUTO. This is the case
demonstrated in the sample command input below.
If the model is partially constrained, use
AIRL,NRB,0 where
NRB is the number of rigid body modes embedded in
the model (you must know this number in advance), and
RIGID_CALC is set to 0 so that an eigensolver is
used to determine the rigid body modes.
Example 3.6: Command Input to Include Automatic Inertia Relief in a Static Analysis
/solu
antype,static
!…apply loads
airl       ! include automatic inertia relief calculation (no supports are specified)
solve
For a static analysis base analysis (linear or nonlinear), you can include inertia relief by issuing IRLF,1 in the base analysis. In the perturbed static analysis, the inertia relief load is recalculated to include the prestressed matrix by default. To exclude this inertia relief load vector and its effects you must issue IRLF,0 in the first phase of the linear perturbation static analysis. If large deformation (NLGEOM,ON) is used in the base analysis, the inertia relief loads will be recalculated from the updated geometry in the perturbation phase. Otherwise, the analysis process is as described in the General Procedure for Linear Perturbation Analysis in the Structural Analysis Guide.
Example 3.7: Command Input to Include Inertia Relief in a Linear Perturbation Static Analysis
/solu
antyp,static    ! base analysis type must be static
!…apply loads and boundary conditions
irlf,1          ! include inertia relief calculation
solve           ! base analysis
finish
/solu
antype,,restart,,,perturb  ! perform a linear perturbation analysis at restart
perturb,static  ! set perturbed analysis type to static
irlf,0          ! optional if you want to exclude inertia relief in the perturbed static analysis
solve,elform    ! phase 1 of perturbed analysis
!…apply new loads
solve           ! phase 2 of perturbed analysis
You can include inertia relief in an eigenvalue buckling analysis following the procedure described in the Flowchart of Linear Perturbation Eigenvalue Buckling Analysis, paying special attention to the inclusion and exclusion of the inertia relief load. For inertia relief, the base analysis type must be static (nonlinear or linear).
By default, inertia relief loads are included in the load vector, which is used to calculate the linearly perturbed stress stiffening matrix, in the perturbed buckling analysis. When the base analysis is nonlinear, you may exclude this inertia relief load vector and its effects by issuing IRLF,0 in the first phase of the perturbed buckling analysis so that the inertia relief loads are included only in the base analysis. When the base analysis is linear, the inertia load should be included in the perturbation phase.
Example 3.8: Command Input to Include Inertia Relief in a Linear Perturbation Eigenvalue Buckling Analysis
/solu
antyp,static   ! base analysis type must be static
!…apply loads and boundary conditions
irlf,1         ! include inertia relief calculation
solve          ! base analysis
finish
/solu
antype,,restart,,,perturb  ! perform a linear perturbation analysis at restart
perturb,buck    ! set perturbed analysis type to buckling
irlf,0          ! optional if base analysis is nonlinear
solve,elform    ! phase 1 of perturbed analysis
bucopt,subsp,2
solve           ! phase 2 of perturbed analysis
Use the IRLIST command or the
PrintFreq argument on the IRLF
command to print the output from inertia relief calculations. This output
consists of the translational and rotational accelerations required to balance
the applied loads and can be used by other programs to perform kinematics
studies. If it is a linear static analysis, the reaction forces at the
constraints will be zero because the calculated inertia forces balance the
applied forces. If it is a nonlinear analysis, the reaction forces at the
constraints may not be zero.
Inertia relief output is stored in the database rather than in the results file (Jobname.rst). When you issue IRLIST, Mechanical APDL retrieves the information from the database, which contains the inertia relief output from the most recent solution (SOLVE).
Ocean loading includes the effects of waves, current, drag, and buoyancy. Loading
is input globally via the ocean
family of commands (OC
xxxxxx). Ocean loading is supported in static, full
transient (TRNOPT,FULL), and full harmonic
(HROPT,FULL) analyses.
The following ocean-loading input groups are available:
Basic (required for any ocean loading)
Current (optional, for applying drift current)
Wave (optional, for applying a wave state)
Zone (optional, for applying local ocean effects)
Basic, wave, and zone inputs use the OCTYPE, OCDATA, and OCTABLE commands. Current inputs use the OCTYPE and OCTABLE commands.
The OCLIST and the OCDELETE commands assist in data handling and perform the tasks that their names imply.
All ocean loading requires specifying the linear acceleration of the global
Cartesian reference frame (ACEL, where
ACEL_X = ACEL_Y = 0.0, and
ACEL_Z = acceleration due to gravity).
Ocean-loading support is available for the following current-technology elements:
| Element | Description |
|---|---|
| SURF154 | 3D Structural Surface Effect |
| LINK180 | 3D Spar (or Truss) |
| BEAM188 | 3D 2-Node Beam |
| BEAM189 | 3D 3-Node Beam |
| PIPE288 | 3D 2-Node Pipe |
| PIPE289 | 3D 3-Node Pipe |
For more information, see the following related topics:
A coupled-field analysis usually involves applying results data from one analysis as loads in a second analysis. For example, you can apply the nodal temperatures calculated in a thermal analysis as body loads in a structural analysis (for thermal strain). Similarly, you can apply magnetic forces calculated in a magnetic field analysis as nodal forces in a structural analysis. To apply such coupled-field loads, issue the LDREAD command.
For more information, see the Coupled-Field Analysis Guide.
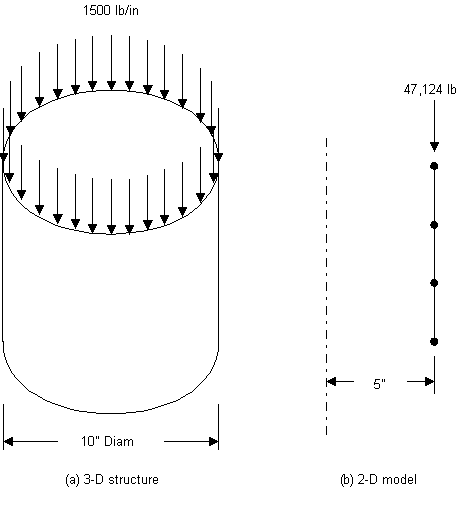
For constraints, surface loads, body loads, and Y-direction accelerations, you define loads exactly as they would be for any nonaxisymmetric model. However, for concentrated forces the procedure is a little different. For these quantities, input load values of force, moment, etc. are on a "360° basis." That is, the load value is entered in terms of total load around the circumference. For example, if an axisymmetric axial load of 1500 pounds per inch of circumference were applied to a 10" diameter pipe (Figure 3.17: Concentrated Axisymmetric Loads), the total load of 47,124 lb. (1500*2 π*5 = 47,124) would be applied to node N as follows:
F,N,FY,-47124
Axisymmetric results are interpreted in the same fashion as their corresponding input loads. That is, reaction forces, moments, etc. are reported on a total load (360°) basis.
Axisymmetric harmonic elements require that their loads be provided in a form that the program can interpret as a Fourier series. The MODE command, together with other load commands (D, F, SF, etc.), are required for these elements.
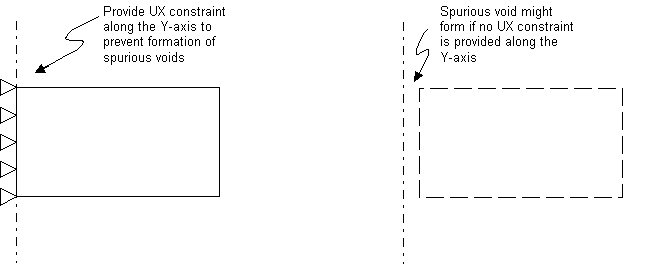
Specify a sufficient number of constraints to prevent unwanted rigid-body motions, discontinuities, or singularities. For example, for an axisymmetric model of a solid structure such as a solid bar, a lack of UX constraint along the axis of symmetry can potentially allow spurious "voids" to form in a structural analysis.
If an applied load acts on a degree of freedom which offers no resistance to it (that is, perfectly zero stiffness), the program ignores the load.
You can specify initial state as a loading parameter for a structural analysis. Initial state loading is valid for static or full transient analyses (either linear or nonlinear), and for modal, buckling and harmonic analyses. Initial state must be applied in the first load step of an analysis.
Initial state is also available for distributed-memory parallel processing analyses.
For more information, see Initial State in the Advanced Analysis Guide.
To apply loads using tabular input, issue the appropriate loading commands for your analysis and input the name of a table array parameter instead of a load value. Not all boundary conditions support tabular loads; refer to the command documentation for the specific loads you are working with to determine if tabular loads are supported.
When defining loads, enclose the table name within % characters:
%tabname%. For example, to specify a table of
convection values, issue a command similar to the following:
SF,all,conv,%sycnv%,tbulk
If your data cannot be conveniently expressed as a table, you may want to use function boundary conditions. See Using the Function Tool.
Define a table before applying loads (*DIM).
Tabular loads can be defined in the global Cartesian (default) coordinate system, or in a local coordinate system (LOCAL). Only Cartesian, spherical, and cylindrical coordinate systems are valid.
The following topics are available concerning applying loads via table array parameters
For more information, see Tabular Input via Table Array Parameters in the Ansys Parametric Design Language Guide and Defining Linear Material Properties Using Tabular Input in the Material Reference.
When defining a table array parameter for loading, you can use various primary variables depending on the engineering discipline of your analysis. For a coupled-field analysis, there might be loads from more than one discipline (for example, structural and thermal).
Table 3.10: Boundary Condition Type and Corresponding Primary Variable
| Boundary Condition | Primary Variable | Command [1] |
|---|---|---|
| Thermal | ||
|
Fixed Temperature |
TIME, X, Y, Z, NODE |
D,,(TEMP, TBOT, TE2, TE3, . . ., TTOP) |
|
Heat Flow |
TIME, X, Y, Z, TEMP[a], NODE |
F,,(HEAT, HBOT, HE2, HE3, . . ., HTOP) |
|
Film Coefficient (Convection) |
TIME, X, Y, Z, TEMP[a], VELOCITY, ELEM, NODE |
SF,,CONV SFE,,,CONV |
|
Bulk Temperature (Convection) |
TIME, X, Y, Z, ELEM, NODE |
SF,,,TBULK SFE,,,TBULK |
|
Heat Flux |
TIME, X, Y, Z, TEMP[a], ELEM, NODE |
SF,,HFLUX SFE,,,HFLUX |
|
Heat Generation |
TIME, X, Y, Z, TEMP[a], ELEM |
BFE,,HGEN |
|
Uniform Heat Generation |
TIME |
BFUNIF,HGEN |
| Structural | ||
|
Displacements |
TIME or FREQ, X, Y, Z, TEMP[a], NODE |
D,(UX, UY, UZ, ROTX, ROTY, ROTZ) |
|
Hydrostatic Pressure |
TIME or FREQ, X, Y, Z, TEMP[a] |
D,HDSP |
|
Forces and Moments |
TIME or FREQ, X, Y, Z, TEMP[a], SECTOR, NODE |
F,(FX, FY, FZ, MX, MY, MZ) |
|
Fluid Mass Flow Rate |
TIME or FREQ, X, Y, Z, TEMP[a], SECTOR |
F,DVOL |
|
Pressures |
TIME or FREQ, X, Y, Z, TEMP[a], SECTOR, ELEM, NODE |
SF,,PRES SFE,,,PRES |
|
Temperature body load |
TIME, X, Y, Z, ELEM, NODE | |
| Body-force density | TIME or FREQ, ELEM |
BFE,,FORC |
|
Linear Acceleration |
TIME or FREQ |
ACEL,ACEL_X, ACEL_Y,ACEL_Z |
|
Translational Acceleration |
TIME or FREQ |
CMACEL,CMACEL_X, CMACEL_Y,CMACEL_Z |
|
Superelement Load Vector |
TIME |
SFE,,,SELV |
| Electromagnetic | ||
|
Current Density |
TIME, X, Y, Z, ELEM, NODE |
BFE,,JS |
| Velocity | TIME, X, Y, Z, NODE |
BF,,VELO |
| Electric | ||
|
Voltage |
TIME, X, Y, Z, NODE |
D,,VOLT |
|
Current |
TIME, X, Y, Z, NODE |
F,,AMPS |
| Fluid | ||
|
Pressure |
TIME, X, Y, Z, NODE |
D,,PRES |
|
Flow |
TIME, X, Y, Z, NODE |
F,,FLOW |
| Diffusion | ||
| Concentration |
TIME, X, Y, Z, NODE |
D,,CONC |
| Diffusion Flow Rate |
TIME, X, Y, Z, NODE |
F,,RATE |
| Diffusion Flux |
TIME, X, Y, Z, TEMP[a], CONC, ELEM, NODE |
SF,,DFLUX SFE,,,DFLUX |
| Diffusion Substance Generation |
TIME, X, Y, Z, TEMP[a], CONC, ELEM, NODE |
BF,,DGEN BFE,,DGEN |
| Temperature body load | TIME, X, Y, Z | |
| Transport Velocity | TIME, X, Y, Z, NODE | BF,,VELO |
| Acoustic | ||
| Pressure | TIME or FREQ, X, Y, Z, NODE | D,,PRES |
| Energy density | TIME or FREQ, X, Y, Z, NODE | D,,ENKE |
| Velocity | FREQ, X, Y, Z, NODE | D,,(VX, VY, VZ) |
| Temperature | FREQ, X, Y, Z, NODE | D,,TEMP |
| Impedance | TIME or FREQ | SF,,IMPD |
| Surface normal velocity or acceleration | TIME or FREQ | SF,,SHLD |
| Absorption coefficient | TIME or FREQ | SF,,ATTN |
| Surface pressure | FREQ | SF,,PRES |
| Heat flux | FREQ | SF,,CONV |
| Viscous impedance | FREQ | SF,,VIMP |
| Thermal impedance | FREQ | SF,,TIMP |
| Mass source, mass source rate, or power source | TIME or FREQ, X, Y, Z, NODE | BF,,MASS |
| Static pressure | TIME or FREQ, X, Y, Z, NODE | BF,,SPRE |
| Temperature body load | TIME, X, Y, Z, NODE | BF,,TEMP[b] |
| Velocity or acceleration | TIME or FREQ, X, Y, Z, NODE | BF,,VELO |
| Mean flow velocity | X, Y, Z, NODE | BF,,VMEN |
| Shear force | FREQ, X, Y, Z, NODE | BF,,SFOR |
| Volumetric heat source | FREQ, X, Y, Z, NODE | BF,,HFLW |
Additional primary variables are available using function boundary conditions. See Using the Function Editor for more information. Primary variables are shown as the valid labels used by the *DIM command. You can apply tabular loads according to a local coordinate system defined via LOCAL, and specified in *DIM.
When defining the tables, the primary variables must be in ascending order in the table indices (as in any table array).
See the *DIM command for more information about defining your labels.
The VELOCITY label refers to the magnitude of the
velocity degrees of freedom or the computed fluid velocity in
FLUID116 elements.
In addition, some real constants for elements SURF151, SURF152, and FLUID116 can have associated primary variables.
Contact elements (CONTA172, CONTA174, CONTA175, CONTA177, and CONTA178) also support table parameter input for some real constants. For a complete list of these real constants and their associated primary variables, see Real Constants and Corresponding Primary Variables for CONTA172, CONTA174, CONTA175, CONTA177 in the Contact Technology Guide and Real Constants and Corresponding Primary Variables for CONTA178 in the Element Reference.
The following two primary variables are used exclusively with contact element real constants:
PRESSURE -- Contact pressure. The index values associated with PRESSURE are positive for compression and negative for tension.
GAP -- Geometrical contact gap/penetration. The index values associated with GAP are positive for closed penetration and negative for an open gap.
If you need to specify a variable other than one of the primary variables listed, you can do so by defining an independent parameter. To specify an independent parameter, you define an additional table for the independent parameter. That table must have the same name as the independent parameter, and can be a function of either a primary variable or another independent parameter. You can define as many independent parameters as necessary, but all independent parameters must relate to a primary variable.
Example 3.9: Defining Independent Variables
Consider a convection coefficient (HF) that varies as a function of rotational speed (RPM) and temperature (TEMP).
The primary variable in this case is TEMP. The independent parameter is RPM, which varies with time.
In this scenario, you need two tables: one relating RPM to TIME, and another table relating HF to RPM and TEMP.
*DIM,SYCNV,TABLE,3,3,,RPM,TEMP
SYCNV(1,0)=0.0,20.0,40.0
SYCNV(0,1)=0.0,10.0,20.0,40.0
SYCNV(0,2)=0.5,15.0,30.0,60.0
SYCNV(0,3)=1.0,20.0,40.0,80.0
*DIM,RPM,TABLE,4,1,1,TIME
RPM(1,0)=0.0,10.0,40.0,60.0
RPM(1,1)=0.0,5.0,20.0,30.0
SF,ALL,CONV,%SYCNV%
When defining the tables, the independent variables must be in ascending order in the table indices (as in any table array).
For convenience, you can multiply table parameters by constants, add one table to another, and add a constant increment for offset. To do so, issue the *TOPER command. The two tables must have the same dimensions and must have the same variable names for the rows and columns. The tables must also have identical index values for rows, columns, etc.
If you use table array parameters to define boundary conditions, you may want to verify that the correct table and the correct values from the table were applied. You can do so in several ways:
You can look in the Output window. If you apply tabular boundary conditions on finite element or solid model entities, the name of the table, not the numerical value, is echoed in the Output window.
You can list boundary conditions. If you list the boundary conditions during /PREP7, table names are listed. Longer table names may be truncated. However, if you list boundary conditions during any of the solution or postprocessing phases at a particular entity or time point, the actual numerical value at the location or time is listed.
You can look at the graphical display. Where tabular boundary conditions were applied, the table name and any appropriate symbols (face outlines, arrows, etc.) can be displayed using the standard graphic display capabilities (/PBC, /PSF, etc.), provided that table numbering is on (/PNUM,
TABNAM,ON).You can look at the numerically-substituted table of values (/PNUM,
SVAL) in POST1.You can retrieve the values of a table parameter at any given combination of index numbers via the *STATUS command. Referring to the above example, *STATUS,SYNCV,2,2,3,3 [print SYNCV at index position (2,3)] prints 40.0.
You can retrieve the values of a table parameter at any given combination of its primary variables via the *SET command. Referring to the above example, CON = SYNCV(30.0,0.25) [evaluate SYNCV at RPM = 30.0 and TEMP = 0.25] gives CON = 37.5.
An example of how to run a steady-state thermal analysis using tabular boundary conditions is described in Performing a Thermal Analysis Using Tabular Boundary Conditions in the Thermal Analysis Guide.
This example shows how to run an analysis using a 5-D table. Note that 4- and 5-D tables cannot be defined interactively; you must use the command method.
This problem consists of a thermal-stress analysis with a pressure that varies as a function of (x,y,z,time,temp). The table and table values are first defined. The table is applied as a pressure boundary condition to the faces of a rectangular beam. Time and temperature are prescribed for two load steps and solved.
/batch,list
/title, Illustrate use of 5D table for SF command (pressure) loading
!!!!
!!!!
                                 !!!! create 5D table for applied pressure
X1=2                             !!!! X dimensionality
Y1=2                             !!!! Y dimensionality
Z1=10                            !!!! Z dimensionality
D4=5                             !!!! time dimensionality
D5=5                             !!!! temperature dimensionality
len=10                           !!!! cantilever beam length
wid=1                            !!!! cantilever beam width
hth=2                            !!!! cantilever beam height


*dim,xval,array,X1               !!!! create 1D arrays to load 5D table
xval(1)=0,20                     !!!! variations per dimension same
*dim,yval,array,Y1               !!!! but give different values on each
yval(1)=0,20                     !!!! book and shelf
*dim,zval,array,10
zval(1)=10,20,30,40,50,60,70,80,90,100
*dim,tval,array,5
tval(1)=1,.90,.80,.70,.60
*dim,tevl,array,5
tevl(1)=1,1.20,1.30,1.60,1.80

*dim,ccc,tab5,X1,Y1,Z1,D4,D5,X,Y,Z,TIME,TEMP
*taxis,ccc(1,1,1,1,1),1,0,wid			!!! X-Dim
*taxis,ccc(1,1,1,1,1),2,0,hth			!!! Y-Dim
*taxis,ccc(1,1,1,1,1),3,1,2,3,4,5,6,7,8,9,10	!!! Z-Dim
*taxis,ccc(1,1,1,1,1),4,0,10,20,30,40		!!! Time
*taxis,ccc(1,1,1,1,1),5,0,50,100,150,200	!!! Temp
*do,ii,1,2
   *do,jj,1,2
      *do,kk,1,10
         *do,ll,1,5
            *do,mm,1,5
               ccc(ii,jj,kk,ll,mm)=(xval(ii)+yval(jj)+zval(kk))*tval(ll)*tevl(mm)
            *enddo
         *enddo
      *enddo
   *enddo
*enddo

/prep7
block,,wid,,hth,,len            !!!! create beam volume
et,1,5                          !!!! use SOLID5

esize,0.5                       !!!! element size
mshkey,1                        !!!! mapped mesh
vmesh,all

mp,ex,1,1e7                     !!!! material properties
mp,nuxy,1,.3
mp,kxx,1,1

nsel,s,loc,z,0                  !!!! fix end of beam
d,all,all
fini
save                            !!!! save problem for future restart
/solu
antyp,trans
timint,off

asel,u,loc,z,0
sfa,all,1,pres,%ccc%            !!!! apply pressure to all selected areas
alls
time,1e-3                       !!!! first solution at time = "0"
nsub,1
outres,all,all                  !!!! output everything to results file
d,all,temp,0                    !!!! for first problem, temp = 0
solve

time,30				!!!! second solution, time=30
d,all,temp,150			!!!! second solution, temp=150
solve
finish
/post1
/view,1,1,1,1
/psf,press,norm,3,0,1
/pbc,all,0
set,1,1
/title, Pressure distribution; time=0, temp=0
eplot
set,2,1
/title, Pressure distribution; time=30, temp=150
eplot
finish
The following plots illustrate the pressure distribution for the two load cases.
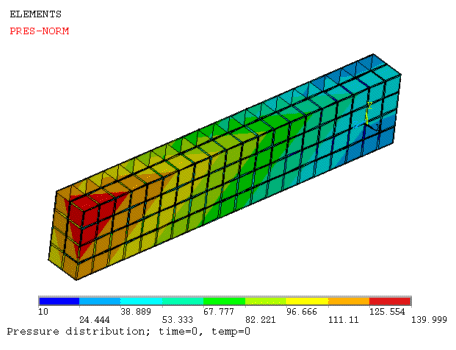

Notice the difference in the pressure load in the second load case.
You can use components and assemblies to apply loads to portions of the mode:
For related information, see Using Components and Assemblies.
Apply loads to portions of the model using a component as follows:
CM,cmp,EntitySF,cmp,CONV,10
The SF command specifies the film coefficient of 10 on
nodes in the component (cmp). All nodes in the
component are retrieved regardless of the entity type.
An equivalent method for applying the coefficient uses the CMSEL, ALLSEL, and SF commands, as follows:
CMSEL,S,cmp
ALLSEL,BELOW,ALL
SF,ALL,CONV, 10