


The use pass is where you use the superelement in an analysis by making it part of the model. The entire model may be a superelement or, as in the plate example, the superelement may be connected to other nonsuperelements (see Figure 2.2: Example of a Substructuring Application). The solution from the use pass consists only of the reduced solution for the superelement (that is, the degree of freedom solution only at the master DOF) and complete solution for nonsuperelements.
The use pass can involve any type of structural analysis (except a buckling or explicit dynamics analysis). The only difference is that one or more of the elements in the model is a superelement that has been previously generated. The individual analysis guides contain detailed descriptions about performing various analyses. This section, we will concentrate on the steps you need to make the superelement a part of your model.
The use pass consists of a new model and new loads. Therefore, the first step is to clear the existing database by issuing /CLEAR. This has the same effect as leaving and re-entering the program. By default, clearing the database causes the START.ans file to be reread. To avoid this, issue /CLEAR,NOSTART.
Caution: If you are using the command input method to clear the database, additional commands may not be stacked on the same line (using the $ delimiter) as the /CLEAR command.
To ensure the generation pass files are not overwritten, define a new jobname for the use pass that is different than the one used for the generation pass by issuing the /FILNAME command.
This step is performed in PREP7 and consists of the following tasks:
Define MATRIX50 (the superelement) as one of the element types via the ET command.
Define other element types for any nonsuperelements. Nonlinear behavior may or may not be allowed, depending on the type of analysis to be performed.
Note: Using the lumped mass matrix formulation (LUMPM,ON) modifies the superelement mass matrix and may give unexpected results.
Define element real constants and material properties for the nonsuperelements. Nonlinear properties may or may not be allowed, depending on the type of analysis to be performed.
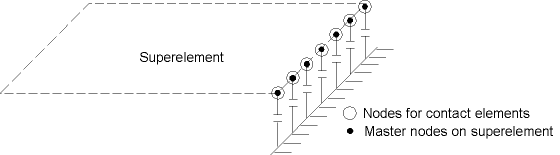
Define the geometry of the nonsuperelements. Take special care in defining the interfaces where the nonsuperelements connect to the superelements. The interface node locations must exactly match the locations of the corresponding master nodes on the superelements (see Figure 2.3: Node Locations).
There are three ways to ensure connectivity at these interfaces:
Use the same node numbers as the ones in the generation pass.
Use the same node number increment (or offset) between interface nodes in the generation pass and interface nodes in the use pass. (Use SETRAN, as described below in step 5.)
Couple the two sets of nodes in all degrees of freedom using the CP family of commands (CP, CPINTF, etc.). This method is helpful if you cannot use one of the above two methods.
If the superelement is not connected to any other elements, you do not need to define any nodes in the use pass.
Interface nodes between superelement and nonsuperelement must exactly match the master node locations.
Define the superelement by pointing to the proper element type reference number (TYPE) and reading in the superelement matrix file (Jobname.sub) that was created in the generation pass using the SE command (.sub files generated in previous versions may also be used as they are forward compatible). The procedure depends on the specifics of your model:
If there are no nonsuperelements in the model, or if there are nonsuperelements and the interface nodes have the exact same node numbers as the master nodes on the superelement, simply read in the superelement via SE:
TYPE,...  ! Element type reference number
SE,GEN    ! Reads in superelement from file GEN.SUB
The
Senamefield on the SE command identifies the name of the superelement matrix file. The extension .sub is assumed, so the complete file name isSename.sub (GEN.sub in the above example). The superelement is given the next available element number.If there are nonsuperelements in the model and the interface nodes have a constant node number offset from the master nodes, you must first create a new superelement matrix with new node numbers (SETRAN command) and then read in the new matrix (SE command). For example, the command snippet below creates a new superelement matrix file named GEN2.sub with a node number offset of 2000 from an existing one, GEN2.sub.
SETRAN,GEN,,2000,GEN2,SUB   ! Creates new superelement GEN2.SUB with
                            !   node offset = 2000
TYPE,...                    ! Element type reference number
SE,GEN2                     ! Reads in new superelement from file GEN2.SUB
If there are nonsuperelements in the model and the interface nodes have no relationship with the master nodes (as would be the case with automatically meshed models), it is likely that the node numbers of the master nodes from the generation pass overlap with node numbers in the use pass model. In such cases, reading in the superelement (SE) causes existing use pass nodes to be overwritten by the superelement's master nodes.
To avoid overwriting existing nodes, follow the steps and example command snippet below:
*GET,MAXNOD,NODE,,NUM,MAX    ! MAXNOD = maximum node number
SETRAN,GEN,,MAXNOD,GEN2,SUB  ! Creates new superelement with
                             !   node offset = MAXNOD, name = GEN2.SUB
SE,GEN2                      ! Reads in new superelement
NSEL,...                     ! Select all nodes at the interface
CPINTF,ALL                   ! Couples each pair of interface nodes in
                             ! all DOF
NSEL,ALL
If the superelement is to be transformed (moved or copied to a different position, or symmetrically reflected), you must first use the SETRAN command or SESYMM command with the appropriate node number offsets, to create new superelement matrix files and then issue SE to read in the new matrices. Connecting the superelements to the nonsuperelements is done as discussed above - by using common node numbers, a constant node number offset, or the CPINTFcommand.
When the superelement is transformed, the precise mass summary printed out at the beginning of the solution may be approximate.
Note: If you use SETRAN to transfer the superelement to a different coordinate system, the superelement's master nodes are rotated with it by default. This is typically useful if the original superelement's master nodes are rotated, into a cylindrical system for example. (In this case, the transfer does not effect the superelement stiffness matrix.) If the original superelement has no rotated nodes, it is likely that the transferred superelement will not need rotated nodes either. You can prevent node rotation in such cases by setting the NOROT field on SETRAN to 1. (The superelement stiffness matrix and load vector are modified by the program for this type of transfer.)
Verify the location of the superelement using graphics displays and listings. Superelements are represented by an edge outline display, the data for which are written to the .sub file in the generation pass, provided that
SeEdgeKey= ON (default value) on the SEOPT command. To produce a graphics display, issue EPLOT. To produce a listing, issue SELIST.Save the complete model database (SAVE) and exit the PREP7 processor (FINISH).
This step is performed during the solution phase of the analysis. The procedure to obtain the use-pass solution depends on the analysis type. As mentioned earlier, you can subject a superelement to any type of analysis. You should, of course, have the appropriate matrices generated during the generation pass. For example, if you intend to do a structural dynamic analysis, the mass matrix must be available. The procedure is as follows:
Enter the SOLUTION processor (/SOLU).
Define the analysis type and analysis options.
For large rotation analyses - turn large deformation effects on (NLGEOM,ON), and define the proper number of substeps for the nonlinear analysis.
Apply loads on the nonsuperelements. These may consist of DOF constraints and symmetry conditions (D family of commands), force loads (F family), surface loads (SF family), body loads (BF family), and inertia loads (ACEL, etc.). Remember that inertia loads will affect the superelement only if its mass matrix was generated in the generation pass. DOF constraints (D) or force loads (F) can be applied on master degrees of freedom.
Note: For large rotation analyses, be sure to apply the proper constraints in this step.
Apply superelement load vectors (if any) using the SFE command.
One load vector per load step (created during the generation pass) is available on the superelement matrix file, and is identified by its reference number:
SFE,63,1,SELV,0,0.75
applies, on element number 63, load vector number 1, with the load applied as a real load and with a scale factor of 0.75. Thus the
ELEMfield represents the element number of the superelement,LKEYrepresents the load vector number (default = 1),Labis SELV,KVALis for a real or imaginary load vector, andVAL1represents the scale factor (default = 0.0). (See the SFE command description for more information.)Note: The load vector orientation is fixed (frozen) to the superelement, so if the superelement is used in a rotated position, the load vector rotates with it. The same applies to the degree of freedom directions (UX, UY, ROTY, etc.). They too are fixed to the superelement and will rotate with the superelement if it is rotated (unless
NOROT= 1 on the SETRAN command, in which case the nodal coordinate systems will not be rotated).Specify load step options that are appropriate for the analysis type. Use the EQSLV command to select an appropriate equation solver based on the chosen analysis type and the physics of the problem.
Initiate the solution (SOLVE).
Results from the solution consist of the complete solution for nonsuperelements and the reduced solution - DOF solution at masters - for the superelements. The complete solution for nonsuperelements is written to the results file (Jobname.rst, Jobname.rth, or Jobname.rmg), which you can postprocess using normal postprocessing procedures.
The reduced solution is written to the file Jobname.dsub. You can review this file using the SEDLIST command.
You can control the frequency at which the superelements reduced solution is written to the .dsub file by specifying a value for
FREQon the OUTRES command forItem= NSOL or DSUB. Note that the default value ofFREQdepends on the analysis type, as listed in the command description of OUTRES.To expand the reduced solution to all elements within the superelement, you will need to perform the expansion pass, explained next.
Note: If the use pass is performed using a mode-superposition method and you intend to perform a superelement expansion pass, do not activate the element results superposition key (
MSUPkey= YES on the MXPAND command).Note: Restarting an analysis overwrites the file Jobname.dsub. Only the reduced solutions of the last analysis are then available in the expansion pass.
Leave the SOLUTION processor (FINISH).