


The feature allows you to manipulate bodies. Any type of body can be used with body operations, regardless of whether it is active or frozen. However, point feature points (PF points), attached to the faces or edges of the selected bodies, are not affected by the body operation.
The feature is available via the Create Menu. It has up to six options, although not all of them will be available at all times. For selections, bodies are selected via the Apply/Cancel button property in the Details View. Planes are also selected via the Apply/Cancel button property. The options are:
The three types, Cut Material, Imprint Faces, and Slice Material, are designed to use bodies in Boolean Operations, similar to the material types used in other features. You may choose whether you wish to keep or destroy the bodies you have chosen for the Boolean operation through the Preserve Bodies property. The default value for Preserve Bodies is No.
Simplify
Use to select bodies to simplify, and then select the Simplify Geometry property and/or the Simplify Topology property. The Simplify Geometry option will simplify the surfaces and curves of the model into analytical geometry where possible. The default for this property is Yes. The Simplify Topology will remove redundant faces, edges, and vertices from the model where possible. The default for this property is Yes. Performing a Simplify operation may increase the robustness of further modeling operations, including Share Topology.
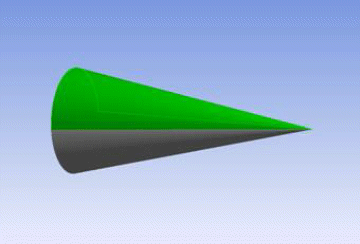
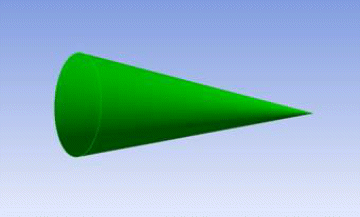
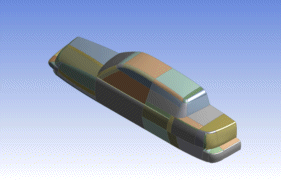
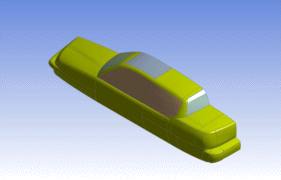
Example 70: Simplifying Geometry and Topology
The body has three Non-Uniform Rational B-Splines (NURBS) surfaces and can be simplified:
After the simplification, the surfaces were reduced to planes and cones. The cone faces were merged together:
Sew
Select bodies to use in a sewing operation. Upon clicking Generate, DesignModeler will attempt to sew the selected Surface bodies together where they have edges common to within a given tolerance. This property has four options:
Create Solids: If Yes, then DesignModeler will convert closed surface bodies to solids after sewing. The default is No.
Tolerance: Choose from Normal, Loose, or User Tolerance stitching tolerance. Default is Normal.
User Tolerance: Enter user-defined tolerance (only if the Tolerance property has a value of User Tolerance).
Merge Bodies: If Yes, then stitching will be attempted with all selected Surface bodies. If Compatible Attributes means that stitching will be attempted for subsets of selected surface bodies that have attributes that are compatible.
Example 71: Sewing Operation
Multiple surface bodies before sewing operation:
A single surface body after sewing operation:
Example 72: If Compatible Attributes option
A model consisting of 73 surface bodies before sewing operation:
The same model with Merge Bodies set to If Compatible Attributes, resulting in five surface bodies:
Note that in Edit Selections mode the mouse cursor is enclosed by a circle of diameter equal to the “Tolerance” used for stitching. This enables you to visualize the tolerance in the model workspace (Graphics Window). The image shows the cursor change when user tolerance value provided is 2 millimeter.

Cut Material
You select bodies to use in a cut operation that is performed on the active bodies in the model. Body Operation's Cut Material option works the same way as Cut Material does for any of the basic features. This option is available when active bodies exist in the model.
Note: Cut Material is designed to use bodies in Boolean Operations, similar to the material types used in other features. Selected bodies will be destroyed by the operation by default, but they can be protected by setting the Preserve Bodies option to Yes. The default value for the Preserve Bodies option is No.
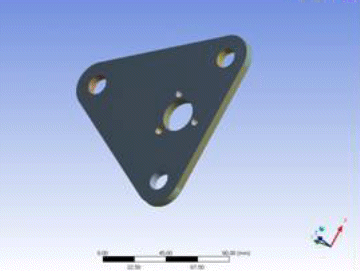
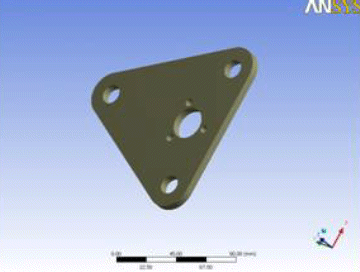
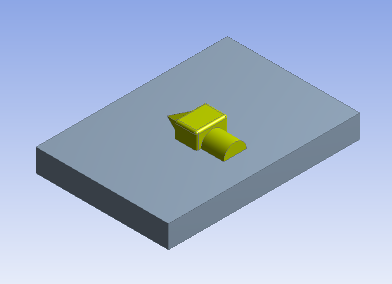
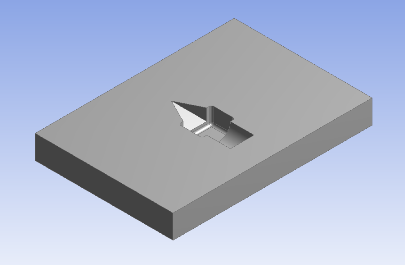
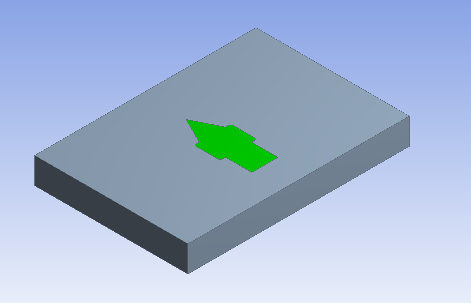
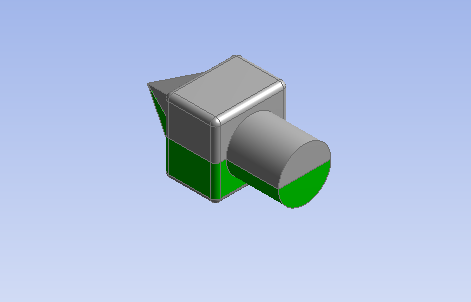
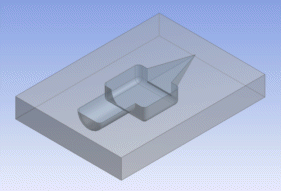
Example 73: Cutting to form a mold
A body is selected to cut into the block to form a mold:
After the cut operation:
Imprint Faces
The feature takes either all of the bodies (default) or selected bodies of the model as input, based on the Target Bodies property. If the “Target Bodies” is set to “Selected Bodies,” then an additional “Bodies” property becomes available. The “Bodies” property is an “Apply/Cancel” button that facilitates the selection of target bodies that you wish to be imprinted.
An imprint operation is performed on the target bodies. Each target body will imprint and be imprinted upon by adjacent bodies that are also part of the target bodies. Any body not included in the target bodies will be unchanged. This option is available when active or frozen bodies exist in the model. All bodies will survive the operation.
In Ansys DesignModeler 14.5 and earlier, selected bodies would only imprint on selected, active bodies in the model. Furthermore, the selected bodies would be destroyed by the operation by default, but they can be protected by setting the Preserve Bodies option to Yes. Body Operation features saved in a previous version and resumed in Release 15.0 will execute as they did in the previous version. In Release 15.0, this behavior can be recreated by using the Boolean — Imprint Faces operation.
Example 74: Imprint faces of a block
In this example of an imprint operation, both bodies are selected. Faces from both bodies are used to imprint upon each other.
Notice the block was imprinted upon, and also imprinted itself onto the other body.
Slice Material
You select bodies for a slice operation. Body Operation's option works the same way as does for any of the basic features.
Note that Slice Material is designed to use bodies in Boolean Operations, similar to the material types used in other features. Selected bodies will be destroyed by the operation by default, but they can be protected by setting the Preserve Bodies option to Yes. The default value for Preserve Bodies is No.
Example 75: Slicing a block
An example of a slice operation where a body is selected to slice the block:
Clean Bodies
Select Clean Bodies to remove body faults via the Fault Detection option. The options are Normal and High. High is more thorough but also more time-consuming. The number of faults removed depends on the body.
The Clean Bodies feature cleans each body and then performs an analysis. Using the Normal option, if any faults are found the feature is marked as being in a warning mode. To identify the remaining faults, select the feature in the tree and click the right mouse button to select “Show Problematic Geometry.”
Subsequently you can select the High level of cleaning on the body, or use other features such as the Repair features to further improve the model.
Cleaning existing faults can significantly improve reliability of further modeling operations. The Clean Bodies option functions similarly during the model import process. See Import and Attach Options.
Other Advanced Tools: