


The Mid-Surface feature allows the creation of Surface bodies that are midway between existing Solid body faces. The resulting surface body/bodies have a Thickness property which defines the "thickness" that surface body represents. The faces can be manually selected, or an automatic mode allows you to set a thickness range and then automatically detect matching face pairs. Along with the basic name property, there are six properties for defining a Mid-Surface via manual selection, and four additional properties for automatic detection. Starting in release 12.1, the output bodies are grouped into parts based on the original bodies they came from.
Mid-Surface topics:
Basic Properties
The basic properties that define the Mid-Surface feature:
Mid-Surface: This property allows you to assign your own name to the Mid-Surface feature.
Face Pairs: An Apply/Cancel property that facilitates the selection of the matching faces. The selected faces must be of the same type and be defined such that one is essentially offset from the other by a fixed distance. The order of the selected faces is important, especially the first pair of a given thickness. The mid-surface will be generated attempting to have the normal such that it points from the second (lavender / hot pink) face towards the first (purple) face. You must select a face and its matching face in the order you prefer. If you try to select two or more faces on one side before selecting the other side, the feature will assume you are selecting a face and immediately its matching face, thus leading to errors. Also, if you select a pair of faces that are not exact offsets of one another, and the extent to which they are not perfect offsets is greater than the Selection Tolerance, a warning message will be displayed and the pair will not be used.
If possible, the warning message will include a "suggested" Selection Tolerance that would allow the face pair to be used. Since the "suggested" value is determined via a quick binary search, you typically can use a value slightly smaller than what is suggested. In general, the normals from the two faces should point away from each other. For planar faces this is explicitly tested for and if they do not point away from each other, a warning will be displayed and they will not be used. For other face types, if they are offsets, but the normals point toward each other, or in the same direction, they will be used but the results may not be correct. If they are valid, the first face will be colored purple, and the second lavender (hot pink), with the eventual normal pointing outward from the purple face.
Selection Method: Here you can decide whether to manually select faces, or set up additional properties so that matching faces can be automatically detected. If you have face pairs already selected when you select Automatic mode and you have not yet set min/max threshold values, then they will be automatically computed from your current selections.
It is suggested, especially if you use a non-zero Selection Tolerance, that you manually select several face pairs before first going to Automatic mode, or that if expected pairs are not getting selected that you manually select one of these pairs and then use the right mouse button context menu option to Adjust Min/Max Thresholds. This helps to insure that you automatic selection range includes what is needed.
Selection Tolerance: Here, you can set the allowable deviation from a "perfect offset" that is allowed during face pair selection. Because allowing face pairs to be slightly off by this tolerance amount, could result in some face pairs being off in one direction and others being off in the opposite direction, the final Mid-Surface itself allows for a tolerance of twice this amount for the overall surface. Like the Sewing Tolerance below, a tolerance can be very helpful, but too loose of a tolerance can also lead to problems. For example you could get face pairs being selected by Automatic selection that are not really wanted. A good approach is to try to use a small selection tolerance and if some face pairs cannot be selected automatically, then try manual selection. If the Selection Tolerance is too tight, it will try to suggest a looser value. This value cannot be larger than the Thickness Tolerance. If you set it to a larger value, then the Thickness Tolerance will automatically be updated to the larger value.
When using Automatic Selection and you set the Selection Tolerance to other than zero, it can take significantly longer to do the Automatic Selection. This is because internally when there is a Selection Tolerance, many offsets/orientations are attempted in testing to see if a face pair is usable. Also, if the Selection Tolerance is set larger than half of the Minimum Threshold, a warning will be displayed that this can affect both speed and reliability of the result.
Thickness Tolerance: This property provides a tolerance so that face pairs that are the same distance apart, along with those that are within the thickness tolerance of that distance, can be grouped together. The feature will attempt to combine resulting surface bodies which touch one another and have the same thickness into a single Surface body. The thickness of resulting surface bodies is also rounded to the nearest multiple of the Thickness Tolerance. If the actual thickness of a resulting surface body is less than half of the Thickness Tolerance, be aware that this means its thickness will be set to zero. This value cannot be smaller than the Selection Tolerance. If you set it to a smaller value, then the Selection Tolerance will automatically be updated to the smaller value.
Sewing Tolerance: During the creation of the Mid-Surface, internally surfaces are created from each face pair selected. These are then trimmed to other surfaces and then sewn together with other surfaces of the same thickness to attempt to form as few surface bodies as possible. However, there are sometimes small gaps between these individual surfaces. This tolerance specifies the maximum gap that can be closed by the sewing process. Normally it is not necessary to change this tolerance. However, if you find there are small gaps in the resulting body, this may be increased to a point where the gap gets closed. Note that using too large of a sewing tolerance can lead to slots or openings getting filled when they should not. Very large tolerances can result in strange results and should be avoided.
Extra Trimming: As with the Sewing Tolerance above, there are situations that the internal trimming algorithms cannot completely handle. In these cases, it is useful to be able to trim surface bodies that have trimming errors to the original body, or at times to trim all surface bodies to the original body for cases where no error was detected even though the trimming was not correct. If trimming to the original body would result in a non-manifold surface body, then the surface body will remain untrimmed. You also have options to delete surface bodies with trimming errors, or to keep them with no additional trimming. Note that if you use the "Delete Untrimmed" option and there are trimming problems, you will not be able to use "Show Problematic Geometry" as the problem geometry will have been deleted.
Preserve Bodies: Here you can decide whether the bodies whose faces you are selecting are kept or not after the Mid-Surface feature is generated. Along with the Yes and No options there is also an option to Preserve body if error. With this option, if one or more of the selected face pairs in a body cannot be properly processed, then that body will be preserved. If some face pairs for that body are successful, then the surface bodies created by those pairs will be inside the preserved Solid body. If there are no problems then this option is the same as the No option. The default value is No.
Automatic Detection Properties
If you choose the Automatic Selection method, the following four additional properties are shown:
Bodies to Search: Here you choose which bodies to search. The default is Visible Bodies. The other choices are All Bodies, and Selected Bodies. If you choose Selected Bodies an additional Bodies property is displayed that allows you to select the bodies to process.
Minimum Threshold: This sets the minimum distance allowed between face pairs during automatic detection. If it is set larger than the Maximum Threshold, then that value is set equal to the Minimum Threshold. Also, only values greater than zero are allowed.
Maximum Threshold: This sets the maximum distance allowed between face pairs during automatic detection. If it is set less than the Minimum Threshold, then that value is set equal to the Maximum Threshold. Also, only values greater than zero are allowed.
Find Face Pairs Now: This property will always display a No as its value. When you set it to Yes, detection is done at that time, using the settings you have provided for the Threshold and Bodies, as well as the Thickness Tolerance. When it is finished processing, this value is automatically set back to No. If you have previously selected face pairs, the options shown for this are
No
Yes, Add to Face Pairs
Yes, Replace Face Pairs
Note that this option will not be available if these are zero.
Note that in Edit Selections mode the mouse cursor is enclosed by a pair of concentric circles whose diameters are equal to the Minimum and Maximum Threshold provided. This enables you to visualize the threshold provided in the model workspace (Graphics Window). The image shows the cursor change when Minimum and Maximum Threshold provided are 1 and 2 millimeters respectively.
Mid-Surface Context Menu Options
If you select the right mouse button while the cursor is in the graphics area, several Mid-Surface specific options are presented:
Add Face Pairs: This is the default mode for selecting face pairs. When the Face Pairs property is active, this allows you to add additional face pairs.
Remove Face Pairs: When the Face Pairs property is active, this allows you to select a single face and all face pairs that contain that face are removed.
Reverse Face Pairs: When the Face Pairs property is active, this allows you to select a single face and all face pairs that contain that face are reversed. Additionally, all face pairs that are dependent on the selected face via adjacent face connections that have matching orientation are also reversed.
Clear Existing Face Pair Selections: This clears all current face pairs.
Adjust Min/Max Thresholds: This uses the distance between all currently selected face pairs to set the Minimum and Maximum Threshold properties.
Usage
There are several important concepts to understand to ensure successful use of the Mid-Surface feature.
Resultant surface body names come from their original bodies.
Selected face pairs must be an equal distance apart at all locations. Close is not good enough, unless you have a Selection Tolerance of greater than zero, otherwise they must be exact offsets of each other. Also, the normals to the selected pairs should point away from each other, with solid material between them. This is automatically checked for planar pairs. Planar faces will not be accepted if the normals do not point in the correct directions. For other face types it is up to you to choose properly. If faces are selected that do not follow this rule, the resulting mid-surface may not be correct.
Selecting face pairs that do not make sense will likely lead to errors. For example, selecting more than a single face pair on a simple block solid leads to multiple intersecting Surface bodies rather than a single mid-surface surface body to represent the block. These cannot be properly trimmed and lead to trimming errors.
You can control the normal direction of automatically detected faces by selecting an initial pair manually.
You are free to mix manual selections and automatic detections (for example with different thresholds).
The minimum and maximum threshold ranges are actually expanded by half of the Thickness Tolerance. This means you can set both thresholds to the same value and then only get faces that are within the tolerance range of that thickness.
If your model has small faces, it is better to set identical minimum and maximum threshold ranges and use a fairly tight tolerance to avoid a mismatch of faces.
Another reason to use small threshold ranges is to avoid selection of valid, but unwanted face pairs. For example if you have a rectangular block 2 x 4 x 8 and you use a threshold range from 1 to 5, you will get the face pair that is 2 units apart and the face pair that is 4 units apart. The result would be two intersecting mid-surface surface bodies. A range of 1 to 9 would result in three intersecting surface bodies. So for this part a range of 1 to 3 would work much better, or even better would be 2 to 2 so that you get used to using just exactly what is wanted. Starting in release 12.1, the Automatic Face Pair detection logic does a much better job of avoiding selection of face pairs that would result in intersection surface bodies. However, you should still avoid using too large of a gap between the minimum and maximum threshold.
Sewing Tolerance can be used to close small gaps, but using very large values can lead to invalid results.
You may right click on the Mid-Surface feature in the tree if it has errors or warnings and look at either the error/warnings, or at the geometry causing the problem.
Like the Sewing Tolerance, be wary of using too large of a Selection Tolerance as that can lead to potential errors as well. To avoid problems, you should try to use as small of a Selection Tolerance as may be needed.
In some cases with a very difficult to handle face pair, another approach is to just not use that face pair and instead use the Surface Patch feature to fill the hole in the resulting surface body.
When the low level functions detect a possible error in trimming, the feature is marked with a warning. However, at times these “possible” errors are either not truly an error, or are internally corrected but subsequent operations before the feature completes generation. In these cases the feature will still be marked with the warning, but it actually okay.
As noted above in the description of Selection and Thickness Tolerances, there is a relationship between them. If you interactively change the Selection Tolerance to a value larger than the Thickness Tolerance, then the Thickness Tolerance will be updated to the same value. Similarly, if you set the Thickness Tolerance to a value smaller than the Selection Tolerance, then the Selection Tolerance will be set to the same value. However, If one of these is made into a parameter, then when you interactively try to change the other and it would cause the parameterized value to need to change, a warning will be displayed and your change will not be accepted. If this situation occurs during execution of parameters, the warning will not show, but the “Check” tab will show an “Invalid” for the offending assignment and the change will not be used.
When using a Selection Tolerance for selecting face pairs that are not truly offsets of one another, the created surface between those faces will actually be offset from one side or the other, provided it can be done within tolerance. There is no control as to which side will be used for the offset. The selection order of the face pair can influence this, but does not always force it to the side you may want.
When using the Automatic Selection method on large complex bodies, especially with a non-zero selection tolerance, it can be very slow. There are several things you can do to improve this:
Try to keep your Minimum and Maximum Thresholds as close as possible.
First use the Automatic Selection method with zero Selection Tolerance. After that finishes, do it again with the Selection Tolerance, using Yes, Add to Face Pairs.
Use as small of a Selection tolerance as possible (manually select a number of the face pairs that are not perfect offsets to get an idea of what tolerance is needed).
Reduce complexity of your model as much as possible ahead of time. The overall time is significantly effected by the number of faces in a body, and the complexity of those faces (for example, planar faces go much faster that curved ones). For example if small blends are not needed for your analysis, use Face Delete ahead of time to remove these from the model. Or use Face Delete to remove faces for holes if they are not needed.
Slice can be used to break a large complex body down into smaller ones. The process time to work on multiple bodies created by slicing a complex one will be much faster than dealing with the single complex one. For example, in one example of a complex body that took over 10 and a half minutes to do auto selection (with no selection tolerance), just splitting it in two, allowed auto selection to process both in about 5 and a half minutes.
When using the Import External Geometry File and Attach to Active CAD Geometry features to import CAD geometric data into DesignModeler, you should strongly consider setting the Simplify Geometry option to Yes.
If not done elsewhere, then before using Mid-Surface feature, insert the Body Operation's Simplify option on the bodies to be used for Mid-Surface prior to using them with the Automatic Selection Method basic property. This can make a major difference on the performance. In one example, Auto Selection went from 20 minutes to 3 seconds!
Example 31: Step-by-Step Usage
The following example should help to demonstrate some of the functionality described above. Browse to one of the following:
Windows platform: ...\Program Files\Ansys Inc\v242\AISOL\Samples\DesignModeler\MidSurfaceBracket.
Linux platform: .../ansys_inc/v242/aisol/Samples/DesignModeler/MidSurfaceBracket.
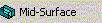
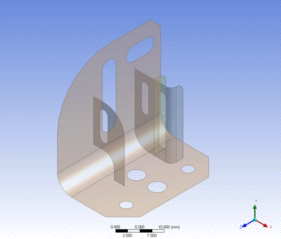
The Demo_Bracket part is imported and is actually two separate solids. The front brace, even though it touches the main bracket is a separate body, as you might have in an assembly part.
In the first figure, load the part, chose the Mid-Surface feature, and select two face pairs (using the stacked rectangles in the lower left to choose hidden faces). These pairs represent the two thicknesses of this model.
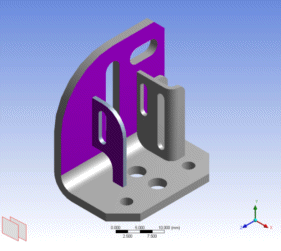
Now, after selecting Apply, go to the Automatic Selection mode. Since some face pairs are already selected, and the minimum and maximum thresholds have not yet been set, it automatically calculates a range based on the current selections. This can also be done via the right mouse button context menu at any time, or the thresholds can be set manually. Next, for Find Face Pairs Now, select Yes, Add to Face Pairs.
Now you are ready to Apply, and then .
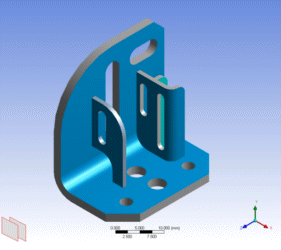
Here is the result of the Generate. Now, instead of two Solid bodies, there are four surface bodies. They cannot be combined into a single body because the "T" intersections would cause it to be non-manifold. Also, in the final figure below, you will see that the resulting surface bodies for the back brace are automatically extended/trimmed to meet the main part of the bracket, as these were all part of one Solid body originally. However, the front brace was a separate body, so it is not automatically extended.
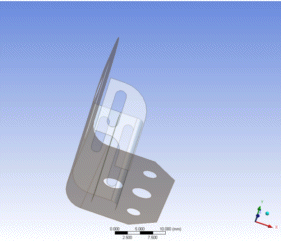
Note that the Surface Extension feature can be used to extend the front brace so it does meet the main bracket.
Other Advanced Tools: