


During the calculation, you can have Fluent create an animation of mesh (primarily for dynamic mesh cases), contours, vectors, pathlines, particle tracks, scenes, XY plots, report plots, residuals, or dashboards. Before you begin the calculation, you will specify and display the variables and types of plots you want to animate, and how often you want plots to be saved. At the specified intervals, Fluent will display the requested plots, and store each one. When the calculation is complete, you can play back the animation sequence, modify the view (for mesh, contour, vector, pathline, and particle tracks plots), if desired, and save the animation to a series of picture files or a video file (MP4).
Instructions for defining a solution animation sequence are provided in Creating an Animation Definition. Playing an Animation Sequence describes how to play back and save the animations.
For additional information, see the following sections:
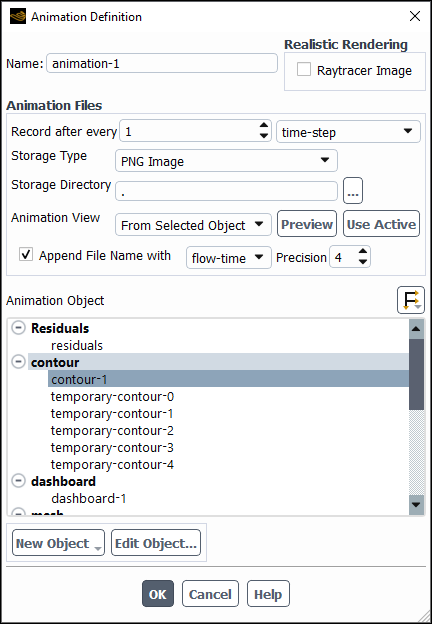
You can use Figure 36.54: The Animation Definition Dialog Box to specify the animation object and the frequency that it will be captured for animating.
![]() Solution → Activities → Create
→ Solution Animations...
Solution → Activities → Create
→ Solution Animations...
The procedure is as follows:
(Optional) Enter a Name for the animation definition.
(Optional) Enable Raytracer Image in the Realistic Rendering group box if you want a raytracer to render the image prior to saving. Refer to Realistic Rendering Using Raytracing for additional information.
Indicate how often you want to create a new frame in the animation by specifying a frequency in Record after every and selecting Iteration, Time Step, or Flow Time.
Specify how you want Fluent to save the animation frames by selecting In Memory, PPM Image (2D image file), HSF File (3D image file), PNG Image (2D image file), JPEG Image (2D image file), or TIFF Image (2D image file) from the Storage Type drop-down.
Important: The advantage to saving the animation sequence using the HSF File option is that these files are highly compressible and can be viewed and interacted with using a “HOOPS Viewer” application on iOS and Android equipped devices. The “HOOPS Viewer” application can be downloaded to iOS and Android equipped devices from the “App Store” and “Google Play” respectively.
An advantage to saving the animation sequence using the PPM Image option is that you can use the separate pixmap image files for the creation of a single GIF file. GIF file creation can be done quickly with graphics tools provided by other third-party graphics packages such as ImageMagick, that is,
animateorconvert. For example, if you save the PPM files starting with the stringsequence-2, and you are using the ImageMagick software, you can use theconvertcommand with the-adjoinoption to create a single GIF file out of the sequence using the following command.convert -adjoin sequence-2_00*.ppm sequence2.gif
Choose the Storage Directory where Fluent will save the animation frames.
Note: Animation files are written to the same directory as the case file, by default. This is stored as a relative path, represented by a dot (.), so that when a case file is shared, animation files are written to an appropriate location.
If you manually specify a path, then what you are specifying is an absolute path that will not automatically be updated if the case file is shared or run from another directory.
(Optional) Specify the Animation View, which determines the orientation of the object for the animation frames captured during the calculation.
You can only specify the view once an Animation Object is selected. Clicking displays the selected object in a reserved graphics window, with the view shown in the drop-down. If your desired view is not available in the drop-down, you can preview the object, change its orientation in the graphics window, then click to save the current graphics window view and use it for this animation definition.
(Optional) Enable Append File Name With and select time-step, iteration, or flow-time to append a more meaningful number to the animation image names. For flow-time you can control the Precision, which determines how many significant digits are included in the appended number.
Select the graphics object you want to animate from the Animation Object list. If you want to animate an object that is not listed, you can create a New Object.
Mesh... opens the Mesh Display Dialog Box.
Contours... opens the Contours Dialog Box.
Vectors... opens the Vectors Dialog Box.
Pathlines... opens the Pathlines Dialog Box.
Particle Tracks... opens the Particle Tracks Dialog Box.
Scene... opens Figure 40.50: The Scene Dialog Box.
XY Plot... opens the Solution XY Plot Dialog Box.
Report Plot... opens the New Report Plot Dialog Box.
Note: If you select residuals, ensure that Plot is enabled in the Residual Monitors dialog box.
Click to create the animation definition.
If you are defining an animation sequence containing mesh, contour, or vector displays, note the following when you are defining the display:
If you want to include lighting effects in the animation frames, be sure to define the lights before you begin the calculation. See Adding Lights for information about adding lights to the display.
If you want to maintain a constant range of colors in a contour or vector display, you can specify a range explicitly by turning off the Auto Range option in the Contours or Vectors dialog box. See Specifying the Range of Magnitudes Displayed or Specifying the Range of Magnitudes Displayed for details.
Advanced scene manipulations that are specified using the Scene Description dialog box will not be included in the animation sequence frames. View modifications such as mirroring across a symmetry plan will be included.
For animations that include titles (enabled by clicking
 in the toolbar), ensure titles are displayed in the
graphics window prior to beginning the computation, which will help the
animation frames appear correctly.
in the toolbar), ensure titles are displayed in the
graphics window prior to beginning the computation, which will help the
animation frames appear correctly.
Once you have defined a sequence (as described in Creating an Animation Definition) and performed a calculation, or read in a previously created animation sequence (as described in Reading an Animation Sequence), you can play back the sequence using the Playback Dialog Box (Figure 36.55: The Playback Dialog Box).
![]() Results → Animations → Solution Animation
Playback
Results → Animations → Solution Animation
Playback ![]() Edit...
Edit...
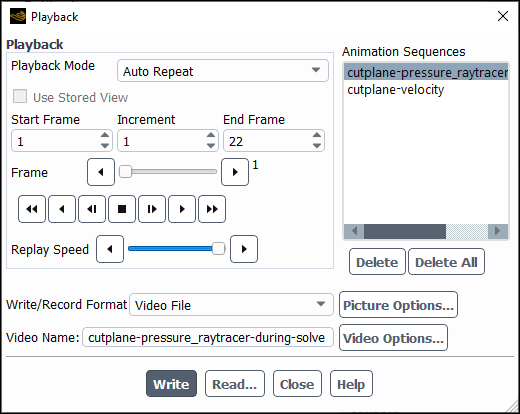
Select the animation you want to play in the Animation Sequences list. To play the animation once through from start to finish, click the “play” button under the Playback heading. (The buttons function in a way similar to those on a standard video player. “Play” is the second button from the right—a single triangle pointing to the right.) To play the animation backwards once, click the “play reverse” button (the second from the left—a single triangle point to the left). As the animation plays, the Frame scale shows the number of the frame that is currently displayed, as well as its relative position in the entire animation. If, instead of playing the complete animation sequence, you want to jump to a particular frame, move the Frame slider bar to the desired frame number, and the frame corresponding to the new frame number will be displayed in the graphics window.
Important: For smoother animations, enable the Double Buffering option in the Display Options Dialog Box (see Modifying the Rendering Options). This will reduce screen flicker during graphics updates.
Note: For HSF File and In Memory 3D animations, you can disable Use Stored View to manipulate the view during playback.
Additional options for playing back animations are described below.
If you want to replay the animation sequence with a different view of the scene, you can use your mouse to modify (for example, translate, rotate, zoom) it in the graphics window where the animation is displayed. Note that any changes you make to the view for an animation sequence will be lost when you select a new sequence (or reselect the current sequence) in the Sequences list.
Different computers will play the animation sequence at different speeds, depending on the complexity of the scene and the type of hardware used for graphics. You may want to slow down the playback speed for optimal viewing. Move the Replay Speed slider bar to the left to reduce the playback speed (and to the right to increase it).
You may sometimes want to play only one portion of a long animation sequence. To do this, you can modify the Start Frame and the End Frame under the Playback heading. For example, if your animation contains 50 frames, but you want to play only frames 20 to 35, you can set Start Frame to 20 and End Frame to 35. When you play the animation, it will start at frame 20 and finish at frame 35.
You can “fast-forward” or “fast-reverse” the animation by skipping some of the frames during playback. To fast-forward the animation, you will need to set the Increment and click the fast-forward button (the last button on the right—two triangles pointing to the right). If, for example, your Start Frame is 1, your End Frame is 15, and your Increment is 2, when you click the fast-forward button, the animation will show frames 1, 3, 5, 7, 9, 11, 13 and 15. Clicking on the fast-reverse button (the first button on the left—two triangles pointing to the left) will show frames 15, 13, 11,...1.
If you want the playback of the animation to repeat continuously, there are two options available. To continuously play the animation from beginning to end (or from end to beginning, if you use one of the reverse play buttons), select Auto Repeat in the Playback Mode drop-down list. To play the animation back and forth continuously, reversing the playback direction each time, select Auto Reverse in the Playback Mode drop-down list.
To turn off the continuous playback, select Play Once in the Playback Mode list. This is the default setting.
To stop the animation during playback, click the “stop” button (the square in the middle of the playback control buttons). If your animation contains very complicated scenes, there may be a slight delay before the animation stops.
To advance the animation manually frame by frame, use the third button from the right (a vertical bar with a triangle pointing to the right). Each time you click this button, the next frame will be displayed in the graphics window. To reverse the animation frame by frame, use the third button from the left (a left-pointing triangle with a vertical bar). Frame-by-frame playback allows you to freeze the animation at points that are of particular interest.
If you want to remove one of the sequences that you have created or read in, select it in the Sequences list and click the button. If you want to delete all sequences, click the button.
Important:
Note that if you delete a sequence that has not yet been saved to disk (that is, if you selected In Memory under Storage Type in the Animation Sequence dialog box), it will be removed from memory permanently. If you want to keep any animation sequences that are stored only in memory, you should be sure to save them (as described in Saving an Animation Sequence) before you delete them from the Sequences list or exit Ansys Fluent.
Animations sequences with a corresponding animation definition must be deleted by deleting the corresponding animation definition object—they cannot be removed by clicking . Right-click an animation definition in the Outline View tree to see the Delete option (Solution>Calculation Activities>Solution Animations).
Once you have created an animation sequence, you can save it in any of the following formats:
Solution animation file containing the Ansys Fluent metafiles
Picture files, each containing a frame of the animation sequence
Video file containing each frame of the animation sequence. Available video formats include MP4, AVI, FLV, MOV, and MPEG.
Note that MPEG is not supported for saving on Ubuntu operating systems.
Note that, if you are saving picture files or a video file, you can modify the view (for example, translate, rotate, zoom) in the graphics window where the animation is displayed, and save the modified view instead of the original view.
If you selected HSF File or PPM Image for Storage Type in Figure 36.54: The Animation Definition Dialog Box, then Fluent will save the solution animation file for you automatically. It
will be saved in the specified Storage Directory, and its name will be the Name you
specified for the sequence, with a .cxa extension (for example,
pressure-contour.cxa). In addition to the .cxa file, Fluent will also
save image files with .hsf or .ppm extensions for each frame (for example,
pressure-contour_0002.hsf). The .cxa file contains a list of the associated
.hsf or .ppm files, and tells Fluent the order in which to display them.
If you selected In Memory under Storage Type, then the solution animation file (
.cxa) and the associated files (.hmf) will be lost when you exit from
Ansys Fluent, unless you save them as described below.
You can save the animation sequence to a file that can be read back into Ansys Fluent (see Reading an Animation Sequence) when you want to replay the animation. As noted in Reading an Animation Sequence, the solution animation file can be used for playback in Fluent independent of the case and data files that were used to generate it.
To save a solution animation file (and the associated files), select Animation Frames in the
Write/Record Format drop-down list in the Playback dialog box, and click the
button. Ansys Fluent will save a .cxa file, as well as a
.hmf file for each frame of the animation sequence. The filename for the .cxa
file will be the specified sequence Name (for example, pressure-contour.cxa), and
the file names for the metafiles will consist of the specified sequence Name followed by a frame number (for
example, pressure-contour_0002.hmf). All of the files (.cxa and
.hmf) will be saved in the current working directory.
You can also generate a picture file for each frame in the animation sequence. This feature allows you to save your sequence frames to picture files used by an external animation program such as ImageMagick. As noted above, you can modify the view in the graphics window before you save the picture files.
To save the animation as a series of picture files, follow these steps:
Select Picture Files in the Write/Record Format drop-down list in the Playback dialog box.
If necessary, click the button to open the Save Picture Dialog Box and set the appropriate parameters for saving the picture files. (If you are saving picture files for use with ImageMagick, for example, you may want to select the window dump format. See Window Dumps (Linux Systems Only) Apply in the Save Picture dialog box to save your modified settings.
Important:Do not click the button in the Save Picture dialog box. You will save the picture files from the Playback dialog box in the next step.
The AVZ and VRML formats are not supported for writing solution animation picture files.
In the Playback dialog box, click the button. Ansys Fluent will replay the animation, saving each frame to a separate file. The filenames will consist of the specified sequence Name followed by an animation sequence and a frame number (for example,
pressure-contour_1_0002.ps), and they will all be saved in the current working directory.
It is also possible to save all of the frames of the animation sequence in a video file. There are several video formats available including: MP4, AVI, FLV, MOV, MPEG.
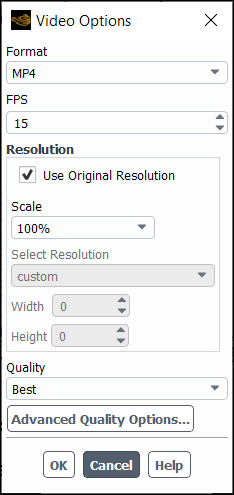
Use the Video Options dialog box to control how the video file is written.
Select Video File in the Write/Record Format drop-down list in the Playback dialog box.
Provide a name for the saved video file in the Video Name field.
Click .
Select the format you want the video written in from the Format drop-down list.
MP4—most common video file format.
AVI—developed by Microsoft, this format is common.
FLV—flash video format.
MOV—developed by Apple, this format can be played on both Macintosh and Windows machines.
MPEG—can be viewed using an MPEG decoder such as mpeg_play. Saving the entire animation to an MPEG file will require less disk space than storing individual window dump files (using the picture method), but the MPEG file will yield lower-quality images.
Note: Video Options are not available with an academic license.
Specify the frames per second (FPS) for the video file.
Set the Resolution for how the video file will be written. Your options include:
Original resolution—the same resolution as the image files that make up the animation. If you want this resolution, ensure Use Original Resolution is enabled. You have the option of scaling the original resolution using the Scale drop-down list.
4K—3840x2160pixels
2K—2560x1440pixels
WUXGA—1920x1200pixels
1080p FHD—1920x1080pixels
720p HD—1280x720pixels
480p SD—845x480pixels
custom—enter whatever resolution you want by specifying the Width and Height.
Select the quality of the video file from the Quality drop-down list.
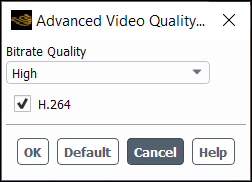
(Optional) Click to access the Advanced Video Quality Options dialog box.
Select the Bitrate Quality from the drop-down list.
Enable H.264 to use this method for video compression.
Click to save the advanced quality options.
Click to save the video options.
Click .
Note: You can specify your preferred video settings in the Save Video Settings node of the Graphics branch in Preferences (accessed via File/Preferences...).
These preferences are not applicable for academic licenses.
If you have saved an animation sequence to a solution animation file (as described in Saving an Animation Sequence), you can read that file back in at a later time (or in a different session) and play the animation. Note that you can read a solution animation file into any Ansys Fluent session; you do not need to read in the corresponding case and data files. In fact, you do not need to read in any case and data files at all before you read a solution animation file into Ansys Fluent.
To read a solution animation file, click the button in the Playback Dialog Box. In The Select File Dialog Box, specify the name of the file to be read.