


Graphic window displays can be saved in various 2D and 3D formats (see Choosing the Picture File Format for a full listing of the supported file types). There can be slight differences between pictures and the displayed graphics windows depending on your settings and hardware, as the pictures may be generated using the internal software renderer while the graphics windows may use specialized graphics hardware for optimum performance. To eliminate such differences and save these files at the fastest rate possible, you must follow all of the following best practices:
Run Cortex on a suitable machine with an appropriate graphics card and the latest drivers (for details, see the Ansys website). Note that you can assign Cortex to a particular machine using the
-gui_machine=<hostname>command line option, or by selecting Specify Machine from the Graphics Display Machine list in the Scheduler tab of Fluent Launcher.Ensure that Cortex / the host process is run on a separate machine than that used for compute node 0. For example, do not include the machine assigned using the
-gui_machineoption as the first machine in the hosts file / machine list (specified using the-cnf=xcommand line option).Do not set the graphics driver to
null,x11(for Linux), ormsw(for Windows).When saving picture files, enable the Fast hardcopy option in the Preferences dialog box (under Graphics).
Many systems provide a utility to “dump” the contents of a graphics window into a raster file. This is generally the fastest method of generating a picture (since the scene is already rendered in the graphics window), and guarantees that the picture is identical to the window.
Note: You can control the line thickness in saved images by specifying the Line width setting in Preferences, under Save Picture Settings.
For additional information, see the following sections:
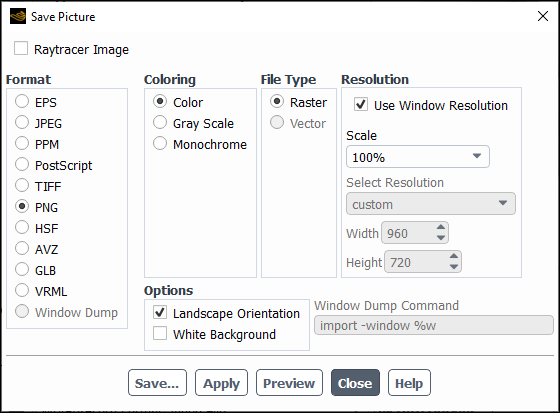
To set picture parameters and save picture files, use the Save Picture Dialog Box (Figure 3.20: The Save Picture Dialog Box).
![]() File → Save
Picture...
File → Save
Picture...
For your convenience, this dialog box may also be opened using
the button (![]() ) in the standard toolbar.
) in the standard toolbar.
The procedure for saving a picture file is as follows:
(Optional) Enable Raytracer Image if you want a raytracer to render the image prior to saving. Refer to Realistic Rendering Using Raytracing for additional information.
Choose the picture file Format.
Set the Coloring.
Specify the File Type, if applicable.
Define the Resolution, if applicable.
Set the appropriate Options.
If you are generating a window dump, specify the Window Dump Command.
(optional) Preview the result by clicking Preview.
Note: The preview for a Monochrome picture may not match the end result. If you see gray, it will be black when the picture is saved.
Click the button and enter the file name in the resulting Select File dialog box. See Automatic Numbering of Files for information on special features related to file name specification.
If you are not ready to save a picture but want to save the current picture settings, click the button instead of the button. The applied settings become the defaults for subsequent pictures.
To choose the picture file format, select one of the following items in the Format list:
- EPS
(Encapsulated PostScript) output is the same as PostScript output, with the addition of Adobe Document Structuring Conventions (v2) statements. Currently, no preview bitmap is included in EPS output. Often, programs that import EPS files use the preview bitmap to display on-screen, although the actual vector PostScript information is used for printing (on a PostScript device). You can save EPS files in raster or vector format.
- JPEG
is a common raster file format.
- PPM
output is a common raster file format.
- PostScript
is a common vector file format. You can also choose to save a PostScript file in raster format.
- TIFF
is a common raster file format.
- PNG
is a common raster file format.
- HSF
is HOOPS Visualize Stream Format, a highly-compressible and streamable 2D/3D file format.
- AVZ
is the free Ansys Viewer Format, which is a 3D file format allowing you to visualize, share, collaborate, and interactively manipulate the displayed object. For additional information on the Ansys Viewer, refer to Ansys Viewer User's Guide.
Note: Graphics effects such as reflections and the ground plane grid are not exported to AVZ format. (211327)
Limitations for AVZ Export:
Only mesh faces and edges (not nodes) can be displayed in the Ansys Viewer.
Contour values may be displayed incorrectly in the Ansys Viewer, if the Node Values option was disabled when the
.avzfile was saved.Contour lines are not exported to AVZ format.
Lighting effects and the brightness of the display may vary in AVZ when compared to the Fluent graphics windows.
When the entire colormap represents a single value, the color on the surface(s) may display differently in the Ansys Viewer than it does when it is displayed in Ansys Fluent.
Scenes containing multiple colormaps may show the colormaps overlapping when displayed in the Ansys Viewer. You can rearrange the colormaps by dragging and dropping them to different locations in the graphics window (top, bottom, right) in Ansys Fluent before saving in AVZ format to avoid this overlap issue.
Colormap properties such as font type and size and number format are not retained when imported into the Ansys Viewer.
The Ansys Viewer has a fixed size for pathline and particle track displays that may not match the exact settings of the pathline or particle track object when it was saved in
.avzformat in Ansys Fluent.2D plots cannot be saved in
.avzformat, including report plots, residuals, and XY plots.Mesh included as part of a scene may appear black, if the transparency has been modified from 0.
Hovering over individual vectors will not display their values in the Ansys Viewer. This also applies for pathline displays with the Style set to either line, point, or sphere.
The colormap type and precision displayed in the Ansys Viewer may not match how the colormap appeared when the
.avzfile was saved in Ansys Fluent.Cylindrical/Spherical silhouettes (artificial edges rendered for surfaces characterized by roundness that do not have a 'sharp edge') are not properly preserved and displayed in the Ansys Viewer.
Mesh displays that are colored by a material are not rendered properly in the Ansys Viewer.
- GLB
is a 3D file format frequently used in virtual reality (VR) and augmented reality (AR) applications. The file size is relatively small as it is a binary format of the GL Transmission Format (glTF).
Note:You cannot save animation files in GLB format.
You can only export and successfully view faces or faces + edges. Exporting only edges is not supported.
- VRML
is a graphics interchange format that allows export of 3D geometrical entities that you can display in the Ansys Fluent graphics window. This format can commonly be used by VR systems and the 3D geometry can be viewed and manipulated in a web-browser graphics window.
Important: Non-geometric entities such as text, titles, color bars, and orientation axis are not exported. In addition, most display or visibility characteristics set in Ansys Fluent, such as lighting, shading method, transparency, face and edge visibility, and the making of front faces transparent, are not explicitly exported but are controlled by the software used to view the VRML file.
- Window Dump
(Linux systems only) selects a window dump operation for generating the picture. With this format, you must specify the appropriate Window Dump Command.
Important: The advantage to saving the animation sequence using the HSF File option is that these files are highly compressible and can be viewed and interacted with using a “HOOPS Viewer” application on iOS and Android equipped devices. The “HOOPS Viewer” application can be downloaded to iOS and Android equipped devices from the “App Store” and “Google Play” respectively.
An advantage to saving the animation sequence using the PPM Image option is that you can use the separate pixmap
image files for the creation of a single GIF file. GIF file creation
can be done quickly with graphics tools provided by other third-party
graphics packages such as ImageMagick, that is, animate or convert. For example, if you save the
PPM files starting with the string sequence-2, and you are using the ImageMagick software, you can use the convert command with the -adjoin option to create a single GIF file out of the sequence using the
following command.
convert -adjoin sequence-2_00*.ppm sequence2.gif
For all formats except VRML, HSF, and the window dump, specify the type of Coloring you want to use for the picture file.
Select Color for a color-scale copy.
Select Gray Scale for a gray-scale copy.
Select Monochrome for a black-and-white copy.
Note: The preview for a Monochrome picture may not match the end result. If you see gray, it will be black when the picture is saved.
Most monochrome PostScript devices render Color images in shades of gray, but to ensure that the color ramp is rendered as a linearly-increasing gray ramp, you should select Gray Scale.
When you save an EPS (Encapsulated PostScript) or PostScript file, choose one of the following under File Type:
A Raster file defines the color of each individual pixel in the image. Raster files have a fixed resolution. The supported raster formats are EPS, JPEG, PPM, PostScript, TIFF, and PNG.
A Vector file defines the graphics image as a combination of geometric primitives like lines, polygons, and text. Vector files are usually scalable to any resolution. The supported vector formats include EPS, PostScript, and VRML.
Important: For the quickest print time, you can save vector files for simple 2D displays and raster files for complicated scenes.
For raster picture files (that is, JPEG, PPM, TIFF, and PNG), you can control the resolution of the picture image by specifying the size (in pixels). Set the desired Width and Height under Resolution. If the Width and Height are both zero, the picture is generated at the same resolution as the active graphics window. To check the size of the active window in pixels, click Info in the Display Options dialog box.
For EPS and PostScript files, specify the resolution in dots per inch (DPI) instead of setting the width and height.
For all picture formats except VRML, HSF, and the window dump, you can control two additional settings under Options:
Specify the orientation of the picture using the button. If this option is turned on, the picture is made in landscape mode; otherwise, it is made in portrait mode.
Control the foreground/background color using the White Background option. If this option is enabled, the picture is saved with a white background and, for 2D plots, the axes and labels are saved in black. This option allows for the production of consistent images, regardless of variations in user preferences, such as when running in Dark theme or with a custom background color.
Ansys Fluent provides options that allow you to save PostScript
files that can be printed more quickly. The following options are
found in the display/set/picture/driver/
post-format text menu:
-
fast-raster enables a raster file that may be larger than the standard raster file, but will print much more quickly.
-
raster enables the standard raster file.
-
rle-raster enables a run-length encoded raster file that is about the same size as the standard raster file, but will print slightly more quickly. This is the default file type.
-
vector enables the standard vector file.
If you select the Window Dump format, the
program uses the specified Window Dump Command to save the picture file. For example, if you want to use xwd to capture a window, set the Window Dump
Command to
xwd -id %w >
When the dump occurs, Ansys Fluent automatically interprets %w to be the ID number of the active window.
When you click the button, the Select File dialog box appears. Enter the file name for
the output from the window dump (for example, myfile.xwd).
If you are planning to make an animation, save the window dumps
into numbered files, using the %n variable.
To do this, use the Window Dump Command (xwd -id %w), but for the file name in the Select File dialog box enter myfile%n.xwd. Each time a new window dump is created, the value of %n increases by one. So there is no need to tack numbers
onto the picture file names manually.
To use the ImageMagick animate program,
saving the files in MIFF format (the native ImageMagick format) is more efficient. In such cases, use the ImageMagick tool import. Set the default Window Dump Command enter
import -window %w
Click Save... to open the Select
File dialog box. Specify the output format to be MIFF by
using the .miff suffix at the end of file
name.
The window dump feature is both, system and graphics-driver specific. Thus the commands available for dumping windows depends on the particular configuration.
The window dump captures the window exactly as it is displayed, including resolution, colors, transparency, and so on. For this reason, all of the inputs that control these characteristics are disabled in the Save Picture dialog box when you enable the Window Dump format. If you are using an 8-bit graphics display, use one of the built-in raster drivers (for example, TIFF) to generate higher-quality 24-bit color output rather than dumping the 8-bit window.
Before saving a picture file, you have the option of previewing what the saved image will look like. Click Preview to open a new window that will display the graphics using the current settings. This allows you to investigate the effects of different options interactively before saving the final, approved picture.