2.29. Hotkeys and Keyboard Shortcuts

Mechanical supports a variety of hotkeys and hotkey combinations that enable you to quickly execute actions. For example, the popular hotkey “N” is used to create Named Selections once you select a geometric or mesh entity.

Hotkey and keyboard actions are described in the following topics:

Key Assignment Pane

You use the Key Assignments pane, illustrated below, to view application assigned hotkeys. The option to display this window is available in the Tools group of the Home tab. Hotkeys are listed either by groups or you can list all available key assignments.

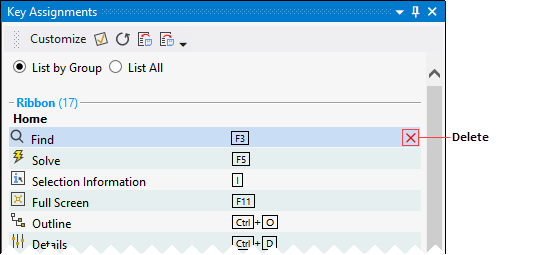
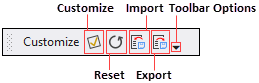
This window also provides a toolbar that includes 1) an option that opens the Customize dialog that enables you to modify hotkeys, 2) a reset option, 3) options to Import and Export user-defined key assignments, 4) a drop-down menu you can use to display or hide default options.

Ribbon Shortcuts

In addition to the options of the Key Assignments window, selecting the [Alt] key displays keyboard selection options. As illustrated below, when you select the [Alt] key, letters for each tab display. When you select one of these letters, additional options also display for the given tab.

Hotkeys and Hotkey Combination Descriptions

Application default hotkeys and their actions are described below.

Selection Filters Graphical Actions
Ctrl+P: Activate Vertex selection.
Ctrl+E: Activate Edge selection.
Ctrl+F: Activate Face selection.
Ctrl+B: Activate Body selection.
Ctrl+M: Activate option to merge virtual topologies. Perform this key combination once you have selected one or more edges in order to merge adjacent faces into one or more virtual face(s) or select one or more faces to merge the faces into one or more virtual face(s).
Ctrl+N: Activate Node selection.
Ctrl+K: Activate Element Face selection.
Ctrl+L: Activate Element selection.
Ctrl+Q: This option adds your current clipboard geometry or mesh selection to the existing geometry or mesh selection(s).
Ctrl+R: This option clears all clipboard selections
Ctrl+W: This option removes your current clipboard geometry or mesh selection from the existing geometry or mesh selection(s).
Shift+F1: Activate Extend to Adjacent selection.
Shift+F2: Activate Extend to Limits selection.
Shift+F3: Activate Extend to Connection selection.
Shift+F4: Activate Extend to Instances selection.

Go To Options

Ctrl+1: Highlight the corresponding Bodies in tree.
Ctrl+2. Highlight the contacts for the selected bodies.
Ctrl+3: Highlight the contacts common to the selected Bodies
Ctrl+4: Highlight the corresponding Named Selections object in the tree.
Ctrl+5: Highlight all Named Selections common the to given Named Selection.
Ctrl+6: Highlight the Mesh Controls in the tree that are associated with the selected bodies.
Animation Actions

The following hotkeys are available for the animation feature when the Geometry window has focus.

P: Plays and pauses the animation.
S: Stops the animation.
Shift +Right/Left Arrow Key: Reverse or advance the animation frame by frame.

Note:  For the Standard Animation (SA) setting, you can abort the animation creation process using the ESC key.

Use a Macro
Ctrl+F7: Display a Open dialog to select and then run a macro file.
G: When the Geometry window has focus, this key displays the content of the Graph window in the Geometry window. This feature is also available from the Graphics Toolbar and a context (right-click) menu.
H: When the Geometry window has focus, and you have modified the view of your model, for example, examining a part up-close, this key returns the view to the application default, Isometric View.
I: When the Geometry window has focus, this key toggles the display of the Selection Information Window on/off.
K: Create a local probe at the largest result value.
L: Create a local probe at the smallest result value.
M: When the Geometry window has focus, this key opens the Select Mesh By ID dialog box.
N: When the Geometry window has focus, this key opens the Named Selection dialog window, enabling you to create a named Selection for the selected geometric or mesh entity.
Z: When the Geometry window has focus, this key zooms in on the selected entity (body, face, edge, vertex). If no geometric entity is selected in the Geometry window, this key acts the same as the F7 (Zoom to Fit) option.
Ctrl+A: Selects all entities based on the active selection filter (bodies, faces, edges, vertices, nodes).
Ctrl+C: Copy the content of the graphics window into the clipboard. The content is available to paste (Ctrl + V) into a compatible application. Default image resolution settings can be changed using the Graphics Resolution option under the Graphics preference.
Ctrl+D: Display/hide the Details pane.
F4: This key enables you to move a vertex or a node to a new location. When you are using the Node Move feature, hold this key to reposition the desired node if you want to relax the node and move the node away from the geometry it is associated with.
F6: Toggle between the Shaded Exterior and Edges, Shaded Exterior, and Wireframe views.
F7: Executes the Zoom to Fit option (also available on the Graphics Toolbar).
F8: Hide selected faces.
F9: Hide selected bodies in Geometry window and hide/show selected bodies from the tree view.
F10: Maximize/Minimize the Ribbon.
F11: When the Geometry window has focus, this key toggles the full screen display on/off.
Shift+F8: Show Hidden Face(s).
Ctrl+F9: Hide all other bodies.
Shift+F9: Show all bodies.
Arrow Keys: Pan your model in the Geometry window. The window must be the active interface element.
Ctrl+Arrow Keys: Rotate the model about the vertical or horizontal axis of the model's orientation in the Geometry window.
Shift+[1]: Turn the Anti-Aliasing (MSAA) preference Off.
Shift+[2]: Set the Anti-Aliasing (MSAA) preference to Low (2x).
Shift+[3]: Set the Anti-Aliasing (MSAA) preference to Medium (4x).
Shift+[4]: Set the Anti-Aliasing (MSAA) preference to High (8x) (default).
Shift+W: Increases the number of layers displayed on a mesh that includes poor quality elements. See the Check Mesh Quality section for more information. 
Shift+S: Decreases the number of layers displayed on a mesh that includes poor quality elements. See the Check Mesh Quality section for more information. 
Outline Pane Actions
These hotkeys require an object in the Outline pane to be selected or that the pane has focus:
F1: Open the Mechanical User’s Guide to a section associated with the selected object.
F2: Rename a selected object.
F3: Open the search (Find In Tree) dialog box.
Ctrl+G: Group objects.
Shift+Ctrl+G: Ungroup objects.
Ctrl+O: Display/hide the Outline pane.
Ctrl+S: Save the project.
Solution/Retrieve Results
The F5 key starts the solution process for a selected Environment or if you have an object selected in the tree that is above all of the properly defined environments, then all branches will be solved. This action is also available when the Graphics window has focus.
Ctrl+U: Retrieve current result data when you are using Result Plot Trackers.

Note:  When you place your cursor within the Geometry window, and given a generated mesh, and the Node or Element selection option is active, holding the right mouse button and then clicking the left mouse button scrolls through the available Select Mode options (single section, box selection, box volume, lasso, lasso volume).


Keyboard Number Pad Shortcuts

Certain display functionalities are also available via the number pad on your keyboard provided the NumLock key is enabled. The numbers correlate to the following functionality:

0 = View Isometric
1 = +Z Front
2 = -Y Bottom
3 =+X Right
4 = Previous View
5 = Default Isometric
6 = Next View
7 = -X Left
8 = +Y Top
9 = -Z Back
. (dot) = Set Isometric