


Once you have generated the mesh for your model, the contextual menu (right-click) option, , is available from the Geometry window. You can also activate the feature using the M key, when the Geometry window has focus. As illustrated below, this dialog enables you to select mesh nodes and mesh elements using their IDs. This feature is modeless and therefore enables you to work with the user interface while the dialog box is displayed.
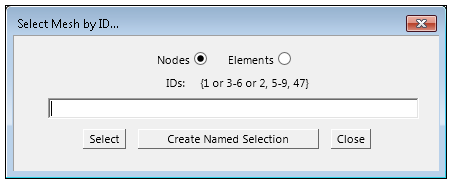
From this entry window, you can make comma separated entries of individual nodes (or elements), range entries by using a dash, and/or a combination of the two and then click the button. Range entries must increase in the appropriate order (for example, 1-10, not 10-1). The dialog displays messages regarding incorrect criteria as needed.
This feature works in tandem with the Selection Information window, enabling you to view and verify your entries. Open the window to display information about your selections as you make them. In addition, the status bar displays your selections. You can double-click the status bar pane to activate the Selection Information window. You can refer to the View Node/Element Information topics in the Selecting Nodes and Selecting Elements sections of the Help for additional information.
Important:
The application does not verify your ID entries. The application ignores any specified ID that does not exist.
Exponential (for example, 1e6) notation is not supported.
Once you make your selections, you can create an associated Named Selection by selecting the button. For the newly created Named Selection, there will be a Worksheet entry for each delimiter-separated set of nodes or elements.