


Recording or writing PrePost Scripts and then playing or using them in Rocky are great ways to save time by automating repeatable tasks.
Python is the programming language upon which Rocky is built. While knowing how to understand Python is not a requirement for using Rocky, there are several ways you can use the language to customize and extend the features included within the program.
For example, one way in which Python is useful is for creating and editing scripts.
You can also use Python to customize an Advanced Expression for a Property or Curve function. (See also About Customizing Properties or Curves.)
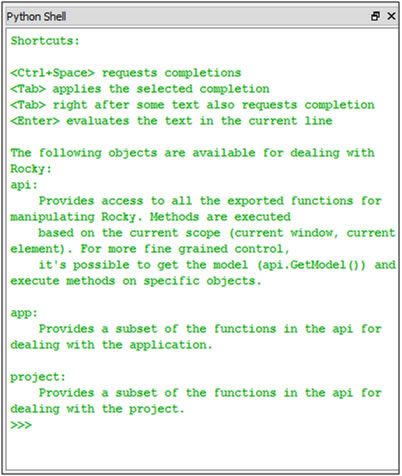
Rocky also includes a special panel that you can use to edit the underlying Python code and explore Rocky's API:PrePost functionality. To open this panel, from the Tools menu, click Python Shell.
Note: This version of Rocky supports only the Python 3 language. If your scripts were built using an older version of Rocky-or an older version of Python (for example, Python 2.7)-they might no longer work in this version. (See also My old script no longer works.)
Tips:
Find Rocky APIs quickly by using the Contents, Search, or Index tabs in the Rocky PrePost Scripting Manual. (From the Rocky Help menu, point to Manuals and then click PrePost Scripting Manual.)
View and modify sample scripts in the PrePost Scripts Repository section on the Rocky Customer Portal. (If you do not already have sign-in information for the customer portal, please contact your Rocky representative for assistance.)
See Also:
See Also:
Creating and using PrePost Scripts in Rocky is a great way to save time by automating repeatable tasks. Scripts can be recorded and played in the PrePost Script panel, added to the PrePost Scripts list under the Solver entity, and can be launched from the command line (see also Use the Command Line to Play a Script).
How you choose to create a script depends upon the task you are trying to repeat, and your level of familiarity with both Python and Rocky's API:PrePost functionality (see also Customize and Extend Rocky with Python). Specifically:
If the set of steps you want to repeat can be limited to things you click or enter in the Rocky UI, recording a script in the PrePost Script panel might be your easiest and quickest choice.
If you require more control over inputs or want access to tasks not directly accessible from the Rocky UI, then writing a script in Python may work better for your needs.
See the sections below for more detail.
ABOUT RECORDING AND PLAYING SCRIPTS IN THE PREPOST SCRIPT PANEL
When you choose to start recording a script from the PrePost Script panel, every step you take in Rocky is remembered until you choose to stop the recording. Then, you can choose to "play" your script within other parts of the set up, another view, or even other simulation files to repeat the same recorded steps automatically.
For example, you can use recorded scripts to accomplish all of the following tasks:
Create the very same Animation Key Frame sets in other simulations
Create a common variable set for use in other simulations
Apply custom graph views to your plot window that use your preferred units and grid settings
Export a set of animation key frames to individual image files
Apply your preferred visualization settings to other 3D View windows within your same simulation
When you record a script using the PrePost Script panel, Rocky automatically saves the resulting PY file in the correct folder location and using the required script_ prefix.
Tip: As long as your script PY file begins with script_ and is saved in either the ..RockyScripts folder (for scripts shared across projects) or the ..<ProjectName>rocky.filestmpmacros-0 folder (for current-project-only scripts) (see also File Types and Folders in Rocky), it can be listed and played in the PrePost Script panel.
ABOUT WRITING PREPOST SCRIPTS IN PYTHON
You can also write and edit scripts outside of the Rocky program, and then apply them to your simulations in Rocky-either by playing the resulting PY file from the PrePost Script panel, or by pasting the code directly into the Python Shell panel.
To write or edit a script, knowledge of both Python (see also Customize and Extend Rocky with Python) and Rocky's API:PrePost functionality (see also I cannot find Rocky API documentation) is required.
Tips:
Gain hands-on experience with creating and using scripts by following either Tutorial - Static Angle of Repose Test in the Rocky Tutorial Guide or Tutorial - Tablet Coater in the Rocky Tutorial Guide.
View and modify sample scripts in the PrePost Scripts Repository section on the Rocky Customer Portal. (If you do not already have sign-in information for the customer portal, please contact your Rocky representative for assistance.)
ABOUT SHARED AND PROJECT-ONLY SCRIPTS
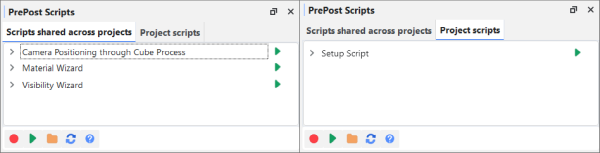
Rocky enables you to share your recorded and saved scripts across different Rocky projects, or use them for only the current project. Scripts saved to the Scripts shared across projects tab will be available for all your Rocky projects across the application; scripts saved to the Project scripts tab will appear only in the current project (Figure 1).
The tab you have selected when you choose to record your script (see also Record a New Script) or import your script (see also Add an External Script File to the Scripts Directory) determines the category to which the new script will be assigned. Scripts can be copied from one tab to another through the right-click menu (see also Copy a Script).
Note: Only scripts on the Project scripts tab are saved during archiving (see also Archive a Simulation Project) and are shown on the PrePost Scripts entity under Solver (see below.)
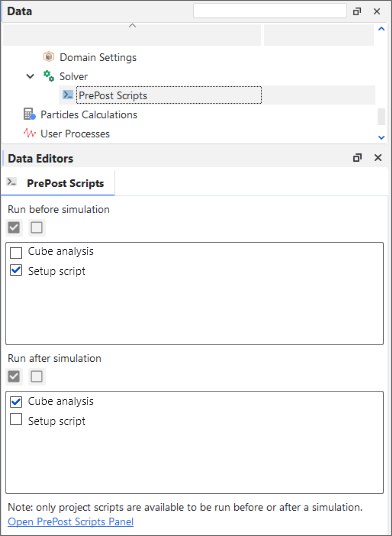
Any scripts that you have saved to the Project scripts tab are eligible for running automatically before and/or after simulation processing through the PrePost Scripts sub-entity on the Data panel under Solver (Figure 2). In this way, you can further automate your setup and post-processing, especially in situations where you are running many similar kinds of cases.
In this version of Rocky, only scripts that are compatible with the Python 3 (PY3) language will be supported. This means that some scripts that worked in older versions of Rocky may need to be recreated or modified to support the Python 3 guidelines. (See also My old script no longer works.)
In addition, only PY files starting with script_ will be eligible to play in the PrePost Script panel. Script files without this prefix can still be applied by copying and pasting the code into the Python Shell panel.
Use the images and table below to understand how to create and apply scripts.
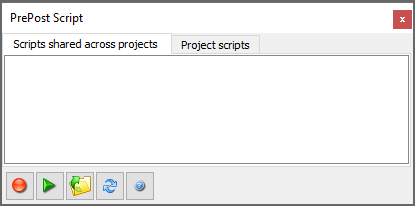
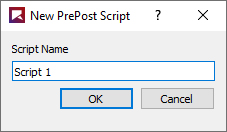
Table 1: PrePost Script panel button descriptions
|
Button |
Description |
|---|---|
|
|
Starts the recording process, which is the first step to creating a new script. Saves each step in Rocky until you press the Stop and Save Script button. Note: The tab you have selected when you click Record Script determines what kind of script is created-a script shared across all projects, or a script saved only for this project. |
|
|
Stops the recording process and saves the steps that were taken. |
|
|
Applies the recorded steps of the selected script to whatever element is currently active in the Rocky UI. |
|
|
Opens the tab-specific (shared across project or just current project) Scripts folder where the script PY files are saved. From here, you can choose to do any of the following:
Note: The tab you have selected when you click Open PrePost Scripts Directory determines which scripts folder is opened-the folder containing scripts that are shared across all projects, or the folder containing scripts saved only for this project. |
|
|
When scripts are added to or removed from the directory, this refreshes the list in the PrePost Script panel to include any newly added or removed PY files. |
|
|
Opens a short Help file with instructions for how to use the PrePost Script panel. |


What do you want to do?
See Also:
Ensure the PrePost Script panel is displayed. (From the Tools menu, click PrePost Script.)
From the PrePost Script panel, do one of the following: - To record a script that can be shared across all other Rocky projects, ensure the Scripts shared across projects tab is selected. - To record a script that can be used only for this project, ensure the Project scripts tab is selected.
Tip: If you change your mind, you can copy the script to the other tab later. (See also Copy a Script.)
Click the Record Script button.
From the New PrePost Script dialog, enter a name for the script you want to create, and then click OK. The new script name appears on the selected PrePost Script panel tab and the button changes to the Stop and Save PrePost Script button.
In the Rocky UI, perform the steps of the task that you want to repeat.
When the steps are complete, from the PrePost Script panel, click the Stop and Save PrePost Script button.
See Also:
Use this procedure to add a script to the Scripts directory.
Copy the PY script file that you want to add. Tip: In order for Rocky to recognize it and have it show within the PrePost Script panel, the script file name must begin with script. For example: script_video settings.py Note: A Rocky script not named in this exact way may still be used but will not be listed within the PrePost Script panel. Instead, these scripts must be launched from outside of Rocky. (See also Use the Command Line to Play a Script.)
Ensure the PrePost Script panel is displayed. (From the Tools menu, click PrePost Script.)
From the PrePost Script panel, do one of the following: - To add the script in a way that it can be shared across all other Rocky projects, ensure the Scripts shared across projects tab is selected. - To add the script in a way that can be used only for this project, ensure the Project scripts tab is selected.
Click the Open PrePost Scripts Directory button.
Into the file directory location that opens, paste the PY file you copied in step 1.
See Also:
Ensure that the script you want to apply has been saved to the correct directory. (See also Add an External Script File to the Scripts Directory.)
Within the Rocky UI, select the component to which you want the recorded steps of the script applied.
From the PrePost Script panel, select the name of the script you want applied, and then click the Playback PrePost Script button. The recorded or scripted steps are taken on the selected component. Tip: To see an overview of the script's processes, click the expand arrow to the left of the script's name. Click the arrow again to contract it.
Note: You can also have scripts applied automatically either directly before and/or after the simulation is processed. (See also Automatically Apply Scripts Directly Before or After Processing.)
See Also:
Ensure that the scripts you want to automatically apply either directly before and/or after your simulation is processed are listed on the Project scripts tab of the PrePost Script panel. (See also Copy a Script.)
From the Data panel, expand the Solver entity, and then click PrePost Scripts.
From the Data Editors panel, do the following:
In the Run before simulation box, enable all the scripts you want to automatically run directly before the simulation is processed.
In the Run after simulation box, enable all the scripts you want to automatically run directly after the simulation is processed.
Tip: You can also manually apply scripts at any time during your Rocky project. (See also Manually Apply a Saved Script.)
See Also:
From the PrePost Script panel, select the tab containing the script you want to edit.
Click the Open PrePost Scripts Directory button.
From the directory dialog, right-click the script file you want to edit, open it with your favorite Python editor, modify it as desired, and then save the file as a PY extension. Notes:
In order for Rocky to recognize it and have it show within the PrePost Script panel, the script file name must begin with
script_. For example:script_video settings.pyA Rocky script not named in this exact way may still be used but will not be listed within the PrePost Script panel. Instead, these scripts must be launched from outside of Rocky. (See also Use the Command Line to Play a Script.)To work properly in this version of Rocky, the Python 3 programming language must be used. (See also My old script no longer works.)
Tip: Scripts also have access to the Rocky's API:PrePost functionality, which can be explored in the following ways:
By using the Python Shell panel. (From the Tools menu, click Python Shell.) (See also Customize and Extend Rocky with Python.)
By using the Contents, Search, or Index tabs within the API:PrePost Manual. (From the Rocky Help menu, point to Manuals and then click API:PrePost Manual.)
See Also:
Ensure the PrePost Script panel is displayed. (From the Tools menu, click PrePost Script.)
Ensure also that you have saved your Rocky project. (See also Save a Simulation Project.)
From the PrePost Script panel, do one of the following:
To copy a shared script to the current project folder, select the Scripts shared across projects tab. Tip: Follow this procedure if you want to do either or both of the following:
Automatically apply a script either directly before and/or after the project is processed. (See also Automatically Apply Scripts Directly Before or After Processing.)
Include the script in your Rocky Archive. (See also Archive a Simulation Project.)
To copy a current project script to the folder shared with all other projects, select the Project scripts tab.
Right-click the name of the script you want to copy, and then click Copy Prepost Script to project. The script you selected now appears on the other PrePost Script panel tab. In addition, any copies on the Project scripts tab now also appear on the Solver PrePost Scripts list. (See also Automatically Apply Scripts Directly Before or After Processing.)
See Also:
From the PrePost Script panel, select the tab containing the script you want to remove.
Right-click the name of the script you want to remove, and then click Remove. The script name is removed from the PrePost Script panel. The script PY file is also removed from the Script directory. If the script was removed from the Project scripts tab, then it was also removed from the Solver | PrePost Scripts boxes. (See also Automatically Apply Scripts Directly Before or After Processing.)
See Also:
Note: Renaming a script affects only what is shown in the Rocky UI. It does not change the PY file name that is saved in the PrePost Scripts directory.
From the PrePost Script panel, select the tab containing the script you want to rename.
Right-click the name of the script you want to rename, and then click Rename.
From the Renaming PrePost Script dialog, enter a new name for the script, and then click OK. The script's new name appears in the PrePost Script panel. If the renamed script was on the Project scripts tab, the name in the Solver | PrePost Scripts boxes are also updated accordingly. (See also Automatically Apply Scripts Directly Before or After Processing.)
See Also: