


When you save a simulation project, you are saving into a .rocky file the various parameters you have specified in the Rocky user interface. When you choose to process a simulation, you will be asked to save the simulation project before processing. As you process, the simulation output files are saved automatically.
There are several different ways you can choose to save, copy, and archive your Rocky project, depending upon your goals. See sections below for details.
You can save the full project, including any results that have been generated, as a new project by specifying a project name and location for the .rocky and related project files. (See also Save a New Simulation Project.)
Once the project has been saved, you can continue to Save Over the Current Simulation Project as needed.
If you want to save a copy of all or part of the Rocky project for building upon later, you have three options for doing so:
Archiving a project is similar to saving a copy of the simulation, but packages it in a format easier sharing with support. (See also Archive a Simulation Project.)
You can also choose to save an image of what is currently being shown in the Workspace. Save an image when you need only a static snapshot of one moment during the simulation. (See also Save an Image of the Rocky Window.)
What would you like to do?
See Also:
From the File menu, click Save.
In the Save in list, click the drive or folder of the location to which you want to save the file.
In the File name box, enter a name for the file, and then click Save.
Tip: You can see the full path of the saved project file on the "Study" entity. (See also About Study Parameters.)
See Also:
From the File menu, click Save As.
From the Save As dialog, choose the first option, "Save As a New Project and Copy Simulation Results", and then click OK.
In the Save in list, click the drive or folder of the location to which you want to save the file.
In the File name box, enter a name for the file, and then click Save.
Tip: You can see the full path of the saved project file on the "Study" entity. (See also About Study Parameters.)
See Also:
Note: If you do not want to save the results of your simulation, but you do want to reuse your setup parameters as a basis for your next analysis, you can also choose to delete the simulation results. (See also Delete the Results of a Simulation (But Keep the Setup).)
From the File menu, click Save As.
From the Save As dialog, choose the second option, "Save As a New Project but DON'T Copy Simulation Results," and then click OK.
In the Save in list, click the drive or folder of the location to which you want to save the file.
In the File name box, enter a name for the file, and then click Save.
Tip: You can see the full path of the saved project file on the "Study" entity. (See also About Study Parameters.)
See Also:
This procedure is useful in situations where you will be reusing the beginning part of a processed simulation as a starting place for other, new simulations. This saves you from having to repeat the beginning portions of a simulation over and over, conserving processing time. Some examples of when this might be useful include:
Pre-filling a large bin or container with particles
Changing-out boundaries in the latter part of a long chute or conveyor system
Important: Because you are saving a copy of an already processed simulation, you will lose the ability to see timestep files within the copy prior to the point you have saved it, and the processing time will be reset to zero (0).
The main requirement for this procedure is that there must be particles released into the simulation at the timestep you select when the copy is made. If the selected timestep is zero or is at a point prior to when particles are released into the domain, no restart copy will be saved.
In this version of Rocky, you can save for restart purposes a partially processed copy of nearly any type of simulation, including those involving 1-Way LBM CFD Coupling, and all kinds of 1- and 2-Way Fluent coupling. (See also Set or Modify Fluid and/or Air Flow Properties.)
Although Rocky allows you to save for restart purposes a simulation with breakage enabled, it is important to know that any broken fragments that are in the simulation at the time you choose to save a copy of it will not be saved in the copy. (See also Enable Particle Breakage Calculations.)
In addition, if you have chosen to use parametric expressions in certain Start Time and Stop Time fields, only the resulting value and not the variables and/or mathematical functions will be retained in the copy you have saved for restart purposes. (See also I get a "Links removed" message when I save my project for restart purposes.)
Tip: Not all parameters in Rocky will be editable in your simulation copy. To learn more about what can and cannot be edited, including special considerations for Particle Inputs and Motion Frames, see About Changing Geometries and/or Particles in a Partially Processed Simulation.
From the Time toolbar, ensure that the current timestep is set to the point at which you want the new copy to begin. (See also Use the Time Toolbar to Change the Current Timestep.) Note: There must be particles released into the domain at the timestep you select otherwise a copy will not be saved.
From the File menu, click Save project as….
From the Save Options dialog, choose the third option, "Save as a New Project for Restart", and then click OK. Note: This dialog will only appear if your simulation has been processed far enough to have results.
In the Save File dialog, select the folder in which you want to save the project copy.
In the File name box, enter a name for the new file, and then click Save.
Note: When you open the copy, the beginning timestep will be reset to zero (0) but the simulation will start from the output file you choose in step #1.
Tips:
Before you process your simulation copy, you may want to first Change Geometries and/or Particles in a Partially Processed Simulation.
You can see the full path of the saved project file on the "Study" entity. (See also About Study Parameters.)
To see a walk-through example of saving a copy of a Rocky project for restart purposes, refer to the following Workshop: Tutorial - Fluidized Bed in the Rocky Tutorial Guide
See Also:
From the File menu, click Save.
Tip: You can see the full path of the saved project file on the "Study" entity. (See also About Study Parameters.)
See Also:
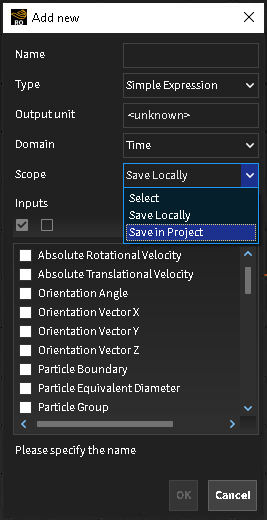
When adding a custom property or a custom curve, you can select in the Scope option whether you want to save it in the project, so that this curve or property is sent together when sharing the project, or save it only locally.

In the Workspace, select the 3D View, Motion Preview, Particles Details, Plot, or Histogram window for which you want to save an image.
From the Window menu, click Save Image. The Snapshot dialog appears.
From the Snapshot dialog, enter a folder location, File Name and Save as Type information, and then click Save. The image is saved to the location you chose and Rocky asks you whether you want to open the snapshot.
Tips:
If you want more control over the dimensions of your image, export your image from the Window Editors panel. (See also Save a Snapshot of the Rocky Window.)
To make a copy the image instead of saving it, right-click the area within your window, point to Copy, and then click Image. A copy of the image will be placed on the clipboard for you to paste into an image editor or other program.
See Also: