


To get more help understanding the features and capabilities of Rocky, please consult the following resources.
Table 1: Product Documentation
Resource | Description | Location |
Rocky User Manual (this resource) | Provides feature descriptions, parameter definitions, and step-by-step instructions for accomplishing various setup, processing, and post-processing tasks using the Rocky program's User Interface (UI). It is tied to the Rocky product version and receives updates with new software releases. | From within the Ansys Rocky program, click Help, point to Manuals, and then click User Manual. |
|
Rocky SPH Technical Manual |
Provides a brief description of the Smoothed-Particle Hydrodynamics (SPH) method and details the specific models and calculations used within the Ansys Rocky program. |
From within the Ansys Rocky program, click Help, point to Manuals, and then click SPH Technical Manual. |
Rocky Technical Manual | Provides a brief description of the Discrete Element Method (DEM) and details the specific models and calculations used within the Ansys Rocky program. | From within the Ansys Rocky program, click Help, point to Manuals, and then click DEM Technical Manual. |
Rocky CFD Coupling Technical Manual | Provides best practices for using the Ansys 1- and 2-Way Fluent coupling methods within Rocky and explains some limitations of their usage. | From within the Ansys Rocky program, click Help, point to Manuals, and then click CFD Coupling Technical Manual. |
Rocky PrePost scripting Manual | Lists the PrePost scripting functionality that can be used to create and modify Python scripts for automating tasks in Rocky. | From within the Ansys Rocky program, click Help, point to Manuals, and then click PrePost scripting Manual. |
Rocky Solver SDK Manual | Lists the Solver SDK functionality that can be used to create and modify custom external Modules. Also includes instructions for using the SDK and setting up your programming environment, and also provides sample code you can use as examples. | From within the Rocky program, click Help, point to Manuals, and then click Solver SDK Manual. |
Table 2: Training and Support
Resource | Description | Location |
Ansys Customer Portal | Access self-guided Rocky workshops and installation instructions; download example scripts, modules, and the Calibration Suite; submit a customer support request or check-up on existing requests; and more. | Visit the support.ansys.com/portal/site/AnsysCustomerPortal page of the Ansys Customer Portal, and then sign in as instructed. If you do not already have sign-in information for the customer portal, please contact your Rocky representative for assistance. |
Rocky Training | Sign-up for the next Rocky training session to get a better understanding of how Rocky can help you improve your designs, and get hands-on experience using the product. | Please contact your Rocky representative or Submit a Support Request and ask for the latest training schedule. |
What would you like to do?
The Rocky Support Team is available to help answer your questions about Rocky, provide assistance with licenses, report issues or mistakes in the software or documentation, help you troubleshoot issues with the software, and more.
To contact the Rocky Support Team, please access the Ansys Customer Portal.
Note: If you do not already have sign-in information for the customer portal, please contact your Rocky representative for assistance.
This method should result in an automatic email being sent to your account, including the ticket number for your tracking purposes. A member of support will typically respond to your request within 1 business day. Once you receive the response, you may either continue to correspond to support through email, or through the customer portal.
Tip: It can help provide context if you include an illustrative screenshot or even a copy of the simulation project your question is regarding. (See also Include a Simulation Project in a Support Request.)
See Also:
When submitting a support request, it can help expedite the process if you provide a copy of the simulation project to which your request pertains. In this way, the support team can gain additional context as to your unique situation, and can provide answers appropriately.
Note: If your project has already been processed and contains Timesteps, the associated files will likely be too large to send to support. It is therefore important to first save a copy (without results) of the project before you send it. See below for details.
In Rocky, open the project you want to include with your support request.
Do one of the following:
If the project has already been processed (has Timesteps), follow the instructions to Save a Copy of Only the Simulation Settings; Not the Simulation Results.
If the project has not yet been processed (has no Timesteps), continue to step 3.
With your unprocessed project (no results) open, do one of the following:
To have Rocky automatically prepare an archive folder with all the files support needs, follow the instructions to Archive a Simulation Project.
To manually prepare your own folder with all the files support needs, Zip or 7zip the Rocky project (with no results), its associated project folder, and any custom particle .stl files you used in the project setup. Tip:The project folder will have the same prefix as the project file. For Example: If your project file is called "my_project.rocky", then you should zip both the "my_project.rocky" file and the "my_project.rocky.files" folder that is next to it.
Attach the .rocky_archive, Zip or 7zip folder to the ticket when submitting your support request. (See also Submit a Support Request.)
See Also:
Archiving a simulation project saves all the associated setup information, post-processing analyses, and results (Timesteps) for your project-including any scripts you have saved to the Project scripts tab of the PrePost Script panel. (See also About Creating and Using PrePost Scripts.)
For simulations that have already been processed, this can result in a very large file; therefore, the user has the possibility of archiving the project without the results. This will result in a much smaller file that can be more easily shared. (See also Include a Simulation Project in a Support Request.)
Note: Depending upon the geometries and other setup criteria, archiving only the simulation setup portion of your Rocky project may still result in a large archive file, but should still be smaller than archiving the entire processed simulation.
From the File menu, click Archive project;
From the Archive Options select one between the options Archive project with Simulation Results or Archive project WITHOUT Simulation Results;
From the Archive project dialog, choose the drive or folder of the location to which you want to save the file, verify the File name, and then click Save;
From the Project saved message, click Yes to open the directory. The .rocky_archive file that you just saved is shown.
See Also:
If you discover an issue or run into an unexpected error while using the Rocky software, please report it to Customer Support by Submitting a Support Request.
In your request, please include the following information:
A short description of the behavior you are reporting.
Step-by-step instructions for reproducing the behavior.
Detail regarding the behavior you expected to see followed by the actual results you experienced.
See Also:
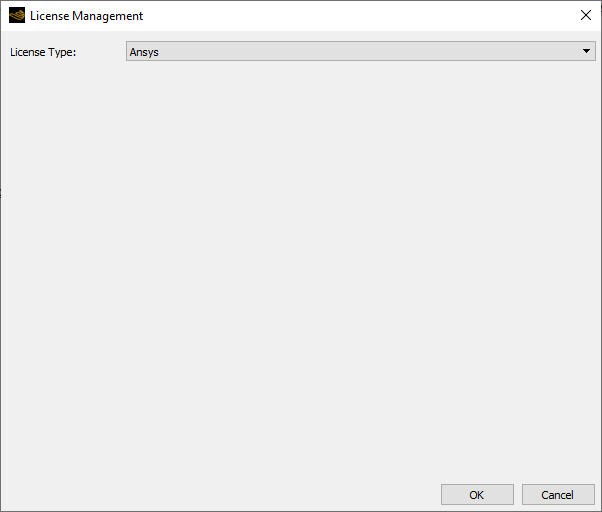
From the Rocky Help menu, click License Info.
From the License Management dialog, look to the right of License Type. If your license is valid and set up correctly, you should see Ansys listed (Figure 1).
See Also:
The Help viewer is the tool that organizes and displays all the information within the Rocky Offline User Manual and the API:PrePost Manual. There are several features within the Help viewer that can assist you with finding the information you need quickly. See the sections below for tips and other useful details.
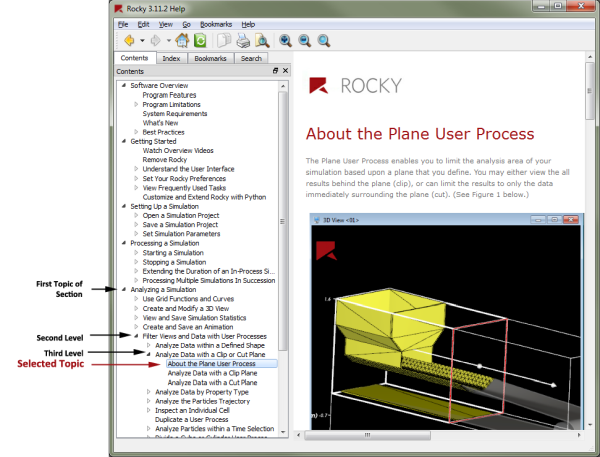
Once the Rocky Help window is open, click the Contents tab (Figure 1) to explore topics by task. Use the arrows to expand sections to see more detailed child (sub) topics.
Alternately, you can use the Search tab (Figure 2) to find topics by a specific word or phrase. Before you begin your search, it can help to be aware of the following:
There is currently no autocorrect functionality, so be sure to use correct spelling. Tip:It can sometimes help to exactly match your search words to the terminology you see in the UI itself.
Search is not case sensitive; so, for example "Cube", "cUbe", and "CUBE" are all treated the same.
Standard search does not always work well with special characters, such as dashes, hyphens, and colons. Tip:In cases with special characters, for example "intra-particle" or "Impact : Normal", it is best to put the word or phrase you want in quotes.
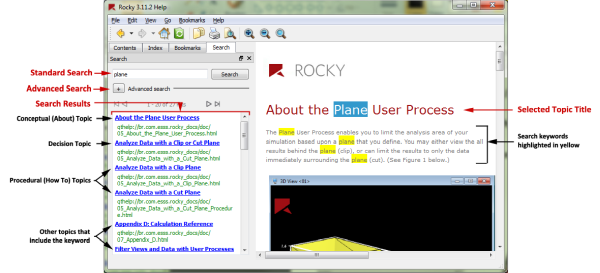
Table 1 below describes some common search patterns and results you might expect to get.
Table 1: Example standard search patterns and results
When you search by this… | The results list… |
|---|---|
rolling | All topics that contain the word "rolling" |
rolling* | All topics that contain a word beginning with "rolling" |
rolling resistance | All topics that contain both "rolling" and "resistance" |
"rolling resistance" | All topics that contain the phrase "rolling resistance" |
Due to the way search works, putting exact phrases in quotes, for example "rolling resistance" can help you find specific parameter definitions.
If you still have trouble finding what you want using standard search, try using the Advanced search to find exact phrases or words similar to the ones you are looking for. You can specify some words so that hits containing these are excluded from the result, or you can search for an exact phrase.
The list of results that appears is ordered according to how often the search text was found within that topic; those topics containing the highest number of occurrences appears first.
Click the topic name to preview where the search term appears in that topic; these locations will be highlighted in yellow. Choose topics starting with "About" to see conceptual information, including tables defining parameter settings. Or choose how-to topics to see the specific steps required to accomplish the task listed.
For example, if you want to understand more about Eulerian Statistics, then from the Search tab, type "Eulerian" to see a list of topics where that term is referenced. The first result in the list is "About Eulerian Statistics," which will give you information about what Eulerian Statistics are, how they work in Rocky, and will also define the various settings required to enable them in your simulation.
If you scroll to the very bottom of that topic, you will see suggestions of what you might like to do next. One of those suggestions is "Divide a Cube or Cylinder User Process into Many Analysis Blocks," which provides you step-by-step instructions for accomplishing the task, along with links to supporting information should you require it.
If you then click the Sync with Table of Contents  button, you will be automatically taken to that topic's location in
the hierarchy on the Contents tab, where you can see what other topics might be related to it, giving you yet another
way to explore the subject matter you are interested in.
button, you will be automatically taken to that topic's location in
the hierarchy on the Contents tab, where you can see what other topics might be related to it, giving you yet another
way to explore the subject matter you are interested in.
Within the topic, the Help viewer will highlight in yellow the word or phrase for which you searched (Figure 2). But if you would rather not scroll through the topic looking for highlighted words, you can also just search for that same word within the topic you have open. To do this, just press the Find in Text button (Figure 3) or press Ctrl+F within the topic and enter the word or phrase in the search field that appears at the bottom of the viewer.
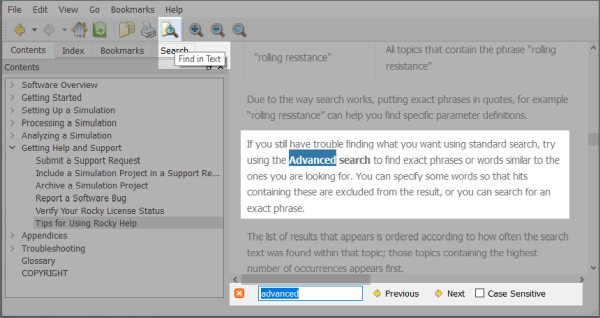
This technique can be especially useful in long topics where scrolling can be cumbersome.
Sometimes, it can be useful to have a printed copy or a PDF of content that you access frequently. One way you can do this within the Help viewer is to Print the selected topic. To do this, from the Help viewer's File ** menu, select **Print and then from the Print dialog, choose the PDF or other printer you want to use.
If you find that the text in the topic itself is too small to see clearly, you can adjust the size by using the Zoom buttons at the top of the window (Figure 4).

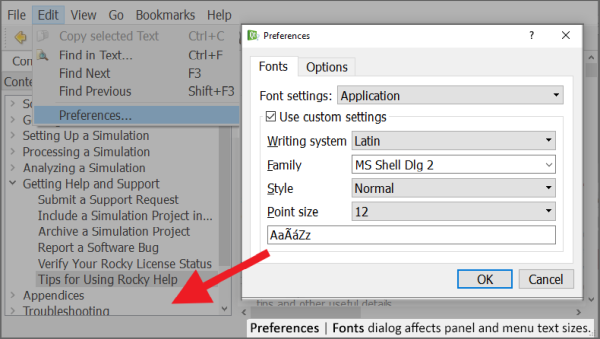
If you find that the text in the Contents or other panels, menus, or dialogs for Rocky Help are too small to see clearly, you can change the font size as follows (also shown in Figure 5):
From the Edit menu, select Preferences.
From the Preferences dialog, on the Fonts tab, change Font Settings to Application.
Enable the Use custom settings checkbox and then increase the Point size as desired.
Click OK to see the changes applied.
Just like in the Rocky UI, Rocky Help includes various panels that you can resize, move, float, dock, and nest with other panels (see also About Panels). Unlike the Rocky UI, however, there is no reset layout functionality for the Help viewer. So if you lose access to panels that you used to have, you can enable them again from the View menu.
Qt Assistant is the help wrapper used by Rocky Help. For more information about the functionality included in this package-including how to move and dock the Tool Windows, understand the Toolbars, adjust the level of zoom, and more-refer to the article Qt Assistant in More Detail.
See Also: