


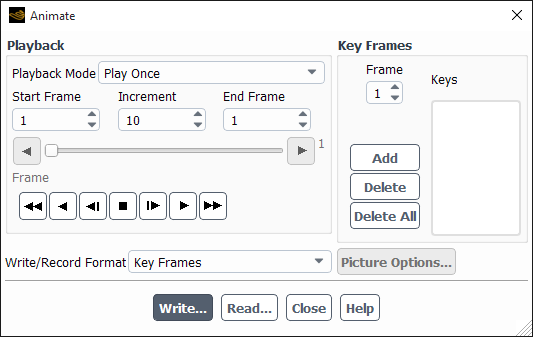
To generate animations that progress from one static view of the graphics display to the next, you can set up “key frames” (individual static images) using the Animate Dialog Box (Figure 40.108: The Animate Dialog Box).
![]() Results → Animations → Scene Animation
Results → Animations → Scene Animation ![]() Edit...
Edit...
You can compose a scene in the graphics window and define it as a single key frame. Then, modify the scene by moving or scaling objects, making some objects invisible or visible, changing colors, changing the view, or making other changes, and define the new scene as another key frame. Ansys Fluent can then interpolate smoothly between the two frames that you defined, creating a specified number of intermediate frames.
If you want to create a graphical animation of the solution over time, you can use Figure 36.54: The Animation Definition Dialog Box to set up the graphical displays that you want to use in the animation. You can choose the type of display you want to animate by selecting it from the Animation Object list or by creating a new animation object. For details on animating the solution, see Animating the Solution. For more information on generating, displaying, and saving pathlines and particle tracks, refer to Displaying Pathlines. See Displaying Results on a Sweep Surface for information about displaying the mesh, contours, or vectors on a surface that sweeps through the domain.
Note:
"Key frame" animations created through the Animate dialog box are not compatible with iso-surfaces.
"Key frame" animations of pathlines are only supported for the non-persistent/"global" version of the Pathlines dialog box that does not have a Name field. This version of the Pathlines dialog box is accessed by right-clicking Pathlines in the Outline View tree and selecting Edit....
You must enable Expose legacy non-persistent graphics in the Graphics branch of Preferences (File > Preferences...) to see the Edit... option for pathlines as described above.
For additional information, see the following sections:
You can define any number of key frames (up to 3000) to create your animation. By assigning the appropriate numbers to the key frames, you provide the information Ansys Fluent needs to create the correct number of intermediate frames. For example, to create a simple animation that begins with a front view of an object, moves to a side view, and ends with a rear view of the object, you would follow the procedure outlined below:
Determine the number of frames that you want in the animation. For this example, consider the animation to be 31 frames.
Determine the number of key frames that you need to specify. In this example, you will specify three: one showing the front view, one showing the side view, and one showing the rear view.
Determine the appropriate key frame numbers to assign to the 3 specified frames. Here, the front view will be specified as key frame 1, the side view will be key frame 16, and the rear view will be key frame 31.
Compose the scenes for each view to be used as a key frame. You can use the Scene Description Dialog Box (see Advanced Scene Composition) and the Views Dialog Box (see Controlling the Display State and Modifying the View) to modify the display, and any other dialog boxes or commands to create contours, vectors, pathlines, and so on to be included in each scene. After you complete each scene, create the appropriate key frame by setting the Frame number and clicking under Key Frames in the Animate Dialog Box. For special considerations related to key frame definition, see Notes on Animation.
Important: Be sure to change the Frame number before clicking , or you will overwrite the last key frame that you created.
You can check any of the key frames that you have created by selecting it in the Keys list. The selected key frame will be displayed in the graphics window.
When you complete the animation, you can play it back as described in Playing an Animation and/or save it as described in Saving an Animation.
Once you have defined the key frames (as described in Creating an Animation) or read in a previously created animation file (as described in Reading an Animation File), you can play back the animation and Ansys Fluent will interpolate between the frames that you specified to complete the animation.
To play the animation once through from start to finish, click the “play” button under the Playback heading in the Animate Dialog Box. (The buttons function in a way similar to those on a standard video cassette player. “Play” is the second button from the right—a single triangle pointing to the right.) To play the animation backwards once, click the “play reverse” button (the second from the left—a single triangle point to the left). As the animation plays, the Frame scale shows the number of the frame that is currently displayed, as well as its relative position in the entire animation. If, instead of playing the complete animation, you want to jump to a particular key frame, move the Frame slider bar to the desired frame number, and the frame corresponding to the new frame number will be displayed in the graphics window.
Additional options for playing back animations are described below. Be sure to check Notes on Animation as well for important notes about playing back animations.
You may sometimes want to play only one portion of a long animation. To do this, you can modify the Start Frame and the End Frame under the Playback heading in the Animate Dialog Box. For example, if your animation contains 50 frames, but you want to play only frames 20 to 35, you can set Start Frame to 20 and End Frame to 35. When you play the animation, it will start at frame 20 and finish at frame 35.
You can "fast-forward" or "fast-reverse" the animation by skipping some of the frames during playback. To fast-forward the animation, set the Increment and click the fast-forward button. If, for example, your Start Frame is 1, your End Frame is 15, and your Increment is 2, when you click the fast-forward button (the last button on the right—two triangles pointing to the right), the animation will show frames 1, 3, 5, 7, 9, 11, 13 and 15. Clicking on the fast-reverse button (the first button on the left—two triangles pointing to the left) will show frames 15, 13, 11,...1.
If you want the playback of the animation to repeat continuously, there are two options available.
To continuously play the animation from beginning to end (or from end to beginning, if you use one of the reverse play buttons), select Auto Repeat in the Playback Mode drop-down list in the Animate Dialog Box.
To play the animation back and forth continuously, reversing the playback direction each time, select Auto Reverse in the Playback Mode drop-down list.
To turn off the continuous playback, select Play Once in the Playback Mode list. This is the default setting.
To stop the animation during playback, click the "stop" button (the square in the middle of the playback control buttons). If your animation contains very complicated scenes, there may be a slight delay before the animation stops.
To advance the animation manually frame by frame, use the third button from the right (a vertical bar with a triangle pointing to the right). Each time you click this button, the next frame will be displayed in the graphics window. To reverse the animation frame by frame, use the third button from the left (a left-pointing triangle with a vertical bar). Frame-by-frame playback enables you to freeze the animation at points that are of particular interest.
Once you have created your animation, you can save it in any of the following formats:
Animation file containing the key frame descriptions
Picture files, each containing a frame of the animation
MPEG file containing each frame of the animation
Note that MPEG is not supported for saving on Ubuntu operating systems.
You can save the key frame definitions to a file that can be read back into Ansys Fluent (see Reading an Animation File) when you want to replay the animation. Since the animation file will contain only the key frame definitions, you must be sure that you have a case and data file containing the necessary surfaces and other information referred to by the key frame descriptions.
To write an animation file, select Key Frames in the Write/Record Format drop-down list in the Animate Dialog Box, and click . In The Select File Dialog Box, specify the name of the file and save it.
You can also generate a picture file for each frame in the animation. This feature enables you to save your animation frames to picture files used by an external animation program such as ImageMagick. To save the animation as a picture file, follow these steps:
Select Picture Files in the Write/Record Format drop-down list in the Animate Dialog Box.
If necessary, click to open the Save Picture Dialog Box and set the appropriate parameters for saving the picture files. (If you are saving picture files for use with ImageMagick, for example, you may want to select the window dump format. See Window Dumps (Linux Systems Only) for details.) Click in the Save Picture Dialog Box to save your modified settings.
Important: Do not click in the Save Picture Dialog Box. You will save the picture files from the Animate Dialog Box in the next step.
In the Animate Dialog Box, click . In The Select File Dialog Box, specify the filename and click to save the files. (See Window Dumps (Linux Systems Only) for information about specifying filenames that increment automatically as additional pictures are saved.) Ansys Fluent will replay the animation, saving each frame to a separate file.
It is also possible to save all of the frames of the animation in an MPEG file, which can be viewed using an MPEG decoder such as mpeg_play. Saving the entire animation to an MPEG file will require less disk space than storing the individual window dump files (using the picture method), but the MPEG file will yield lower-quality images. To save the animation to an MPEG file, follow these steps:
Select MPEG in the Write/Record Format drop-down list in the Animate Dialog Box.
In the Animate Dialog Box, click . In The Select File Dialog Box, specify the filename, and click to save the files.
Ansys Fluent replays the animation and saves each frame to a separate scratch file; it then combines all of the files into a single MPEG file.
If you have saved the key frames defining an animation to an animation file (as described in Saving an Animation), you can read that file back in at a later time (or in different session) and play the animation. Before reading in an animation file, be sure that the current case and data contain the surfaces and any other information that the key frame description refers to.
To read an animation file, click in the Animate Dialog Box. In The Select File Dialog Box, specify the name of the file to be read.
When you are creating and playing back animations, note the following:
For smoother animations, enable the Double Buffering option in the Display Options Dialog Box (see Modifying the Rendering Options). This will reduce screen flicker during graphics updates.
When you are defining key frames, you must create all geometric objects that will be used in the animation before you create any key frames. You cannot create a key frame using one set of geometric objects and then generate a new geometry (such as a vector plot) and include that in another key frame. Create all geometric objects first, and then use the Display Properties Dialog Box to control the visibility of the objects in each key frame (see Controlling Visibility).
A single animation sequence can contain up to 3000 key frames.
When you play back an animation, the colormap used will be the one that is currently active, not the one that was active during “recording.”