


Once you have completed a simulation, you might want to save the results as an animation file so that you can view it and share it outside of Rocky.
You can use any type of view window as a basis for setting up an animation, including 3D View, Motion Preview, and Particles Details windows.
What would you like to do?
Learn more About Creating and Saving an Animation
Use the View in the Window to Change the Qualities of a Key Frame
Use the View in the Key Frame to Edit the Qualities of that Key Frame
Edit the Settings and Key Frames Included in an Already Set-Up Animation
Save a Static Image of Each Individual Frame in an Animation
See Also:
Animations are saved as AVI files, which can be opened with many types of media players, and can be set to show linear and spline transitions, 360° wraparound views, and variable frame rates.
When you create an animation, you can choose which portion of the simulation files to include, enabling you to make an animation of the whole simulation or just a portion of it.
You can create an animation based upon any one of the view window types in Rocky, including 3D Views, Motion Previews, and Particles Details windows. Any visualization settings that you have set for the view window including the colors, particle shapes, labels, and view angles, will also be replicated in the animation exactly as shown in the window, so it is important to ensure that those settings are as you want before adding your Key Frames.
Important: Animation settings are linked to a single view window. The window that is active when you start adding your Key Frames is the one linked to the Animation settings that are shown. While a single Animation set can be based on only a single window, you may have as many different Animation sets as you have open view windows. Because of this relationship, however, you will also lose your Animation settings if you close the window to which the Animation is linked. If that happens, you can use the Undo function to get your settings back. (See also Undo or Redo a Single Action at Once).
Tips:
For precise animations requiring exact positioning and sequencing regardless of the timestep, consider using Custom Cameras when creating your Key Frames.
For creating many similar animations of different simulations, consider using Rocky's script tool to record a repeatable set of UI tasks. (For more information, see Creating and Using Your Scripts).
To see a walk-through example of creating an animation, refer to the following Workshop:
Tutorial - Transfer Chute in the Rocky Tutorial Guide
Use the figure and table below to understand the various parameters you can set for your animation file.
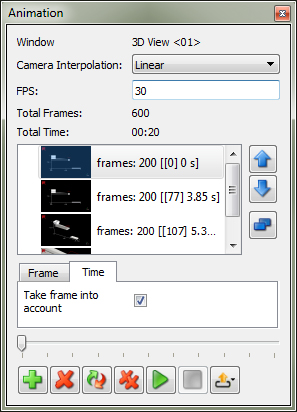
Table 1: Animation Options
Setting | Description | Range |
|---|---|---|
Window | Displays the name of the selected Rocky window to which the current Animation settings apply. | Automatic value |
Camera Interpolation | Determines the type of transition between Key Frames:
| Linear; Spline; No Interpolation |
FPS | Sets how many Frames Per Second (FPS) the animation will include. A higher FPS will produce a shorter, faster video with higher-quality playback. A lower FPS will produce a longer, slower video with lower-quality playback. | Positive value (20 is recommended for most animations) |
Total Frames | Shows how many frames will be included in the overall animation. This number is automatically calculated based upon the Key Frames selected, the FPS, and the Number of Frames values that are set. | value |
Total Time | Shows the length of the animation in real time. This number is automatically calculated based upon the Key Frames selected, the FPS, and the Number of Frames values that are set. | Automatic value |
Take frame into account | When this check box is selected, the Key Frame will show during the animation the progressive simulation results for the time frame until the next Key Frame. When the check box is cleared, the selected Key Frame will show only a static image of the simulation results until the next Key Frame. | Turns on or off |
Number of Frames | Sets how many individual frames this Key Frame will be separated into. These are the number of frames used before the next Key Frame is activated. The minimum number of frames that can be set is 2. Tip: If you want your animation to reflect real time, it is important to keep your frame rate consistent. A general rule of thumb is to set the Number of Frames value equal to the number of seconds between Key Frames multiplied by the FPS you have set. #Frames = #s x #FPS Example: If you set your Key Frames to start at 0s, 10s, 15s, and 20s respectively, and you want a FPS of 10 and a real time video of 20s, then:
| 2 or more |
What do you want to do?
See Also:
Open the simulation containing the results you want to animate.
Ensure the Animation panel is visible. (From the Tools menu, click Animation.)
Create a Key Frames list by doing the following:
Find or create a view window (3D View, Motion Preview, or Particles Details) with the visualization settings you want to animate, including the rotation and level of zoom. Note: This window will be linked to the animation settings that follow.
Using the Timestep dropdown and/or arrows in the toolbar, choose the particular timestep with which you want your animation to start. (For example, if you want your animation to start at the beginning, choose the [0] 0 s timestep.)
From the bottom of the Animation panel, click the Add Key Frame button. An image of the timestep and view you created shows in the Key Frames list.
Set up your next Key Frame by doing one of the following:
To show the same view for a period of time, move only your timestep forward as desired but don't change the view.
To transition to another view over a period of time, move your timestep forward and change your view as desired.
From the bottom of the Animation panel, click the Add Key Frame button. An image of the new timestep and view you created shows in the Key Frames list.
Repeat steps 3d-3e as many times as necessary to complete your animation set up. Tip:Use the buttons at the bottom and side of the Animation panel to help you delete, copy, move, and update Key Frames that you've already created.
From the top of the Animation panel, determine what kind of transitions you want between your Key Frames by choosing an option from the Camera Interpolation list. (See also About Creating and Saving an Animation.)
Determine the speed, length, and quality of your animation by setting the values you want in the FPS field for the animation, and Number of Frames field for each Key Frame. Use the values displayed for Total Frames and Total Time to guide you in your selections.
At the bottom of the Animation panel, click the Play button to view a preview of your animation in the Rocky Workspace, and then edit your Key Frames and animation options as desired.
To transition quickly between views, leave no Timestep gap between Key Frames.
To transition slowly between views, leave a Timestep gap between Key Frames equal to the desired transition length.
To create a 360° wraparound view, include five Key Frames—the first and last with the same exact view, the third at a point halfway around the desired rotation path, and the second and forth views at opposite points in between. For a smooth transition, ensure equal Timestep gap settings between views. For example, create Key Frames at the following camera presets and Timesteps: Z [5s], X [6s], -Z [7s], -X [8s], Z [9s].
See Also:
Change what is shown in the view window (3D View, Motion Preview, or Particles Details) by doing any or all of the following:
From the view window upon which the animation is based, modify the visualization settings as desired, including the rotation and level of zoom.
From the Time toolbar, use the dropdown menu and/or arrows to change the timestep as desired. (See also About the Time Toolbar.)
From the Animation panel, change the Number of frames value as desired.
From the Animation panel, select the Key Frame to which you want to apply the changes.
At the bottom of the Animation panel, click the Update Current Key Frame button. The image of the Key Frame and its settings are updated to match the 3D window accordingly.
See Also:
From the Animation panel, double-click the Key Frame you want to edit. The Key Frame view and timestep location is displayed in the view window (3D View, Motion Preview, or Particles Details) upon which the animation is based.
Do any or all of the following:
From the view window, modify the visualization settings as desired, including the rotation and level of zoom.
From the Time toolbar, use the dropdown menu and/or arrows to change the timestep as desired. (See also About the Time Toolbar.)
From the Animation panel, change the Number of frames value as desired.
At the bottom of the Animation panel, click the Update Current Key Frame button. The image of the Key Frame and its settings are updated accordingly.
See Also:
From the Workspace, select the view window (3D View, Motion Preview, or Particles Details) upon which the animation you want to change is based. The Animation panel displays the Key Frames and settings for the selected window.
Do any or all of the following:
Change the Camera Interpolation and/or FPS values as desired.
Change the order of a Key Frame by first selecting it, and then using the buttons on the side of the Animation panel to move it up or down in the list.
Make a copy of an existing Key Frame by first selecting it, and then on the side of the Animation panel, clicking the Duplicate Key Frame button.
Remove a Key Frame by first selecting it, and then at the bottom of the Animation panel, clicking the Remove Key Frame button.
Delete all Key Frames in the animation by clicking the Remove All Key Frames button at the bottom of the Animation panel.
Create a new Key Frame by clicking the Add Key Frame button at the bottom of the Animation panel.
See Also:
Tip: Before saving your AVI file, ensure that you have the video compression and quality settings you want specified in the Options | Preferences dialog. For more information, see About Setting Global Preferences.
From the bottom of the Animation panel, click the Export Animation button, and then click AVI.
From the Export Animation to AVI dialog, choose the location to which you want to save the AVI file.
In the File name box, enter a name for the file, and then click Save. The Animation Export screen appears to show you the status of your save and a preview of the progress. When the save is complete, the Animation Export screen disappears and Rocky asks you if you want to open the AVI file you just saved.
See Also:
Tip: Before you start, review the Total Frames value displayed in the Animation panel to ensure you have set up your animation the way you want. The number of images exported will equal this value.
From the bottom of the Animation panel, click the Export Animation button, and then click Images.
Form the Export Animation to Images dialog, choose the location to which you want to save the series of images.
In the File name box, enter a name for the images and then from the Save as type list, choose what image format you want.
Click Save. The Animation Export screen appears to show you the status of your save and a preview of the progress. When the save is complete, the Animation Export screen disappears. Each image file name will be appended with the corresponding frame number.
See Also: