


In Rocky, the output time refers to any point in the simulation when an output file has been saved. By selecting different output times or by playing them in succession, you can analyze values calculated at different times within your simulation.
What would you like to do?
See Also:
The Time toolbar (shown below) is the where you change what simulation output time (also referred to as timestep) is currently being analyzed. What output time you select changes the values displayed in 3D Views, individual statistics, and animations, and determines the outcomes of settings like Particle Trajectories.

The Time toolbar enables you to select an individual output time based on the simulation time or output file, or play all available outputs sequentially in a loop. You can also limit the outputs shown on the Time toolbar to a certain range that you specify by using the Time Filter. This can be useful when using the Particles Time Selection User Process, defining Output variables, or when tagging Particles.
Note: Unless you have enabled the Auto Refresh option, the ouput values are updated during processing only when you choose to manually Refresh the results. (See also About Starting a Simulation.)
If you haven't yet processed your simulation, the slider on the Time toolbar will be highlighted yellow (as shown below) to indicate that it can be used for the Motion Preview window. (See also About Creating and Applying Motion Frames to Imported Geometries.)
Figure 5.188: Time Toolbar with slider highlighted in yellow to indicate its use during Motion Preview

When the slider is highlighted yellow, the toolbar represents only the motion-related preview of the expected output times, and does not reflect any other particle calculations that have been performed. A preview length equal to the Simulation Duration is provided (see also About Solver Parameters) with an upper limit of no more than 30,000 timesteps.
After processing, the Time toolbar goes back to its original function, and the highlighting is removed.
Use the images and table below to help you understand how to use the Time toolbar and Time filter to change the current timestep.
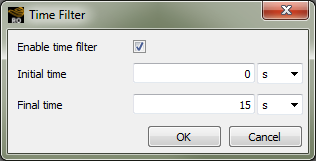
Table 1: Time Filter dialog options
Setting | Description | Range |
|---|---|---|
Enable time filter | When selected, allows you to define a time range by which to limit what outputs are displayed on the Time toolbar. | Turns on or off |
Initial time | Enables you to set the beginning value for the time range. | Any value |
Final time | Enables you to set the ending value for the time range. | Any value |
What would you like to do?
Learn more output time you want to display.
From the Time toolbar, use the Time list, slider, or other navigation buttons to select the output time you want to display.
Note: If you aren't seeing as many outputs as you expected, you might need to refresh your simulation results (see also About Starting a Simulation) or disable your Time Range (see also Limit Output Values by a Specific Time Range.)
Tip: To play a preview of your simulation, select a 3D View and then click the Play simulation button.
See Also:
From the Time toolbar, click the Timeset filter button.
From the Time Filter dialog, do all of the following:
Enable the Enable time filter check box.
Define the time range by entering the values you want in the Initial time and Final time boxes.
Click OK.
The output times available for display on the Time toolbar are now limited by the range you defined.
Tip: To remove the filter and show all available output times, from the Time Filter dialog, clear the Enable time filter checkbox, and then click OK.
See Also: