


An important step in the setup of the model is to define the materials and their physical properties. Material properties are defined using either the Materials Task Page or the Materials tree branch, where you can enter values for the properties that are relevant to the problem scope you have defined in the Models Task Page. These properties may include the following:
density and/or molecular weights
viscosity
heat capacity
thermal conductivity
UDS diffusion coefficients
mass diffusion coefficients
standard state enthalpies
kinetic theory parameters
Properties may be temperature-dependent and/or composition-dependent, with temperature dependence based on a polynomial, piecewise-linear, or piecewise-polynomial function and individual component properties either defined by you or computed via kinetic theory.
The Materials Task Page will show the properties that need to be defined for the active physical models. If any property you define requires the energy equation to be solved (for example, ideal gas law for density, temperature-dependent profile for viscosity), Ansys Fluent will automatically enable the energy equation. Then you have to define the thermal boundary conditions and other parameters yourself.
For additional information, see the following sections:
For solid materials, only density, thermal conductivity, and heat capacity are defined. If you are modeling semi-transparent media, then radiation properties are also defined. You can specify a constant value, a temperature-dependent function, or a user-defined function for thermal conductivity; a constant value or temperature-dependent function for heat capacity; and a constant value for density.
If you are using the pressure-based solver, density and heat capacity for a solid material are not required unless you are modeling transient flow or moving solid zones. Heat capacity will appear in the list of solid properties for steady flows as well. The value will be used just for postprocessing enthalpy; not in the calculation.
In Ansys Fluent, you can define six types of materials: fluids, solids, mixtures, combusting-particles, droplet-particles, and inert-particles. Physical properties of fluids and solids are associated with named material; these materials are then assigned as boundary conditions for zones.
When you model species transport, define a mixture material, consisting of the various species involved in the problem. Properties will be defined for the mixture, as well as for the constituent species, which are fluid materials. The mixture material concept is discussed in detail in Mixture Materials. Combusting-particles, droplet-particles, and inert-particles are available for the discrete-phase model, as described in The Concept of Discrete-Phase Materials.
Ansys Fluent provides the following built-in databases:
A built-in global database of approximately 675 predefined materials along with their properties and default values for each property. To define a material in the problem setup, you can copy materials from this global (site-wide) database and use the default properties or define new materials by editing their properties. The Ansys Fluent materials database is located in the following file:
path
/ansys_inc/v242/fluent/fluent24.2.0/cortex/lib/propdb.scmwhere path is the directory in which you installed Ansys Fluent.
A built-in database of more than 700 predefined solid materials with properties from the Ansys GRANTA Materials Data for Simulation (GRANTA MDS). A separate license is required for copying materials from the GRANTA MDS Database into the problem setup. Materials from the GRANTA MDS Database can be used in the same way as materials from the Ansys Fluent materials database.
A GRANTA MDS license is held for 30 minutes or until the program is closed, whichever is the sooner. Subsequent accesses of MDS data resets the timer. When no MDS license is available, only the description of the selected material will be displayed, but not its properties. The copy operation will abort with an information message.
In addition to using the Ansys Fluent material database, you can also create your own database and materials, and use it to define the materials in your problem setup. See Using a User-Defined Materials Database for information about creating and using user-defined custom material databases.
Important:
All the materials in your local materials list will be saved in the case file (when you write one). The materials specified by you will be available to you if you read this case file into a new solver session.
A material may co-exist as a pure substance fluid as well as a species in one or multiple mixture materials. The pure fluid and the species for each mixture are separate objects and may have independent property settings. Therefore, editing the properties of the pure fluid will not modify the same properties for that fluid included in the mixture. If you intend to modify some material properties, you can make a copy of the pure fluid, and rename it. Using the copy in the mixture makes it easier to understand which version of the fluid is being modified.
The Create/Edit Materials Dialog Box allows you to define the materials and their properties in your problem setup using either the Fluent Database or a User-Defined Database. It enables you to copy materials from a database, create new materials, and modify material properties.
These generic functions are described in this section. The inputs for temperature-dependent properties are explained in Defining Properties Using Temperature-Dependent Functions. The specific inputs for each material property are discussed in the remaining sections of this chapter.
The Create/Edit Materials Dialog Box can be accessed in one of two ways:
Through the Materials task page.
 Setup →
  Materials
Through the material types (Fluid, Solid, and so on) and defined in the case materials under Materials in the tree.
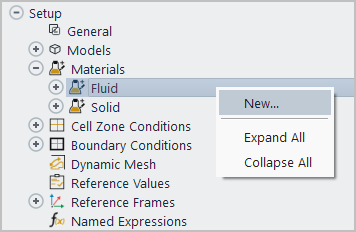
For example, if you want to create a new fluid material you can access the Create/Edit Materials dialog box as follows:
Setup → Materials → Fluid  New...
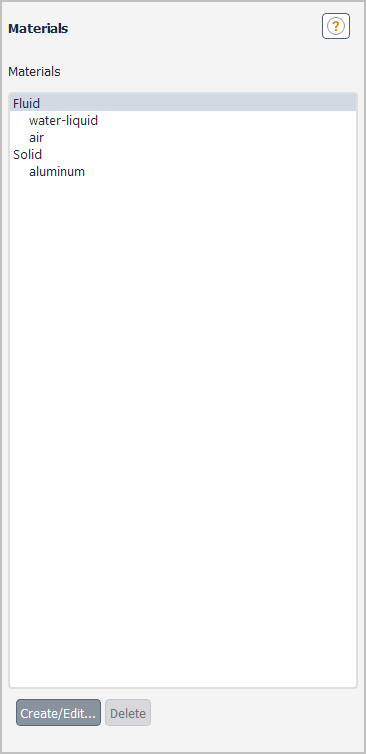
By default, your local materials list will include a single fluid material (air) and a single solid material (aluminum). If the fluid involved in your problem is air, you can use the default properties for air or modify the properties. If the fluid in your problem is water, you can either copy water from the Ansys Fluent database or create a new “water” material from scratch. If you copy water from the database, you can still make modifications to the properties of your local copy of water. See the following sections for detailed information on how to change material properties.
Mixture materials will not exist in your local list unless you have enabled species transport (see Modeling Species Transport and Finite-Rate Chemistry). Similarly, inert, droplet, and combusting particle materials will not be available unless you have created a discrete phase injection of these particle types (see Modeling Discrete Phase). When a mixture material is copied from the database, all of its constituent fluid materials (species) will automatically be copied over as well.
Probably, the most common operation you will perform in the Create/Edit Materials Dialog Box is the modification of properties for an existing material. The steps for this procedure are as follows:
In the Materials Task Page, select the material you want to modify and click the button. (You can also right-click the material in the tree and select Edit... from the material submenu.)
In the Create/Edit Materials Dialog Box select the type of material (fluid, solid, and so on) in the Material Type drop-down list.
Choose the material for which you want to modify properties, in the Fluent Fluid Materials drop-down list, Fluent Solid Materials list, or other similarly named list. The name of the list will be the same as the material type you selected in the previous step.
Make the required changes to the properties listed in the Properties section of the dialog box. You can use the scroll bar to the right of the Properties section to scroll through the listed items.
Click the button to change the properties of the selected material to your new property settings.
To change the properties of an additional material, repeat the process described above. Click the button after making changes to the properties for each material.
Each material is identified by a name and a chemical formula (if one exists). You can change the name of a material, but not its chemical formula (unless you are creating a new material). The procedure for renaming a material is as follows:
In the Materials Task Page, select the material you want to rename and click the button. (You can also right-click the material in the tree and select Edit... from the material submenu.)
In the Create/Edit Materials Dialog Box, choose the material for which you want to modify properties, in the Fluent Fluid Materials list, Fluent Solid Materials list, or other similarly named list. The name of the list will be the same as the material type you selected in the previous step.
Enter the new name in the Name field at the top of the Create/Edit Materials Dialog Box.
Important: The maximum character length you can enter in the Name field is 29. If you enter a material name that is more than 29 characters long, Ansys Fluent will print an error message in the console window.
Click the button.
A Question Dialog Box will appear, asking you if the original material should be overwritten.
If you are renaming the original material, click to overwrite it. If you were creating a new material, click to retain the original material.
To rename another material, repeat the process described above. Click the button after renaming each material.
The global (site-wide) materials database contains many commonly used fluid, solid, and mixture materials, with property data from several different sources [97], [131], [172], [66]. To use one of these materials in your problem, copy it from the Ansys Fluent database to your local materials list. The procedure for copying a material is as follows:
Click the button in the Create/Edit Materials Dialog Box to open the Fluent Database Materials Dialog Box (Figure 8.3: Fluent Database Materials Dialog Box).
Select the type of material (fluid, solid, and so on) in the Material Type drop-down list.
In the Fluent Fluid Materials list, Fluent Solid Materials list, or other similarly named list, choose the materials you want to copy by clicking on them. The properties of the selected material will be displayed in the Properties area.
To check the material properties, use the scroll bar to the right of the Properties area to scroll through the listed items. For some properties, temperature-dependent functions are available in addition to the constant values. Select one of the function types in the drop-down list to the right of the property and the relevant parameters will be displayed. You cannot edit these values, but the dialog boxes in which they are displayed function in the same way as those used for setting temperature-dependent property functions (Defining Properties Using Temperature-Dependent Functions).
The inactive buttons in the Fluent Database Materials Dialog Box are operations that are applicable only for a user-defined database. These operations will be available when you click the button in the Create/Edit Materials Dialog Box.
Click .
The materials and their properties will be downloaded from the database into your local list, and your copy of properties will now be displayed in the Materials Task Page and in the tree under the appropriate material type.
Close the Fluent Database Materials Dialog Box.

After copying a material from the database, you can modify its properties or change its name, as described earlier in this section. The original material in the database will not be affected by any changes made to your local copy of the material.
The procedure for copying a material is similar to that for the Ansys Fluent Database (Copying Materials from the Ansys Fluent Database). Only the differences are highlighted here.
The global (site-wide) GRANTA MDS database contains many solid materials with property data from GRANTA. To use one of these materials, copy it from the Ansys GRANTA MDS database to your local materials list. Doing so requires a separate license.
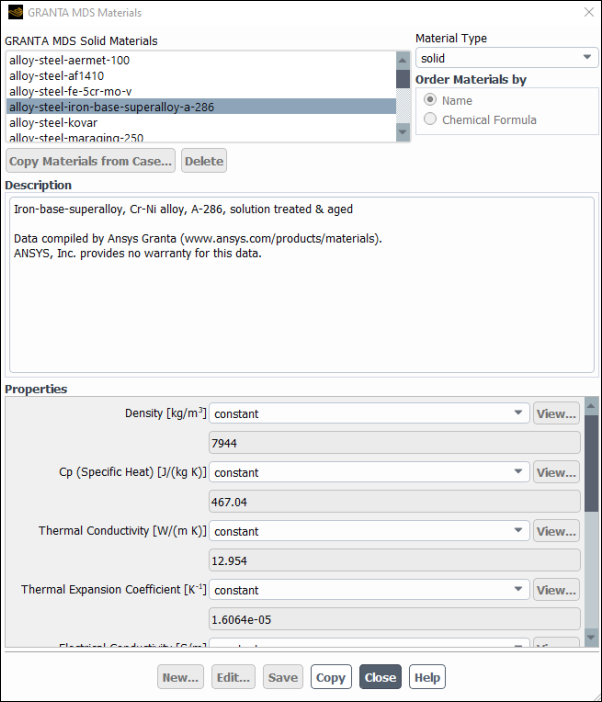
Click the button in the Create/Edit Materials Dialog Box to open Figure 8.4: GRANTA MDS Materials Dialog Box.
In the GRANTA MDS Fluid Materials list or GRANTA MDS Solid Materials list, choose the material you want to copy by clicking it (only one material can be selected at a time). A description of the selected material is displayed in the Description group box, and its properties are listed in the Properties group box.
When no GRANTA license is available, only the description of the selected material will be displayed, but not its properties. The copy operation will abort with an information message.
The details of the remaining steps are covered in Copying Materials from the Ansys Fluent Database.
If the material you want to use is not available in the database, you can easily create a new material for the local list. This material will be available for use only for the current problem and will not be saved in the Ansys Fluent database. The procedure for creating a new material is as follows:
In the Materials Task Page, click the button. (You can also right-click the corresponding material type in the tree (Fluid, Solid, and so on) and select New... from the material type submenu.)
Select the new material type (fluid, solid, and so on) in the Material Type drop-down list. It does not matter which material is selected in the Fluent Fluid Materials, Fluent Solid Materials, or other similarly named list.
Enter the new material name in the Name field.
Important:Ensure you change the name from the default, otherwise the updated properties will change the existing definition of the specified material instead of creating a new one.
The maximum character length you can enter in the Name field is 29. If you enter a material name that is more than 29 characters long, Ansys Fluent will print an error message in the console window.
Set the material’s properties in the Properties area. If there are many properties listed, you may use the scroll bar to the right of the Properties area to scroll through the listed items.
Click the button. A Question Dialog Box will appear, asking you if the original material should be overwritten.
Click to retain the original material and add your new material to the list. A dialog box will appear asking you to enter the chemical formula of your new material.
Click , enter the formula if it is known. Else, leave the formula blank and click . Select the button and answer the Question.
The Materials Task Page and the Material tree branch will be updated to show the new material name and chemical formula under the appropriate material type (Fluid, Solid, or others).
All the materials and properties in your local list are saved in the case file when it is written. If you read this case file into a new solver session, all of your materials and properties will be available for use in the new session.
If there are materials list that you no longer need, you can delete them in one of the following ways:
Using the Materials Task Page.
In the Materials Task Page, select the material to be deleted and click the button at the bottom of the Materials Task Page.
Using the tree.
Right-click the material in the tree and select from the material submenu.
Using the Create/Edit Materials Dialog Box.
From the Material Type drop-down list, select the type of material (fluid, solid, and so on).
Select the material to be deleted from the Fluent Fluid Materials drop-down list, Fluent Solid Materials list, or other similarly named list. The list’s name will be the same as the material type you selected in the previous step.
Click the button.
Deleting materials from your local list will have no effect on the materials contained in the global database.
By default, the materials in your local list and those in the database are listed alphabetically by name (for example, air, atomic-oxygen (o), carbon-dioxide (co2)). If you prefer to list them alphabetically by chemical formula, select the Chemical Formula option under Order Materials By. The example materials listed, will now be in the order of: air, co2 (carbon-dioxide), o (atomic-oxygen). To change back to the alphabetical listing by name, choose the Name option under Order Materials By.
You may specify the ordering method separately for the Create/Edit Materials Dialog Box and Fluent Database Materials Dialog Box. For example, you can order the database materials list by name. Each dialog box has its own Order Materials By options.
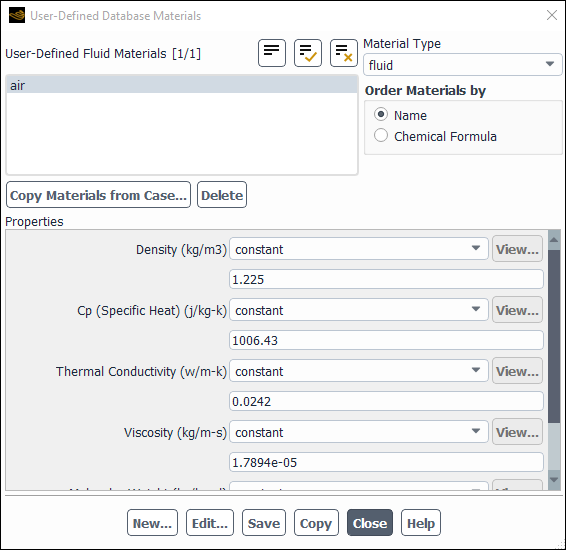
In addition to the Fluent Database Materials Dialog Box, you can also use or create a user-defined materials database using the User-Defined Database Materials Dialog Box. You can browse and do the following:
select from existing user-defined databases
copy materials from a user-defined database
create a new database, create new materials
add them to the user-defined database
delete materials from the database
copy materials from a case to a user-defined database
view the database
The following sections will address each of these functionalities in detail.
In Ansys Fluent, you can open databases of custom materials saved
as .scm files and use them to define the
materials in your problem setup. The material data must be prepared
in a specific format as shown in the examples that follow.
Examples:
The prescribed format for saving material properties information
is shown here for air and aluminum. These files can be created in
a text editor and saved with a .scm extension.
  ((air
  fluid
  (chemical-formula . #f)
  (density (constant . 1.225)
  (premixed-combustion 1.225 300))
  (specific-heat (constant . 1006.43))
  (thermal-conductivity (constant . 0.0242))
  (viscosity (constant . 1.7894e-05)
  (sutherland 1.7894e-05 273.11 110.56)
  (power-law 1.7894e-05 273.11 0.666))
  (molecular-weight (constant . 28.966))
  )
 (aluminum
  solid
  (chemical-formula . al)
  (density (constant . 2719))
  (specific-heat (constant . 871))
  (thermal-conductivity (constant . 202.4))
  (formation-entropy (constant . 164448.08))
  ))
To select a user-defined database, click the button in the Create/Edit Materials Dialog Box. This will open the Open Database Dialog Box.
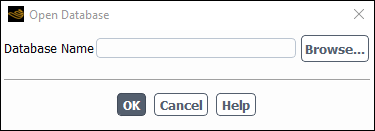
Click the button, select the database in The Select File Dialog Box that opens and click . Click in the Open Database Dialog Box to open the User-Defined Database Materials Dialog Box.
When an existing user-defined database is opened, the materials present in the database are listed in the User-Defined Database Materials Dialog Box. You can select the material type in the Material Type drop-down list and the corresponding materials will appear in the User-Defined Fluid Materials, User-Defined Solid Materials or other similarly named list. The name of the list will be the same as the material type you selected.
The properties of the selected material will appear in the Properties section of the dialog box. This dialog box is similar to the Fluent Database Materials Dialog Box in function and operation.
The procedure for copying a material from a custom database is as follows:
In the Create/Edit Materials Dialog Box, click the button and open the database from which you want to copy the material.
In the User-Defined Database Materials Dialog Box of the selected database, select the type of material (fluid, solid, and so on) in the Material Type drop-down list.
In the User-Defined Fluid Materials list, User-Defined Solid Materials list, or other similarly named list (the list’s name will be the same as the material type you selected in the previous step), choose the materials you want to copy by clicking on them. The properties are displayed in the Properties area.
If you want to check the material properties, use the scroll bar to the right of the Properties area to scroll through the listed items.
Click the button.
The selected materials and their properties will be copied from the database into your local list, and your copy of the properties will now be displayed in the Materials Task Page and under the Materials tree branch.
To copy all the materials from the database in one step, click the button (
 ) next to User-Defined Materials title and click .
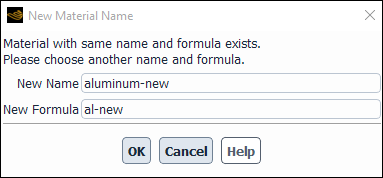
If a material with the same name is already defined in the case, Ansys Fluent will prompt you to enter a new name and formula in the New Material Name Dialog Box. Enter a new name and formula in the respective fields and click to make a local copy of the material.
Close the User-Defined Database Materials Dialog Box.
After copying a material from the database, you may modify its properties or change its name, as described earlier in Using the Create/Edit Materials Dialog Box. The material in the database will not be affected by any changes you make to your local copy of the material.
The procedure for copying a material to a custom database is as follows:
In the Create/Edit Materials Dialog Box, click .
In the Open Database Dialog Box, select the database to which you want to copy the material. If you want to create a new database, enter the name of the new database in the Database Name field and click . A Question Dialog Box will ask you to confirm if you want to create a new file. Click to confirm.
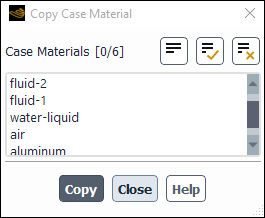
In the User-Defined Database Materials Dialog Box, click . This will open the Copy Case Material Dialog Box.
In the Copy Case Material Dialog Box, select the materials that you want to copy.
To select all the materials, click the shaded icon to the right of the Case Materials title. Clicking on the unshaded icon will deselect the selections in the list.
Click and close the dialog box.
Note: Do not copy materials one by one. This will result in previously copied materials getting overwritten by the new ones. Instead, select all the materials to be copied and click .
You can modify the properties of an existing material and use the modified material in the problem setup and save the modified material to the materials database.
In the Create/Edit Materials Dialog Box, click the button and open the database that you want to use.
In the User-Defined Database Materials Dialog Box of the selected database, select the type of material (fluid, solid, and so on) in the Material Type drop-down list.
In the User-Defined Fluid Materials list, User-Defined Solid Materials list, or other similarly named list (the name of the list will be the same as the material type you selected in the previous step), select the material to be modified.
Click to open the Material Properties Dialog Box.
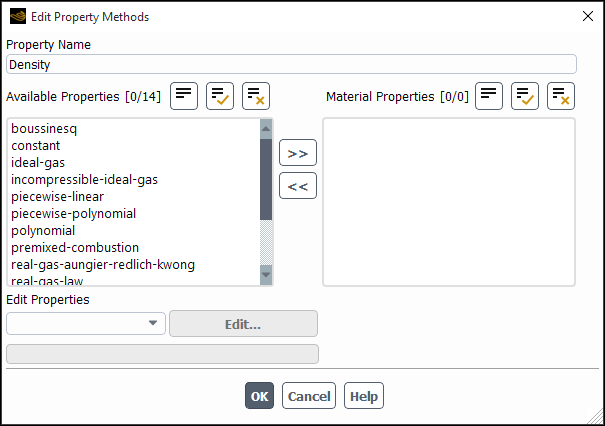
In the Materials Properties list, select the property to be modified and click to open the Edit Property Methods Dialog Box.
Select the method to be modified in the Material Properties list of the Edit Property Methods Dialog Box and click under Edit Properties, in order to modify the properties.
Make the changes in the corresponding method dialog box and click .
Click in the Material Properties Dialog Box.
To use the modified material in the problem setup, click in the User-Defined Database Materials Dialog Box.
To save the modified material to the database, click and close the dialog box.
Using the Create/Edit Materials Dialog Box, you can create a new materials database, copy materials to this database, and also create new materials from scratch. The procedure for creating a new database and add new materials to the database is as follows:
In the Materials Task Page, click .
In the Open Database Dialog Box, enter the name of the database that you are creating and click .
A dialog box will appear asking you confirm the creation of a new file. Click to confirm.
This will open a blank User-Defined Database Materials Dialog Box (Figure 8.9: User-Defined Database Materials Dialog Box: Blank).
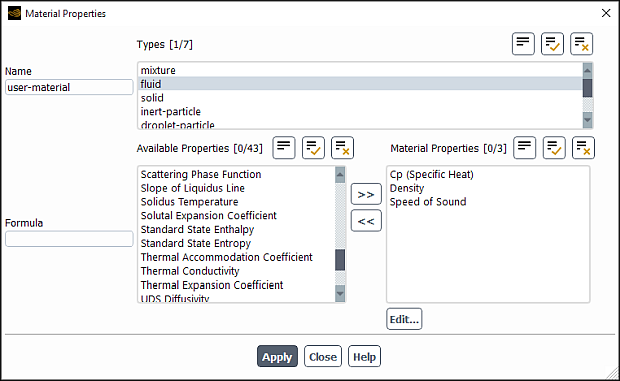
Click in the User-Defined Database Materials Dialog Box. This will open a blank Material Properties dialog box.
In the Material Properties Dialog Box, under Types, select the material type. You can select from fluid, solid, inert-particle, droplet-particle, combusting-particle, and mixture materials.
Enter the name and formula (if required) of the material that you are creating in the Name and Formula fields.
Depending on the type of material selected in the Types list, properties applicable to that material type will appear in the Available Properties list. Select the properties that are applicable for the material that you are defining by clicking on them.
Click the
 button to move these properties to the Material Properties list on the right and click . You can
use the
button to move these properties to the Material Properties list on the right and click . You can
use the  button to move the property from the Material Properties list to the Available Properties list.
To edit the parameters that define a property, select the property in the Material Properties list and click . This opens the Edit Property Methods Dialog Box.
The methods that can be used to define the selected property are listed in the Available Properties list. You can select one or more methods and specify them for the material that you are defining, by selecting and moving them to the Material Properties list.
To modify each of these methods, you can select the method in the Edit Properties drop-down list and click . This will open the corresponding property dialog box, where you can modify the parameters used by the property method. Refer to Defining Properties Using Temperature-Dependent Functions to Real Gas Models for details of these properties, methods used to define the properties and the parameters for each method.
Click in the Edit Property Methods Dialog Box.
Click in the Material Properties Dialog Box.
Click in the User-Defined Database Materials Dialog Box to save the changes to the new materials database.

Similarly, you can also append new materials and click save to append these materials to the existing database.
To delete a material from a database, click the button in the Open Database Dialog Box. Select the database and click in the Open Database Dialog Box. Select the Material Type and the materials that you want to delete in the User-Defined Materials list and click . Click to save the database.