


To export solution data to a different file format after a calculation is complete, use the Export Dialog Box (Figure 3.10: The Export Dialog Box).
![]() File → Export → Solution Data...
File → Export → Solution Data...
Information concerning the necessary steps and available options for each File Type are listed in ABAQUS Files to Tecplot Files.
For details about general limitations for exporting solution data and the manner in which it is exported, see Exporting Solution Data.
For additional information, see the following sections:
- 3.15.1. ABAQUS Files
- 3.15.2. Mechanical APDL Input Files
- 3.15.3. ASCII Files
- 3.15.4. CDAT for CFD-Post and EnSight
- 3.15.5. CGNS Files
- 3.15.6. Common Fluids Format - Post Files
- 3.15.7. EnSight Case Gold Files
- 3.15.8. EnSight DVS
- 3.15.9. FAST Files
- 3.15.10. FAST Solution Files
- 3.15.11. FieldView Unstructured Files
- 3.15.12. NASTRAN Files
- 3.15.13. TAITherm Files
- 3.15.14. Tecplot Files
Select ABAQUS from the File Type drop-down list and choose the surface(s) for which you want to write data in the Surfaces list. If no surfaces are selected, the entire domain is exported.
When the Energy Equation is enabled in the Energy Dialog Box, you can choose the loads to be written based on the kind of finite element analysis you intend to undertake. By selecting Structural in the Analysis list, you can select the following Structural Loads: Force, Pressure, and Temperature. By selecting Thermal in the Analysis list, you can select the following Thermal Loads: Temperature, Heat Flux, and Heat Trans Coeff. Note the following limitations with these loads:
When the Energy Equation is disabled, only the Structural Loads options of Force and Pressure are available.
Loads are written only on boundary walls when the entire domain is exported (that is, if no Surfaces are selected).
Click the button to save the
file, using the Select File dialog box. The exported
file format of ABAQUS (file.inp) contains
coordinates, connectivity, zone groups, and optional loads.
Export of data to ABAQUS is valid only for solid zones or for those surfaces that lie at the intersection of solid zones. Temperature data is exported for the whole domain.
You have the option of exporting data at specified intervals during a transient calculation through the Automatic Export dialog box. See Exporting Data During a Transient Calculation for the complete details.
Select Mechanical APDL Input from the File Type drop-down list and choose the surface(s) for which you want to write data in the Surfaces list. If no surfaces are selected, the entire domain is exported.
When the Energy Equation is enabled in the Energy Dialog Box, you can choose the loads to be written based on the kind of finite element analysis you intend to undertake. By selecting Structural in the Analysis list, you can select the following Structural Loads: Force, Pressure, and Temperature. By selecting Thermal in the Analysis list, you can select the following Thermal Loads: Temperature, Heat Flux, and Heat Trans Coeff. Note the following limitations with these loads:
When the Energy Equation is disabled, only the Structural Loads options of Force and Pressure are available.
Loads are written only on boundary walls when the entire domain is exported (that is, if no Surfaces are selected).
Click the button to save the
file, using the Select File dialog box. Ansys Fluent exports
an input file that contains Mechanical APDL finite element information including
nodes, elements, and loads that can be used to do finite element analysis
in Mechanical APDL with minimal effort. The file format is written in .cdb format. The export of Mechanical APDL Input files is in
ASCII format and therefore is available on all platforms.
You have the option of exporting data at specified intervals during a transient calculation through the Automatic Export dialog box. See Exporting Data During a Transient Calculation for the complete details.
Select ASCII from the File Type drop-down list and choose the surface(s) for which you want to write data in the Surfaces list. If no surfaces are selected, the entire domain is exported. Also select the variable(s) for which data is to be saved in the Quantities list.
When exporting ASCII files, you have the following options:
Select the Location from which the values of scalar functions are to be taken. If you specify the data Location as Node, then the data values at the node points are exported. If you choose Cell Center, then the data values from the cell centers are exported. For boundary faces, it is the face center values that are exported when the Cell Center option is selected.
Select the Delimiter separating the fields (Comma or Space).
Click the button to save the file, using the Select File dialog box. Ansys Fluent will export a single ASCII file containing coordinates, optional loads, and specified scalar function data.
Important: Ansys Fluent supports exporting polyhedral data to ASCII.
You have the option of exporting data at specified intervals during a transient calculation through the Automatic Export dialog box. See Exporting Data During a Transient Calculation for the complete details.
Output from Ansys Fluent simulations can be read into CFD-Post and
EnSight. The default output file for Ansys Fluent is a .dat.h5 file
(see Reading and Writing Data Files), which contains raw data directly from the solver;
when viewed in CFD-Post and EnSight, such files may show results that are not entirely
consistent with what you would see when postprocessing within Fluent (this is even more
true for .dat files, which also have the limitation that they
cannot be read in EnSight). You can instead use .cdat files so
that the raw data is processed prior to export in order to reduce such inconsistencies.
Note:
CDAT for CFD-Post & EnSight is not available for cases using the Structural model. For these cases, export to Common Fluids Format - Post.
One known limitation of
.cdatfiles is that they only contain nodal values, even for face zones.EnSight Case Gold files (EnSight Case Gold Files) are recommended for the best performance in EnSight, even over
.cdatfiles.
To export .cdat files, select CDAT for CFD-Post &
EnSight from the File Type drop-down list. Next, specify
the Cell Zones that contain the data you want exported; note that by
default, all of the cell zones will be exported. If you want to export solution data for
particular surfaces, then select them from the Surfaces list. Once you
have chosen your cells zones and/or surfaces you must select the
Quantities that you want to export.
When selecting the variables, be sure to include any variable that
was used to create an isosurface or clipped surface (as described
in Iso-surfaces and Clipping Surfaces, respectively); otherwise, the
surface will not be created properly if you try to read the exported
state file in CFD-Post.
Specify the format of the .cdat file
by selecting either Binary or ASCII from the Format list. The advantage of the
binary format is that it takes less time to load the exported data
into Ansys CFD-Post and requires less storage space. Note that the
format for the .cst will always be ASCII.
Fluent will write a legacy case file
(that is, .cas) along with the CDAT for CFD-Post & EnSight file. This ensures that the data can be read into Ansys CFD-Post.
Click the button to save the
files, using the Select File dialog box. A .cdat file is written, containing the specified variable
data for the specified cell zones and all of the boundary zones. A
state file (that is, .cst) is also written,
which contains the following surfaces that you created in Fluent for
postprocessing: point surfaces, line surfaces, plane surfaces, isosurfaces,
and clipped surfaces (see Creating Surfaces and Cell Registers for Displaying and Reporting Data).
Note: Imprinted surfaces defined in Ansys Fluent are not available for postprocessing in Ansys CFD-Post.
Important: When you read the .cdat file into Ansys CFD-Post,
the application will attempt to read in the case file that produced
the data by looking in the folder for a .cas file with the same prefix. If such a case file does not exist in that folder, Ansys CFD-Post will prompt you to specify the appropriate
case file.
Important: Before loading the .cst file into Ansys CFD-Post,
make sure that the .cas and .cdat files are already loaded for the session.
You have the option of exporting data at specified intervals during a transient calculation through the Automatic Export dialog box. See Exporting Data During a Transient Calculation for the complete details.
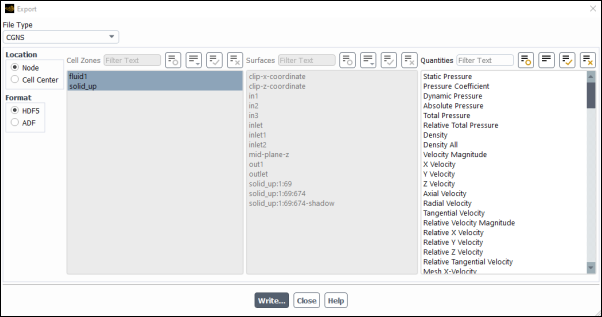
Select CGNS from the File Type drop-down list, select the desired cell zone(s) or surface(s), and specify the scalars you want in the Quantities list.
Specify the Format of the exported file:
HDF5—Hierarchical data format, which makes use of built-in compression. It cannot be viewed in a text editor. However, third-party tools are available that allow you to open and explore the contents of files saved in HDF format.
ADF—Legacy format for CGNS file export.
There are numerous settings available as text commands in the Console that allow you to
fine-tune the mesh that is exported. They are all under
file/export/settings/:
You can control the type of mesh that is exported:
Mixed: The mesh is exported as CGNS mixed type elements (even if the original mesh is uniform).
This is set by entering
file/export/settings/cgns-mesh-type
                1
in the Console.Native: The mesh is exported with the same node ordering as the existing mesh.
This is set by entering
file/export/settings/cgns-mesh-type
                2
in the Console.Important: Files exported in the native mesh format are usually smaller than those exported in mixed or poly format.
Polyhedral : The mesh is exported with the same node ordering as the existing mesh.
This is set by entering
file/export/settings/cgns-mesh-type
                3
in the Console.
Specify whether CGNS should apply any cell size correction:
file/export/settings/cgns-default-cellsize-changes
            yes
Specify that boundary conditions are FamilySpecified in CGNS ZoneBC_t:
file/export/settings/cgns-familyname yesSpecify that multiple CGNS NGON_n's are merged into a single CGNS NGON_n:
file/export/settings/cgns-merge-ngons-to-single-ngon
            yes
Specify how many CPU threads are used for CGNS Poly export:
file/export/settings/cgns-polyhedral-cpu-threads yesSpecify that separate CGNS zone_t's are exported for each cell zone:
file/export/settings/cgns-separate-cellzones yesNote: This option (separate zone_t for each cell zone) is only supported for cell zones with conformal mesh.
Refer to https://cgns.github.io/CGNS_docs_current/sids/gridflow.html#element_example for additional information on CGNS mesh types.
Select the Location from which the values of scalar functions are to be taken. If you specify the data Location as Node, then the data values at the node points are exported. If you choose Cell Center, then the data values from the cell centers are exported. For boundary faces, it is the face center values that are exported when the Cell Center option is selected.
Note: When you select a zone with more than 30 characters in its name, the name is cutoff and the zone ID is appended to the end of the shortened name. This character limit is a CGNS standard.
Click the button to save the
file, using the Select File dialog box. CGNS (CFD
general notation system) is a single file (for example, file.cgns) containing coordinates, connectivity, zone
information, velocity, and selected scalars.
Important:
Ansys Fluent supports exporting polyhedral data to CGNS.
(Windows only) You cannot export files larger than 2GB to CGNS in ADF format. There is no size limitation if you export to CGNS in HDF5 format. As a workaround if you required CGNS files in ADF format, use a Linux machine to export files larger than 2GB.
You have the option of exporting data at specified intervals during a transient calculation through the Automatic Export dialog box. See Exporting Data During a Transient Calculation for the complete details.
Output from Ansys Fluent simulations can be read into EnSight. The default output file
saved from Ansys Fluent is a .dat.h5 file (see Reading and Writing Data Files), which contains raw data directly from the solver; when viewed
in other applications (such as EnSight and CFD-Post) the results may not be entirely
consistent with what you would see when postprocessing within Fluent. This is also true
for legacy .dat files.
Within Fluent, it is possible to export Common Fluids Format - Post files to reduce such inconsistencies. The data exported to these files is made more consistent by processing the raw data within Fluent before writing the file.
The data written to the Common Fluids Format – Post file, does not contain the full mesh, topology, or physics information that is present within the default Fluent files. Instead, the export can be controlled to restrict the mesh and data to specific surfaces and quantities. This can be useful if you wish to monitor how quantities change across time on just a small subset of the problem domain because the reduced datasets can lead to improved read times.
Note:
For the best performance in EnSight export to EnSight Case Gold (EnSight Case Gold Files).
For CFD-Post, export CDAT files if you want to postprocess a full representation of the simulation mesh, topology, and physics used within Fluent with some corrected quantities.
Common Fluids Format - Post files only contain nodal values, even for face zones, with the exception of cell-related field variables such as Active Cell Partition, Cell Volume Change, and so on, which are indicated with the cve code in Field Variables Listed by Category.
When running on mixed Windows / Linux, you must specify a remote working directory at launch in order to be able to export Common Fluids Format - Post files, by using one of the following: the Remote Working Directory option and field in the Remote tab of Fluent Launcher; the
-nodehomedir=<directory>command line option; or theNODEHOMEDIR=<directory>environment variable.
Select Common Fluids Format - Post from the File Type drop-down list and select the cell zone(s) and surface(s) where you want data exported in the Cell Zones and Surfaces lists, as well as the scalars you want in the Quantities list. After you select the cell zones, surfaces, and quantities that you want exported, click >> to add the quantity to the list. Click to remove selected zone/surface and quantities that you do not want exported from the Quantity List.
An advantage of exporting in the Common Fluids Format - Post is that you can export different quantities on different surfaces/cell zones. For example, you can export shear-stress on a wall surface and pressure on an outlet surface. This provides flexibility to limit the data you are exporting to the surfaces where you are interested in postprocessing those values.
Click the button to save the
file, using the Select File dialog box. The following files are written
in the hierarchical data format (HDF) from the Export dialog box:
<filename>.cas.post and
<filename>.dat.post.
When exporting to EnSight, you can choose to export the data associated with a single data file, or you can export the data associated with multiple files that were generated by a transient solution.
To export the solution data from a single data file, read in the case and data file and open the Export dialog box.
 File → Export → Solution Data...
Then perform the following steps in the Export dialog box:
Select EnSight Case Gold from the File Type drop-down list.
Select the Location from which the values of scalar functions are to be taken. If you specify the data Location as Node, then the data values at the node points are exported. If you choose Cell Center, then the data values from the cell centers are exported. For boundary faces, it is the face center values that are exported when the Cell Center option is selected.
Specify the format of the file by selecting either Binary or ASCII from the Format list. The advantage of the binary format is that it takes less time to load the exported files into EnSight.
(optional) Select the Cell Zones from which you want data exported (you must select at least one zone). By default, all of the cell zones are selected.
(optional) Select the Interior Zone Surfaces from which you want data exported. By default, the data being exported is taken from the entire Ansys Fluent domain. The Interior Zone Surfaces selection list allows you to also specify that the data be taken from selected zone surfaces whose Type is identified as interior in the Boundary Conditions task page.
Note: Data on user defined/created surfaces is not available for export to EnSight Case Gold file format.
Select the scalars you want to write from the Quantities selection list.
Click the button to open the Select File dialog box, which you can use to save a file that contains the specified variable data for the specified cell zones, the specified interior zone surfaces, and all of the boundary zones.
To export solution data associated with multiple files that were generated by a transient solution, you must first make sure that the following criteria are met:
All of the relevant case and data files must be in the working folder.
The data files must be separated by a consistent number of time steps.
Next, enter the following text command in the console:
file→transient-export→ensight-gold-from-existing-filesThen, enter responses to the following prompts in the console:
EnSight Case Gold file nameEnter the name you want assigned to the exported files.
Case / Data file selection by base name?Enter
yesif the case and data files share a “base name” (that is, a common initial string of characters). The alphanumeric order of the full names must correspond to the order in which the files were created. You will then be prompted to enter the base name at theCase / Data file base nameprompt that follows. For example, with a set of files namedelbow-0001,elbow-0002,elbow-0003, and so on, enterelbow-for the base name.Enter
noif you have created an ASCII file in the working folder that lists the names of the data files in order of when they were created. The file should list one data file name per line. You will then be prompted to enter the name of this file at theProvide the file name which contains the data file namesprompt that follows. Note that you must include the file extension if any in your entry at the prompt.Specify Skip ValueEnter an integer value to specify the number of files you want to skip in between exporting files from the sequence. For example, enter
1to export every other file, enter2to export every third file, and so on.Cell-Centered?Enter
yesif you want to export the data values from the cell centers (or face center values, for boundary faces).Enter
noif you want to export the data values from the node points.Write separate file for each time step for each variable?Enter
yesif you want separate EnSight Case Gold files written for each time step. Otherwise, all of the data for the.scl1and.velfiles will be combined into a single file for each.Write in binary format?Enter
yesto write the files in binary format. Otherwise, they will be written in ASCII format. The advantage of the binary format is that it takes less time to load the exported files into EnSight.Specify Data File FrequencyEnter the number of time steps between the data files being exported.
Separate case file for each time step?Enter
noif all the data files were generated from the same case file (that is, the simulation involved a static mesh). Note that the name of the case file must be the same (not including the extension) as the name of the first data file in the sequence.Enter
yesif the data files were generated from the different case files (that is, the simulation involved a sliding or dynamic mesh). Note that the names of the case files must be the same (not including the extension) as the names of the corresponding data files.Read the case file?Enter
noif the first (or only, for a static mesh) case file is already in memory.Enter
yesif the first (or only, for a static mesh) case file is not already in memory.cell zone id/name(1)Enter the name or ID of any cell zone from which you want data exported. By default, the data being exported is taken from the entire Ansys Fluent domain. After you specify the first cell zone, you will be prompted to specify the second one, and so on, until you press Enter without typing any characters.
Interior Zone Surfaces(1)Enter the name of any interior zone surface from which you want data exported. By default, the data being exported is taken from the entire Ansys Fluent domain. This prompt allows you to also specify that the data be taken from selected zone surfaces whose Type is identified as interior in the Boundary Conditions task page. After you specify the first interior zone surface, you will be prompted to specify the second one, and so on, until you press Enter without typing any characters.
EnSight Case Gold scalar(1) else q to
continue
Enter in the first scalar quantity you want exported. You can press the Enter key to print a list of available scalar quantities in the console. After you enter the first quantity, you will be prompted to enter the second quantity, and so on, until you enter
q. The EnSight Case Gold files will then be written.
When exporting to EnSight Case Gold, files will be created with the following four formats:
A geometry file (for example,
file.geo) containing the coordinates and connectivity information.A velocity file (for example,
file.vel) containing the velocity.A scalar file (for example,
file.scl1) for each selected variable or function.An EnSight case file (for example,
file.encas) that contains details about the other exported files.
Important:
For non-stationary reference zones, all the velocities are exported to EnSight as velocities relative to the selected reference zone.
Ansys Fluent supports exporting polyhedral data to EnSight.
Note: If you are planning to import files exported to EnSight into a non-Ansys third-party postprocessing software, such as Paraview, then you must ensure that no surface has an ID of zero. If there is, then create a zone surface for that surface and export the newly created zone surface instead of the original.
You also have the option of exporting data at specified intervals during a transient calculation through the Automatic Export dialog box. For details, see Exporting Data During a Transient Calculation.
Refer to Transition Assistance from Fluent to EnSight for Post Processing in the Fluent to EnSight Considerations for additional guidance on choosing the best format for your case.
You can export Fluent solution data in EnSight DVS format. Refer to Transition Assistance from Fluent to EnSight for Post Processing in the Fluent to EnSight Considerations for additional guidance on choosing the best format to use in EnSight for your case.
To export in EnSight DVS format:
Open the Export dialog box.
File → Export
→ Solution Data...Select EnSight DVS from the File Type drop-down list.
Select the desired Cell Zones or Surfaces (not both), and Quantities from their respective lists.
Note: Duplicate surfaces cannot be exported to EnSight.
Click Write... to open the Select File dialog box, so that you can save the EnSight DVS files in the preferred location.
This file type is valid only for triangular and tetrahedral meshes. Select FAST from the File Type drop-down list and select the scalars you want to write in the Quantities list.
Click the button to save the file for the specified function(s), using the Select File dialog box. The following files are written:
A mesh file in extended Plot3D format containing coordinates and connectivity.
A velocity file containing the velocity.
A scalar file for each selected variable or function.
You have the option of exporting data at specified intervals during a transient calculation through the Automatic Export dialog box. See Exporting Data During a Transient Calculation for the complete details.
This file type is valid only for triangular and tetrahedral meshes. Select FAST Solution from the File Type drop-down list and click the button. A single file is written containing density, velocity, and total energy data.
You have the option of exporting data at specified intervals during a transient calculation through the Automatic Export dialog box. See Exporting Data During a Transient Calculation for the complete details.
Select Fieldview Unstructured from the File Type drop-down list. Next, specify the cell zones and surfaces from which you want data exported by making selections in the Cell Zones or Surfaces lists (you must select at least one zone or surface); note that by default, all of the cell zones will be exported. Then select the scalars you want to write in the Quantities list. Finally, click the button to open the Select File dialog box, which you can use to save a file that contains the specified function(s) for the specified cell zones and associated boundary zones or surfaces.
The following files are written:
A binary file (for example,
file.fvuns) containing coordinate and connectivity information and specified scalar function data. In parallel, each partition writes to this file with a grid for each cell zone or surface that is exported. This allows parallel postprocessing in FieldView.A regions file (for example,
file.fvuns.fvreg) containing information about the cell zones or surfaces and the frame of reference. It also includes information about which grids make up the various cell zones or surfaces.
The cell zone and surface information includes the names of the cell zones/surfaces along with the mesh numbers. For the moving frame of reference, the regions file contains information about the origin, the axis of rotation and the rotation speed. Volume data is written using the absolute frame of reference.
If you are running multiple steady-state solutions on the same mesh, you can export only the data files and avoid the repeated writing of the mesh file by using the following TUI command for surfaces and cell zones:
file/export/fieldview-unstruct-data file_name
(
list_of_surfaces
) (
list_of_zones
) list_of_scalars q
where
file_name specifies the name (without the extension) of the file that you want to write.
list_of_surfaces specifies the list of surfaces (separated by spaces, that is, no commas) from which you want data exported. If you want to specify all of the surfaces, enter
*within the parentheses.list_of_zones specifies the list of cell zones (separated by spaces, that is, no commas) from which you want data exported. If you want to specify all of the cell zones, enter
*within the parentheses.list_of_scalars specifies the list of cell functions (separated by spaces, that is, no commas) that you want to write to the exported file. The
qinput terminates the list. For example, the inputx-velocity cell-zone qwill select velocity and the cell volume.
To export only the data files for surfaces, use the following TUI command:
file/export/fieldview-unstruct-surfaces 2 file_name (
list_of_surfaces
) list_of_scalars q
where
2specifies that you want to write a Fieldview unstructured results only file.file_name specifies the name (without the extension) of the file that you want to write.
list_of_surfaces specifies the list of surfaces (separated by spaces, that is, no commas) from which you want data exported. If you want to specify all of the surfaces, enter
*within the parentheses.list_of_scalars specifies the list of cell functions (separated by spaces, that is, no commas) that you want to write to the exported file. The
qinput terminates the list. For example, the inputx-velocity qwill select only the velocity.
You have the option of exporting data at specified intervals during a transient calculation through the Automatic Export dialog box. See Exporting Data During a Transient Calculation for the complete details.
Select NASTRAN from the File Type drop-down list. Select the surface(s) containing the data you want to export in the Surfaces list. If you do not select any surfaces, the entire domain is exported. You can specify which scalars you want in the Quantities list.
Note: If you are exporting data on a polyhedral mesh, only zone surfaces will be available for selection (no volumetric data or user-defined surfaces).
You have the option of selecting loads to be included in the exported file. When the Energy Equation is enabled in the Energy Dialog Box, you can choose the loads based on the kind of finite element analysis you intend to undertake. By selecting Structural in the Analysis list, you can select the following Structural Loads: Force, Pressure, and Temperature. By selecting Thermal in the Analysis list, you can select the following Thermal Loads: Temperature, Heat Flux, and Heat Trans Coeff.
These loads have the following limitations :
When the Energy Equation is disabled, only the Structural Loads options of Force and Pressure are available.
Loads are written only on boundary walls when the entire domain is exported (that is, if no Surfaces are selected).
Click the button to save the
file, using the Select File dialog box. A single
file (for example, file.bdf) is written containing
coordinates, connectivity, optional loads, zone groups, and velocity.
Pressure is written as PLOAD4, and heat flux
is written as QHBDYE data. If you select
wall zones in the Surfaces list, nodal forces
are written for the walls. When data is written for the heat transfer
coefficient, it is based on the wall faces rather than the nodes.
You have the option of exporting data at specified intervals during a transient calculation through the Automatic Export dialog box. For details, see Exporting Data During a Transient Calculation.
The option to export a TAITherm file type is available only when the Energy Equation is enabled in the Energy Dialog Box. Select TAITherm from the File Type drop-down list and select the surface(s) for which you want to write data in the Surfaces list. If no surfaces are selected, the entire domain is exported. If the mesh contains polyhedral cells, Ansys Fluent will export only boundary data. No volume data will be exported.
Select the method of writing the heat transfer coefficient (Heat Transfer
Coefficient), which can be Flux Based or, if a turbulence
model is enabled, Wall Function based. The flux-based heat transfer
coefficient is calculated using Equation 7–123. If no
turbulence model is enabled, the wall-function based heat transfer coefficient is calculated
as  , where
  is the thermal conductivity, and
  is the cell height of the wall-adjacent cell.
Click the button to save the file, using the
Select File dialog box. A PATRAN neutral file (for example,
file.neu) is written containing element velocity components (that
is, the element that is just touching the wall), heat transfer coefficients, and
temperatures of the wall for any selected wall surface. If the wall is one-sided, the data
is written for one side of the wall. If the wall is two-sided (a wall-wall shadow pair), the
values are written only for the original wall face, not for the shadow face (which is a
duplicate).
You have the option of exporting data at specified intervals during a transient calculation through the Automatic Export dialog box. See Exporting Data During a Transient Calculation for the complete details.
Note: If no turbulence model is enabled, the Wall Function based Heat Transfer Coefficient is equal to k/h, where k is the thermal conductivity, and h is the cell height of the wall-adjacent cell.
Select Tecplot from the File Type drop-down list and choose the surface(s) where you want data written in the Surfaces list. If no surfaces are selected, the data is exported at cell centers for the entire domain. If surfaces are selected, the data is exported on their face centers. Select the variable(s) you want exported in the Quantities list.
Click the button to save the file, using the Select File dialog box. A single file is written containing the coordinates and scalar functions in the appropriate tabular format.
Important:
The utility fe2ram can import Tecplot files only in FEPOINT format.
If you intend to postprocess Ansys Fluent data with Tecplot, you can either export data from Ansys Fluent and import it into Tecplot, or use the Tecplot Ansys Fluent Data Loader included with your Tecplot distribution. The data loader reads native Ansys Fluent case and data files directly. If you are interested in this option, contact Tecplot, Inc. for assistance or visit www.tecplot.com.
You have the option of exporting data at specified intervals during a transient calculation through the Automatic Export dialog box. See Exporting Data During a Transient Calculation for the complete details.