


Particle history data can be exported for steady-state solutions or for single transient particle steps by selecting the Particle History Data... option under the File/Export ribbon tab and performing the steps described in this section. For details about exporting particle history data automatically during transient simulations, see Creating Automatic Export Definitions for Transient Particle History Data.
![]() File → Export → Particle History Data...
File → Export → Particle History Data...
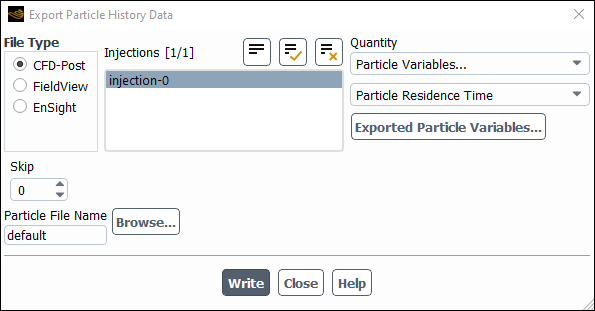
Specify the File Type you want to export by selecting one of the following:
CFD-Post for the CFD-Post compatible format
FieldView for the FIELDVIEW format
EnSight for the EnSight format
Geometry for the
.iblformat (not available when Unsteady Particle Tracking is enabled in the Discrete Phase Model dialog box)
Important: If you plan to export particle data to EnSight, you should first verify that you have already written the files associated with the EnSight Case Gold file type by using the File/Export/Solution Data... ribbon tab option (see EnSight Case Gold Files).
Select the predefined injections that are the source of the particles from the Injections selection list. See Creating and Modifying Injections for details about creating injections.
Select the particle variables contained in the export file by clicking the button and selecting the variables appearing in the Reporting Variables dialog box (Figure 24.68: The Reporting Variables Dialog Box), as described in Reporting of Current Positions for Unsteady Tracking. Note that although the variable Particle Residence Time does not appear in the Available Particle Variables selection list, it is always exported.
If you have added the Color by variable in the Reporting Variables dialog box, select an appropriate category and variable under Quantity for the particle data to be exported.
If your exported particle history file is too large to postprocess because there are too many tracks or particles written to the file, you can reduce the number of particle tracks by increasing the Skip value.
To control the exported file size, the number of points of the particle trajectories can be reduced using the Coarsen value. This is only valid for steady-state particle trajectories.
When exporting to an EnSight file, you can use this value to reduce the temporary file size written during tracking with a small effect on accuracy of the trajectory. The number of steps per trajectory finally exported to the EnSight file is the same as the Number of Particle Time Steps.
Enter the name (and folder path, if you do not want it to be written in the current folder) for the exported particle data file in the Particle File Name text box. Alternatively, you can specify it through the Select File dialog box, which is opened by clicking the button.
If you selected EnSight under File Type, you should specify the EnSight Encas File Name. Use the button to select the
.encasfile that was created when you exported the file with the File/Export/Solution Data... ribbon tab option. The selected file will be modified and renamed as a new file that contains information about all of the related particle files that are generated during the export process (including geometry, velocity, scalars, particle and particle scalar files).The name of the new file will be the root of the original file with
.newappended to it (for example, iftest.encasis selected, a file namedtest.new.encaswill be written). It is this new file that should be read into EnSight. If you do not specify a EnSight Encas File Name, then you must create an appropriate.encasfile manually.If you selected EnSight under File Type, and you are exporting steady-state particle tracks, enter the Number of Particle Time Steps.
Click Write to export the particle history data. If you selected EnSight under File Type, data files will be written in both
.mpgand.msclformats.Click Close to close the dialog box.