


Before you run a transient flow solution, you can set up the case file so that solution data and particle history data is exported as the calculation progresses. This is accomplished by creating automatic export definitions using the Calculation Activities Task Page (Figure 3.12: The Calculation Activities Task Page), as described in the following sections.
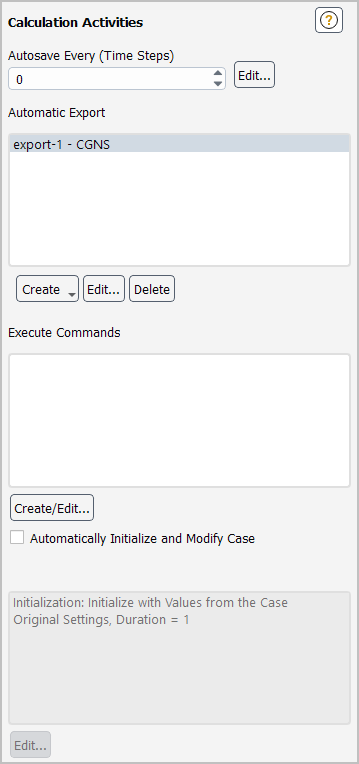
The names of the automatic export definitions you create are displayed in the Automatic Export selection list, along with the format in which it will be exported. You can edit or delete the definition by selecting a definition in the list and clicking the or button,.
For additional information, see the following sections:
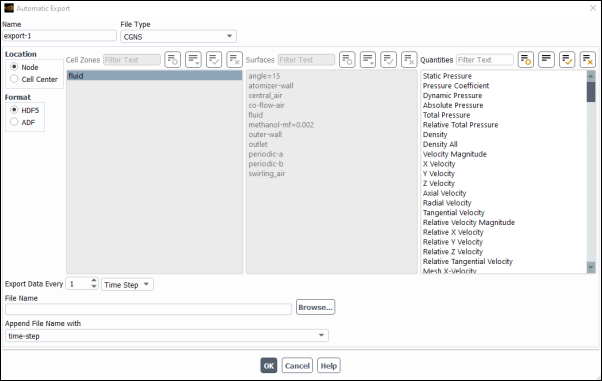
To create an automatic export definition for solution data, begin by making sure that Transient is selected for Time in the General Task Page. Next, click the button under the Automatic Export selection list in the Calculation Activities task page (a drop-down list will appear). Select Solution Data Export... from the drop-down list to open the Automatic Export dialog box (Figure 3.13: The Automatic Export Dialog Box).
Then perform the following steps:
Enter a name for the automatic export definition in the Name text box. This is the name that will be displayed in the Automatic Export selection list in the Calculation Activities task page.
Define the data to be exported by making selections in the relevant group boxes and selection lists: File Type, Cell Zones, Surfaces, Interior Zone Surfaces, Quantities, Analysis, Structural Loads, Thermal Loads, Location, Delimiter, Format, and Heat Transfer Coefficient. See ABAQUS Files – Tecplot Files for details about the specific options available for the various file types.
Set the frequency at which the solution data will be exported during the calculation using the Export Data Every field and specify whether you want the save rate based on Time Steps or Flow Time.
If you selected EnSight Case Gold from the File Type drop-down list, the Separate Files for Each Time Step option allows you to specify that separate files are written at the prescribed time steps. This option is enabled by default and is the recommended practice, as it ensures that all of the data is not lost if there is a disruption to the calculation (for example, from a network failure) before it is complete. If you choose to disable this option, all of the data for the
.scl1and.velfiles will be combined into a single file for each.If you selected CDAT for CFD-Post & EnSight from the File Type drop-down list, by default Ansys Fluent will save a legacy case file (
.cas) with every.cdatfile (that is, at the specified Frequency), but you have the option of picking , which can reduce the total space required to save all files associated with this export. A single.cstfile will also be written when exporting during a transient calculation.For more information about the CDAT for CFD-Post & EnSight file type, refer to CDAT for CFD-Post and EnSight.
Specify how the exported files will be named. Every file saved will begin with the characters entered in the File Name text box (note that a file extension is not necessary). You can specify a folder path if you do not want it written in the current folder. The File Name can also be specified through the Select File dialog box, which is opened by clicking the button.
Next, make a selection in the Append File Name with drop-down list, to specify that the File Name be followed by either the time step number or flow time at which it was saved. Note that this selection is not available when exporting to EnSight. When EnSight Case Gold is selected from the File Type drop-down list, the time step number is always appended if the Separate Files for Each Time Step option is enabled; otherwise, no digits are appended.
When appending the file name with the flow time, you can specify the number of decimal places that will be used by making an entry in the Decimal Places in File Name text box. By default, six decimal places will be used.
Click to save the settings for the automatic export definition.
For details about general limitations for exporting solution data and the manner in which it is exported, see Exporting Solution Data.
Important: If the files that are exported during multiple transient simulations are to be used as a set, you should run all of the simulations on the same platform, using the same number of processors. This ensures that all of the files are compatible with each other.
Note that if you selected EnSight Case Gold from the File Type drop-down list, Ansys Fluent does not support exporting data files to EnSight during a transient calculation in which a new cell zone or surface is created after the calculation has begun (as can be the case for an in-cylinder simulation, for example).
To create an automatic export definition for particle history data:
Make sure that Unsteady Particle Tracking is selected in the Discrete Phase Model dialog box.
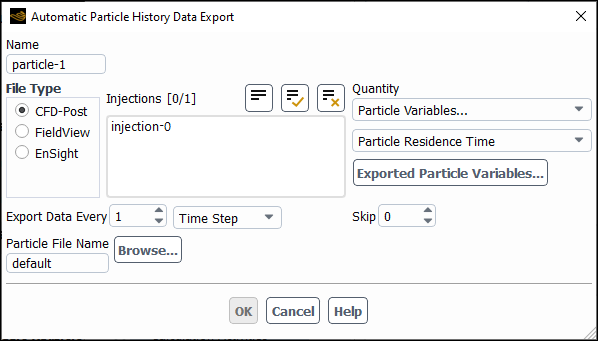
In the Calculation Activities task page, under the Automatic Export selection list, click the drop-down list and select Particle History Data Export... to open the Automatic Particle History Data Export dialog box (Figure 3.14: The Automatic Particle History Data Export Dialog Box).
Enter a name for the automatic export definition in the Name text box. This is the name that will be displayed in the Automatic Export selection list in the Calculation Activities task page. Make sure that the chosen name is not already used for another Automatic Export.
Choose the File Type you want to export by selecting one of the following:
CFD-Post for the CFD-Post compatible format
FieldView for the FIELDVIEW format
EnSight for the EnSight format
Important: If you plan to export particle data to EnSight, you should first set up an automatic export definition so that solution data is also exported to EnSight during this calculation (see Creating Automatic Export Definitions for Solution Data). As described in the steps that follow, some of the settings must correspond between the two automatic export definitions.
Select the predefined injections that are the source of the particles from the Injections selection list. See Creating and Modifying Injections for details about creating injections.
Select the particle variables contained in the export file by clicking the button and selecting the variables appearing in the Reporting Variables dialog box (Figure 24.68: The Reporting Variables Dialog Box), as described in Reporting of Current Positions for Unsteady Tracking. Note that although the variable Particle Residence Time does not appear in the Available Particle Variables selection list, it is always exported.
If you have added the Color by variable in the Reporting Variables dialog box, select an appropriate category and variable under Quantity for the particle data to be exported.
In the Export Data Every integer number entry box, specify the frequency for appending the data during the solution process. You can export particle history data frequency based on either Time Step or Flow Time for unsteady flow cases, or based on DPM Iteration for steady flow cases.
If your exported particle history file is too large to postprocess because there are too many tracks or particles written to the file, you can reduce the number of particle tracks by increasing the Skip value.
If you selected EnSight Case Gold for the File Type, the Separate Files for Each Time Step option allows you to specify that separate files are written at the prescribed time steps. This option is enabled by default and is the recommended practice, as it ensures that all of the data is not lost if there is a disruption to the calculation (for example, from a network failure) before it is complete. If you choose to disable this option, all of the data for the
.mscland.mpgfiles will be combined into a single file for each.Important: The setting for the Separate Files for Each Time Step option should be the same (that is, enabled or disabled) as that of the automatic export definition you set up to export solution data to EnSight during this calculation. For details, see Creating Automatic Export Definitions for Solution Data.
Enter the name (and folder path, if you do not want it to be written in the current folder) for the exported particle data file in the Particle File Name text box. Alternatively, you can specify it through the Select File dialog box, which is opened by clicking the button. Make sure the file name is different from other existing Automatic Export definitions to avoid overwriting data.
If you selected FieldView under File Type, you can write particle history data for each time step to separate files by including the character string
%tin the particle file name. At the time of export, Fluent will substitute%twith the current time step number. The saved files can be processed by FieldView 14 or newer.If you selected EnSight under File Type, you should specify the EnSight Encas File Name. Enter the same name (and folder path, if necessary) that you entered in the File Name text box when you set up the automatic export definition for exporting solution data to EnSight during this calculation. (For details, see Creating Automatic Export Definitions for Solution Data). The
.encasfile created during the solution data export will be modified and renamed as a new file that contains information about all of the related particle files that are generated after every time step during the export process (including geometry, velocity, scalars, particle and particle scalar files). The name of the new file will be the root of the original.encasfile with.newappended to it (for example, if the solution data export createstest.encas, a file namedtest.new.encaswill be written for the particle data export). It is this new file that should be read into EnSight.Important: If you do not specify an EnSight Encas File Name, you will have to manually create an appropriate
.encasfile.Click to save the settings for the automatic export definition.
The particle data will be exported as it is generated during
the transient calculation. If you selected EnSight under File Type, data files will be written
in both .mpg and .mscl formats.