


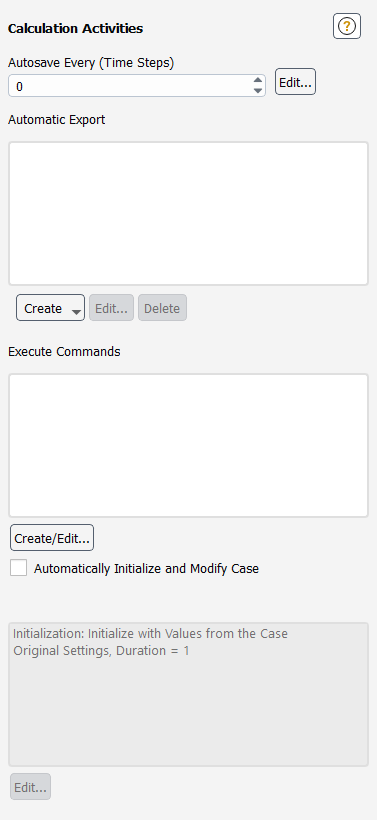
The Calculation Activities task page allows you to set up various tasks that you can perform during the calculation, such as saving files, exporting files, creating solution animations, and command execution.
Important: This feature offers reduced functionality when running Fluent under the Pro capability level.
Controls
- Autosave Every
allows you to set the frequency of the autosave.
opens the Autosave Dialog Box.
- Automatic Export
displays a list of available export objects that will be executed during the calculations. This list and its associated buttons are only available for transient flow calculations.
provides a drop-down list that contains options for creating export objects. Two options are available: the Solution Data Export option opens the Automatic Export Dialog Box; the Particle History Data Export option opens the Automatic Particle History Data Export Dialog Box.
opens the appropriate dialog box for the selected item in the Automatic Export list.
- Delete
removes the selected item from the Automatic Export list.
- Execute Commands
lists available commands to be executed during the calculations.
opens the Execute Commands Dialog Box.
- Automatically Initialize Solution and Modify Case
allows you to automatically have your solution initialized and your case file modified.
opens the Case Modification Manager Dialog Box. This button is only available when the Automatically Initialize Solution and Modify Case option is enabled.
For additional information, see the following sections:
- 51.15.1. Autosave Dialog Box
- 51.15.2. Data File Quantities Dialog Box
- 51.15.3. Automatic Export Dialog Box
- 51.15.4. Automatic Particle History Data Export Dialog Box
- 51.15.5. Execute Commands Manager Dialog Box
- 51.15.6. Execute Commands Dialog Box
- 51.15.7. Define Macro Dialog Box
- 51.15.8. Case Modification Manager Dialog Box
- 51.15.9. Auto Initialization Method Dialog Box
- 51.15.10. Modify Case Dialog Box
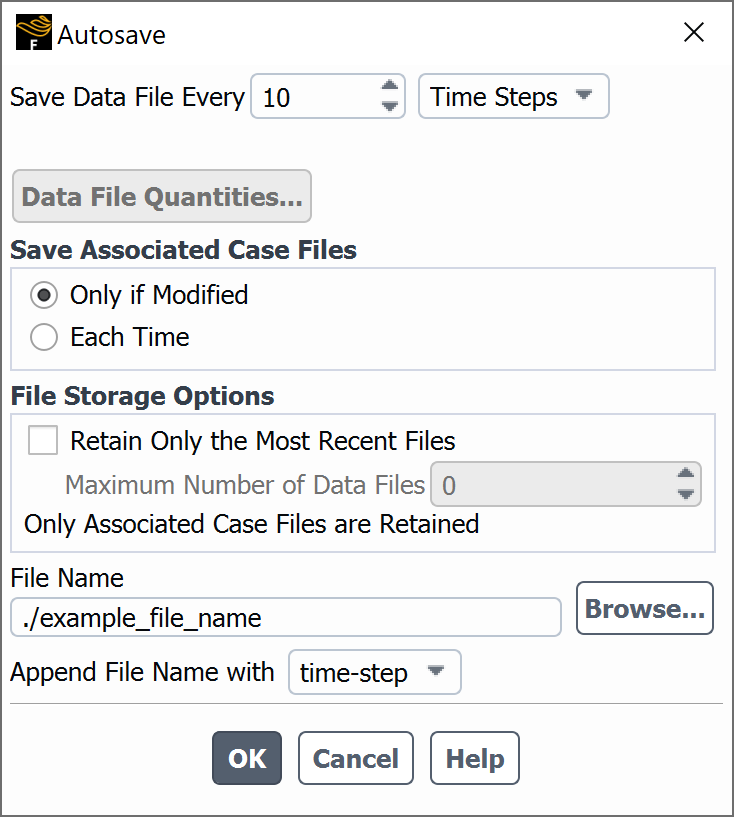
The Autosave dialog box allows you to specify automatic saving of case and data files at specified intervals during a calculation. See Automatic Saving of Case and Data Files for details.
Controls
- Save Data File Every
specifies the frequency with which data files are saved. For steady flows you will specify the frequency in iterations, while for unsteady flows you will specify it in either time steps or flow time (unless you are using the explicit time stepping formulation, in which case you will specify the frequency in iterations or if you are running an in-cylinder simulation you can specify the frequency in crank angles). The default value is set to zero, indicating that no automatic saving is performed.
- Save Associated Case Files
gives you the choice to save the case file only if it is modified or each time that the data file is saved.
- Only if Modified
results in Ansys Fluent saving a case file only if there is a change in the case file settings.
- Each Time
allows you to save the case file every time the data file is saved.
- Retain Only the Most Recent Files
allows you to restrict the number of files saved by Ansys Fluent if you have limited disk space. When this option is enabled, you can enter the appropriate value in the Maximum Number of Data Files field.
Only the associated case files are retained when using this option.
Important: When the Retain Only the Most Recent Files option is selected, the solution history currently in memory will be discarded and the solution history reset.
opens the Data File Quantities Dialog Box where you can specify which quantities you want to automatically save to a data file for postprocessing. This button is only available when you are writing in the legacy format (that is,
.datfiles).- Maximum Number of Data Files
specifies the maximum number of data files that can be saved at any instance. If you have constraints on the disk space, you can restrict the number of files to be saved using this field. After saving the specified number of files, Ansys Fluent will overwrite the earliest existing file. The default value for this field is zero, which saves all the files.
- File Name
specifies the root name for the files that are saved. The iteration or time-step number and an appropriate suffix (
.cas.h5or.dat.h5, by default) will be added to the specified root name. If the specified File Name ends in.gzor.Zand you have requested the reading and writing of files in the legacy format, appropriate file compression will be performed. (For details about file compression and the legacy format, see Reading and Writing Compressed Files and Reading and Writing Files in the Legacy Format, respectively.)The default path is
./<filename>indicating that the autosaved files will be saved in the working directory of the current Fluent session. If you hard code a directory, then the files will always be saved at that location, regardless of the working directory of the current Fluent session.- Append File Name with
allows you to select flow-time, time-step, or crank-angle to be appended to the file name. This option is available only for unsteady-state calculations (only for in-cylinder calculations in the case of crank-angle). The default selection is flow-time.
- Decimal Places in File Name
allows you to specify the number of decimal digits in the file name. This option is available only when flow-time or crank-angle is selected in the Append File Name with drop-down list. The default value for this field is set to
6.
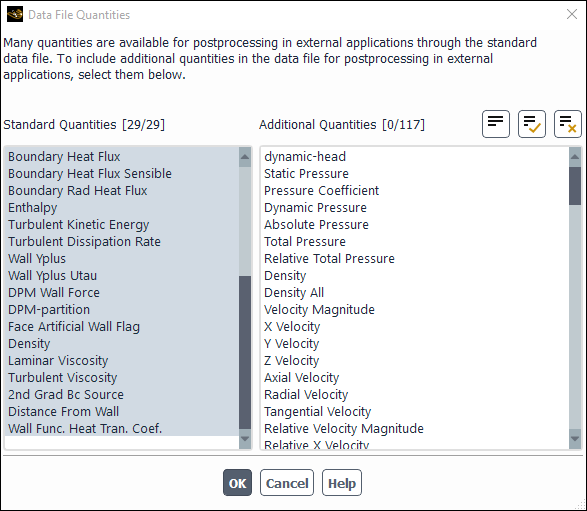
The Data File Quantities dialog box allows you to
specify various quantities for postprocessing when you are writing in the legacy
format (that is, .dat files). See Setting Data File Quantities for details.
Controls
- Standard Quantities
contains a listing of standard postprocessing quantities (for example, density, Mach number, temperature, and so on).
- Additional Quantities
contains a listing of additional postprocessing quantities that are derived from the standard quantities (for example, standard pressure, velocity magnitude, and so on).
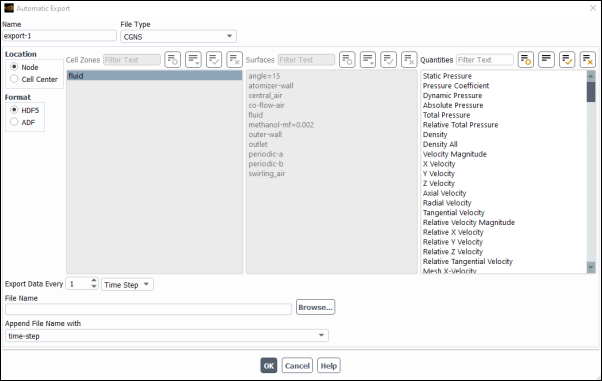
The Automatic Export dialog box allows you to create an automatic export definition for solution data. See Creating Automatic Export Definitions for Solution Data for details.
Controls
- Name
specifies the name of the export definition.
- File Type
contains a drop-down list of file types, which control the output file format that will be written.
- ABAQUS
allows you to specify the surface(s) and optional loads, based on the kind of finite element analysis selected, to be exported to an ABAQUS file (extension
.inp).- ASCII
allows you to specify the surface(s), scalars, location from which the values of scalar functions are to be taken, and the delimiter separating the fields, to be exported to an ASCII file.
- AVS
allows you to specify the scalars you want to write to be exported to an AVS file.
- CDAT for CFD-Post & EnSight
allows you to specify the cell zones, surfaces, quantities, and format (Binary or ASCII) used for data export. The
.cdatfile format is compatible with both CFD-Post and EnSight.- CGNS
allows you to specify the scalars you want to write and the location from which the values of scalar functions are to be taken, to be exported to a CGNS file (extension
.cgns).- Common Fluids Format - Post
allows you to specify the cell zones, surfaces, and quantities that you want exported (note that only nodal values are exported). The following files are written in the hierarchical data format (HDF) from the Automatic Export dialog box:
<filename>.cas.postand<filename>.dat.post. When Fluent is set up to save files in the default Common Fluids Format (CFF), a project file named<filename>.flprjis also written as part of the automatic export; it is recommended that you read this file whenever possible when postprocessing in EnSight, as it contains metadata such as the time values for files exported from transient simulations. Note that if the root name of the exported Common Fluids Format - Post files is the same as that used for case and data files automatically saved during the calculation (through the Autosave dialog box), then the metadata from both operations will be written to the same project file.- Data Explorer
allows you to specify the surface(s) and the scalars you want to write to be exported to a Data Explorer file (extension
.dx).- EnSight Case Gold
allows you to specify the scalars you want to write, the cell zones, interior zone surfaces, and location in the cell from which the values of scalar functions are to be taken, and the file format, to be exported to an EnSight file (extension
.geo,.vel,.scl1, or.encas).- EnSight DVS
allows you to specify the cell zones or surfaces (not both) and the quantities that you want to write, and whether the data is written for nodes or cell centers. Data is exported in
.dvsformat for import to EnSight.- FAST
allows you to specify the scalars you want to write, to be exported as a grid file (Plot3D format), a velocity file, and a scalar file. This option is available only for a triangular or tetrahedral mesh.
- FAST Solution
allows you to export a single file containing density, velocity, and total energy data. This option is available only for a triangular or tetrahedral mesh.
- Fieldview Unstructured
allows you to specify the scalars you want to write and the cell zones from which the values of scalar functions are to be taken, to be exported to a FIELDVIEW binary file (extension
.fvuns) and a regions file (extension.fvuns.fvreg).- I-deas Universal
allows you to specify the surface(s), scalars, and optional loads, based on the kind of finite element analysis selected, to be exported to an I-deas Universal file.
- Mechanical APDL Input
allows you to specify the surface(s) and optional loads, based on the kind of finite element analysis selected, to be exported to a Mechanical APDL Input file (extension
.cdb).- NASTRAN
allows you to specify the surface(s), scalars, and optional loads, based on the kind of finite element analysis selected, to be exported to a NASTRAN file (extension
.bdf).- PATRAN
allows you to specify the surface(s), scalars, and optional loads, based on the kind of finite element analysis selected, to be exported to a PATRAN neutral file (extension
.out).- TAITherm
allows you to specify the surface(s) for which you want to write data and the method of writing the heat transfer coefficient, to be exported to a PATRAN neutral file (extension
.neu). This option is available only when the Energy Equation is enabled.- Tecplot
allows you to specify the surface(s) and the scalars you want to write, to be exported to a Tecplot file.
- Cell Zones
specifies the cell zones for which data is to be written for a CFD-Post compatible, EnSight, or FIELDVIEW file.
- Surfaces
specifies the surfaces for which data is to be written for an ABAQUS, ASCII, Data Explorer, I-deas Universal, Mechanical APDL Input, NASTRAN, PATRAN, TAITherm, or Tecplot file.
- Quantities
specifies valid quantities for output. The attributes of the list are modified based on the active file type. The list may be a single-selection or a multiple-selection list or it may be disabled, depending on the selected File Type.
- Analysis (for ABAQUS, I-deas Universal, Mechanical APDL Input, NASTRAN, and PATRAN formats)
specifies the finite element analysis intended.
- Structural
specifies structural analysis and allows you to select the Structural Loads to be written.
- Thermal
specifies thermal analysis and allows you to select the Thermal Loads to be written.
- Structural Loads
contains optional structural loads that can be written to ABAQUS, I-deas Universal, Mechanical APDL Input, NASTRAN, and PATRAN files. This option is available only when Structural analysis is selected.
- Force
enables force to be written as a load for a structural analysis.
- Pressure
enables pressure to be written as a load for a structural analysis.
- Temperature
enables temperature to be written as a load for a structural analysis. This option is available only when the Energy Equation is enabled.
- Thermal Loads
contains optional thermal loads that can be written to ABAQUS, I-deas Universal, Mechanical APDL Input, NASTRAN, and PATRAN files. This option is available only when Thermal analysis is selected.
- Temperature
enables temperature to be written as a load for a thermal analysis.
- Heat Flux
enables heat flux to be written as a load for a thermal analysis.
- Heat Trans Coeff
enables heat transfer coefficient to be written as a load for a thermal analysis.
- Location (for ASCII, CGNS, and EnSight Case Gold formats)
specifies the location from which the values of scalar functions are to be taken.
- Node
specifies that data values at the node points are to be exported.
- Cell Center
specifies that data values from the cell centers are to be exported.
- EnSight Parallel
(Available only with Fluent in parallel) creates
.encasfiles suitable for use in EnSight Enterprise.- Format (for CDAT for CFD-Post & EnSight and EnSight Case Gold)
specifies the file format.
- Binary
specifies the file format as binary.
- ASCII
specifies the file format as ASCII.
- Heat Transfer Coefficient (for TAITherm format only)
specifies the basis for the heat transfer coefficient exported.
- Flux Based
specifies the flux based method for writing the heat transfer coefficient.
- Wall Function
specifies the wall function based method for writing the heat transfer coefficient.
- Write Case File (for CDAT for CFD-Post & EnSight)
specifies the circumstances under which a case file is written with the
.cdatfile. It is recommended that you select either Every Time or Only if Case/Mesh Changes since applications consuming.cdatfiles require a corresponding case/mesh file to consume the data.- Export Data Every
specifies the frequency for appending the data during the solution process based on either Time Steps or Flow Time.
- File Name
specifies the root name for the files to be saved.
- Append File Name with
allows you to select flow-time or time-step to be appended to the file name.
- Decimal Places in File Name
allows you to specify the number of decimal digits in the file name. This option is available only when flow-time is selected in the Append File Name with drop-down list. The default value for this field is set to
6.
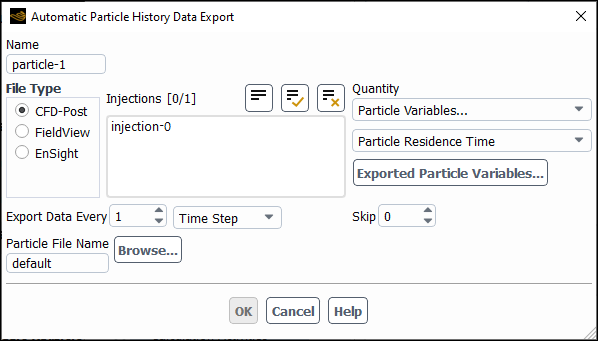
The Automatic Particle History Data Export dialog box allows you to create an automatic particle history export definition for solution data. See Creating Automatic Export Definitions for Transient Particle History Data for details.
Controls
- Name
specifies the name of the particle history export definition.
- File Type
specifies the type of the file you want to write.
- CFD-Post
allows you to write the file in CFD-Post particle tracks format, which can be read in CFD-Post.
- FieldView
allows you to write the file in FIELDVIEW format, which can be read in FIELDVIEW.
- EnSight
allows you to write the file in EnSight format.
- Injections
allows you to select the required injection from the list of predefined injections.
- Quantity
contains the list of variables for which you can export the particle data.
- Skip
allows you to "thin" or "sample" the number of particles that are exported.
- Export Data Every
specifies the frequency for appending the data during the solution process. You can export particle history data frequency based on either Time Step or Flow Time for unsteady flow cases, or based on DPM Iteration for steady flow cases.
- Separate Files for Each Time Step
allows you to have separate exported data files for each time step. Available only when EnSight is selected as the File Type.
- Particle File Name
allows you to specify the file name/directory for the exported data, using the button.
- Ensight Encas File Name
is the file name you will specify if you selected EnSight under File Type. Use the button to select the
.encasfile that was created when you exported the file with the File/Export... ribbon tab option.
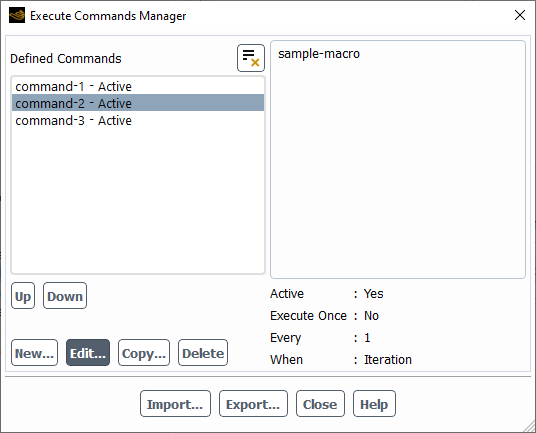
The Execute Commands Manager dialog box allows you to define and manage commands to be executed during the calculation. See Executing Commands During the Calculation for details about using this feature.
Controls
- Defined Commands
lists the total number of monitor commands that have been defined. Details for a selected command in the list are provided to the right.
- Up
moves the selected command up in the list of Defined Commands by one.
- Down
moves the selected command down in the list of Defined Commands by one.
- New...
opens the Execute Commands Dialog Box where you can create a new command.
- Edit...
opens the Execute Commands Dialog Box where you can edit an existing command.
- Copy...
opens the Execute Commands Dialog Box where you can edit an existing command.
- Delete...
removes the selected command from the list of Defined Commands.
- Import...
opens a file selection dialog box where you can designate the name and location for the tab separated value (TSV) file that will contain your imported command(s).
- Export...
opens a file selection dialog box where you can designate the name and location for the tab separated value (TSV) file that will contain your exported command(s).
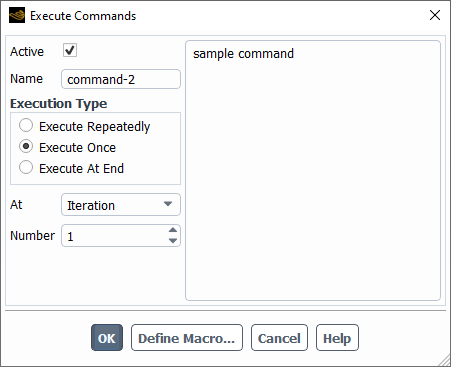
The Execute Commands dialog box allows you to define commands to be executed during the calculation. See Executing Commands During the Calculation for details about using this feature.
Controls
- Active
activates/deactivates the execution of each command.
- Name
specifies a name for each command.
- Execute Repeatedly
Select this option if your command needs to be repeated as part of a sequence of commands.
- Every, When
indicate how often the command is to be executed. You can enter the interval under Every and select Iteration, Time Step, Flow Time, Adjoint Iteration, or Design Iteration under When. (Time Step and Flow Time are only valid choices if you are calculating unsteady flow, and Adjoint Iteration and Design Iteration are only available if you have opened the Execute Commands dialog box from the Gradient-Based Optimizer or Run Adjoint Calculation dialog box.)
- Execute Once
Select this option if your command needs to be executed only once.
- At/Number
indicate how often the command is to be executed. You can enter the interval under Number and select Iteration, Time Step, Flow Time, Adjoint Iteration, or Design Iteration under At. (Time Step and Flow Time are only valid choices if you are calculating unsteady flow, and Adjoint Iteration and Design Iteration are only available if you have opened the Execute Commands dialog box from the Gradient-Based Optimizer or Run Adjoint Calculation dialog box.)
- Execute At End
Select this option if your command needs to be executed at the end of the simulation.
- Command Field
specifies the command to be executed. You can enter text commands (using multiple lines if required) or the name of a command macro that you have defined in the Define Macro Dialog Box.
opens the Define Macro Dialog Box, in which you can define command macros.
ends the definition of a macro. (This button will replace the button when you click in the Define Macro dialog box.)
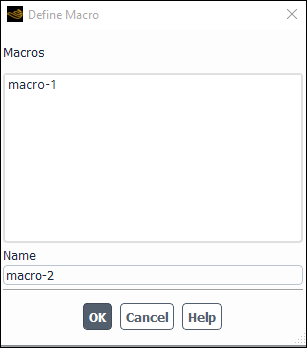
The Define Macro dialog box allows you to define macros for automatic execution by the command monitor, or for interactive use by you. See Defining Macros for details.
Controls
- Macros
contains a selectable list of the currently-defined macros.
- Name
specifies a name for the command macro.
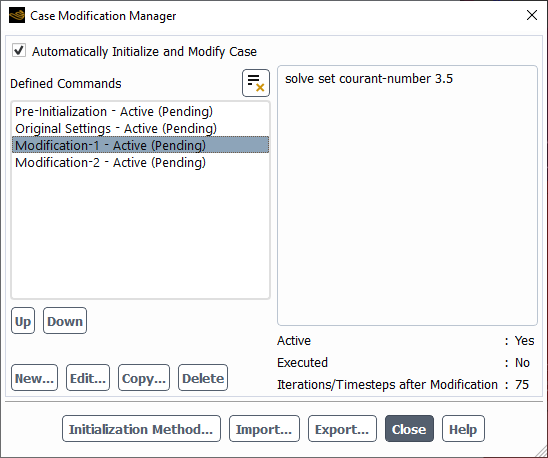
The Case Modification Manager dialog box allows you to specify the initialization method and to modify the case. See Automatic Initialization of the Solution and Case Modification for details.
Controls
- Automatically Initialize Solution and Modify Case
allows you to automatically modify the case based on the settings in the dialog box.
- Defined Commands
lists your pre-defined commands.
- Up
moves the selected command up the list by one increment.
- Down
moves the selected command down the list by one.
- New...
opens the Modify Case Dialog Box where you can create a new case modification command.
- Edit...
opens the Modify Case Dialog Box where you can edit an existing case modification command.
- Copy
copies the selected command in the list. By default, the copy uses the name of the original command and adds a numerical identifier indicating the number of the copy. For example, making multiple copies of a command
my-new-settings, gives you copied commands with the default names ofmy-new-settings-1,my-new-settings-2, andmy-new-settings-3, and so on.- Delete
removes the selected command from the list.
- Initialization Method...
displays the Auto Initialization Method Dialog Box.
- Import...
opens a file selection dialog box where you can locate and select tab-separated value files (
.tsv) that contain your case modification commands.- Export...
opens a file selection dialog box where you can specify the name and location of tab-separated value files (
.tsv) that contain your case modification commands.
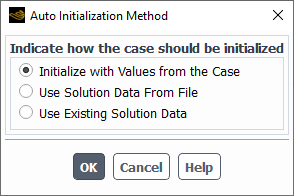
The Auto Initialization Method dialog contains several choices for initializing the solution.
Controls
- Initialize with Values from the Case
uses the values set in the Solution Initialization task page.
- Use Solution Data From File
requires you to read in a data file containing the desired initialization for the case.
- Use Existing Solution Data
is analogous to changing the values in a case and continuing the calculation. However, the iteration counter will be reset to 0 so that the modifications can be applied. Use this method when no solution data exists, similar to the first run.
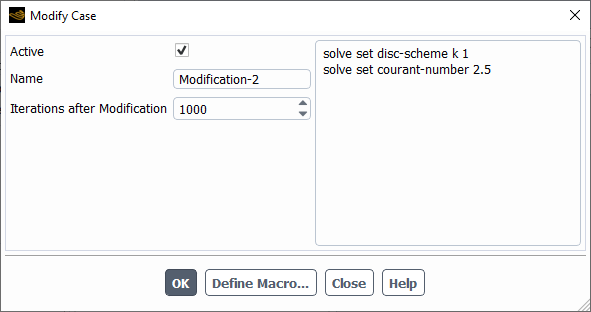
Controls
allows you to enable or disable a defined case modification.
represents the name of the case modification.
represents the number of iterations that you want to run defined case modification commands.
allows you to choose if the case will be modified using Time Steps or by using Flow Time (available for transient calculations).
represents the number of time steps that you want to run defined case modification commands (available for transient calculations when Time Steps is selected for the case modification quality).
represents the number of flow time steps that you want to run defined case modification commands (available for transient calculations when Flow Time is selected for the case modification quality).
opens the Define Macro Dialog Box, in which you can define command macros.