


Configuring an AVAS Sound Function
This procedure shows how to configure an AVAS sound function and to edit its wavetable and granular synthesis layers.
If you use a scenario, play it. If you want to use external data, activate the CAN Mode and make sure that the software can receive external data.
-
Click the speaker button to turn on the audio output.
The speaker button turns light blue
 .
. -
Go to the AVAS tab.
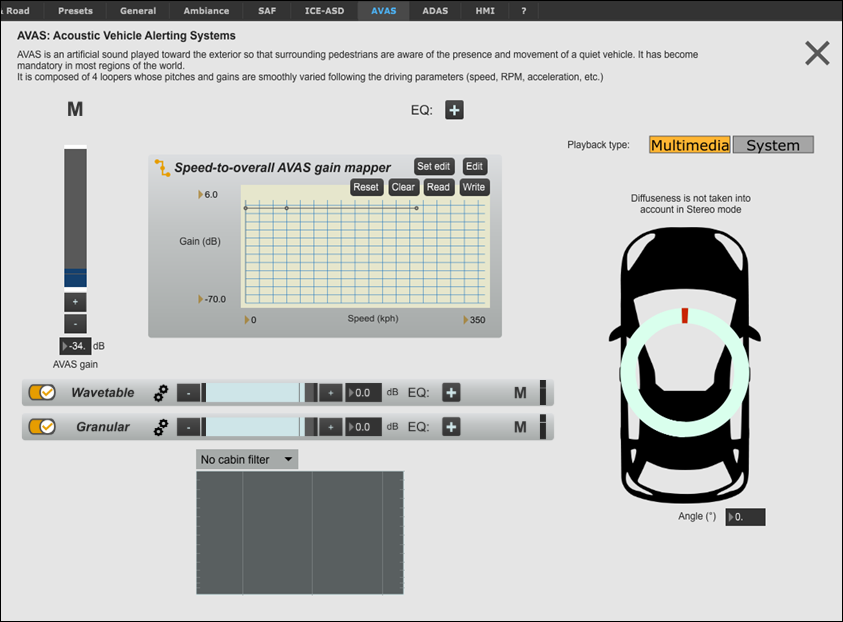
Each of the Wavetable and Granular synthesis layers has an activate button , gain controls for
the entire layer, a mute button
, gain controls for
the entire layer, a mute button  , and an EQ button
to configure Parametric
equalization.
, and an EQ button
to configure Parametric
equalization. -
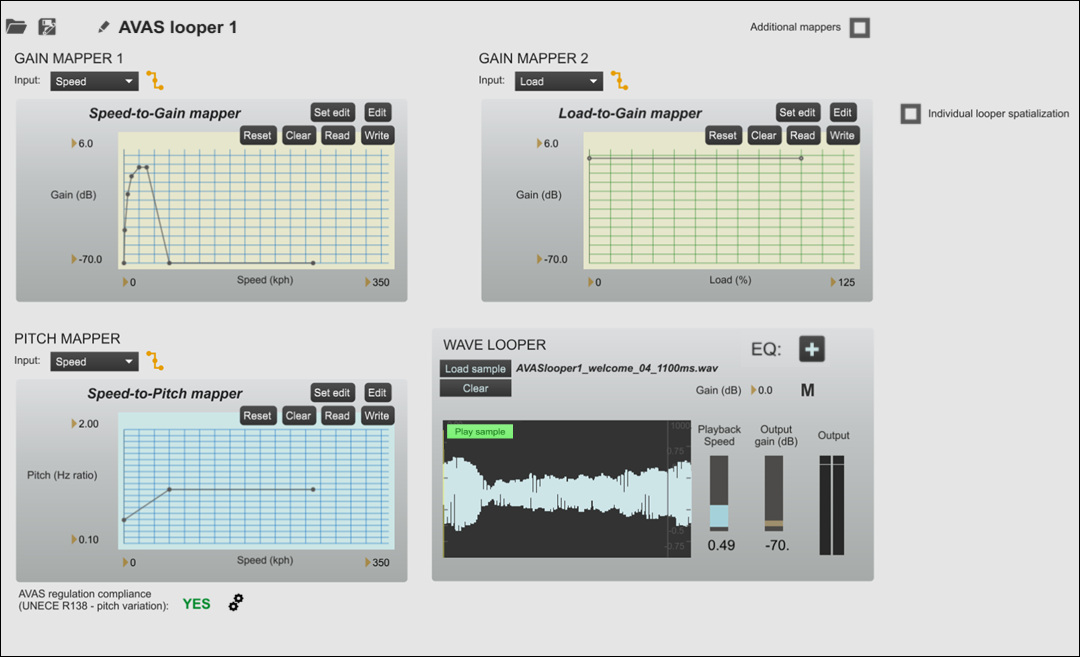
Click the Wavetable Settings button
 to edit the
loopers.
to edit the
loopers.
-
The Wavetable synthesis layer is opened (see
below).
-
Each looper can be activated or deactivated by clicking its button and
the name can be changed by clicking the Rename
button
 .
.
-
The loopers can be reordered in the display by dragging and dropping
the
 button.
-
You can set individual looper gains by using the slider, the
 and
and  buttons, or by entering a
dB value directly (see below).
buttons, or by entering a
dB value directly (see below).
-
You can use the Mute button to
mute an individual looper, or the Solo button
 to mute all except the selected looper. This
allows rapid isolation of a particular sound.
to mute all except the selected looper. This
allows rapid isolation of a particular sound.
-
A VU meter
 is shown next to each looper to provide a
visual indication of active sounds.
is shown next to each looper to provide a
visual indication of active sounds.
 Note: Mute and Solo settings are not saved when saving a preset or a project.
 -
Each looper can be activated or deactivated by clicking its
-
Click the Settings button next to an individual looper to open its
Looper settings window.
The Looper settings window is opened. -
You can Load or Save an
individual looper configuration by clicking
 or
or  . See Saving and Loading Individual Players for
more information.
. See Saving and Loading Individual Players for
more information.
-
You can play the unaltered original sample by clicking the
 button. Using this
feature bypasses all of the mappers and mute states, but the sample playback is
still subject to the overall AVAS gain and project gain settings.
button. Using this
feature bypasses all of the mappers and mute states, but the sample playback is
still subject to the overall AVAS gain and project gain settings.
-
If needed, change the preprocessing formulas associated with the driving
parameters used as mapper inputs by clicking
 (see
Configuring Vehicle Data Preprocessing).
(see
Configuring Vehicle Data Preprocessing).
-
If needed, spatialize this looper individually by selecting
Individual looper spatialization, setting up the desired
Angle and, in the case of multichannel audio mode,
Diffuseness values.
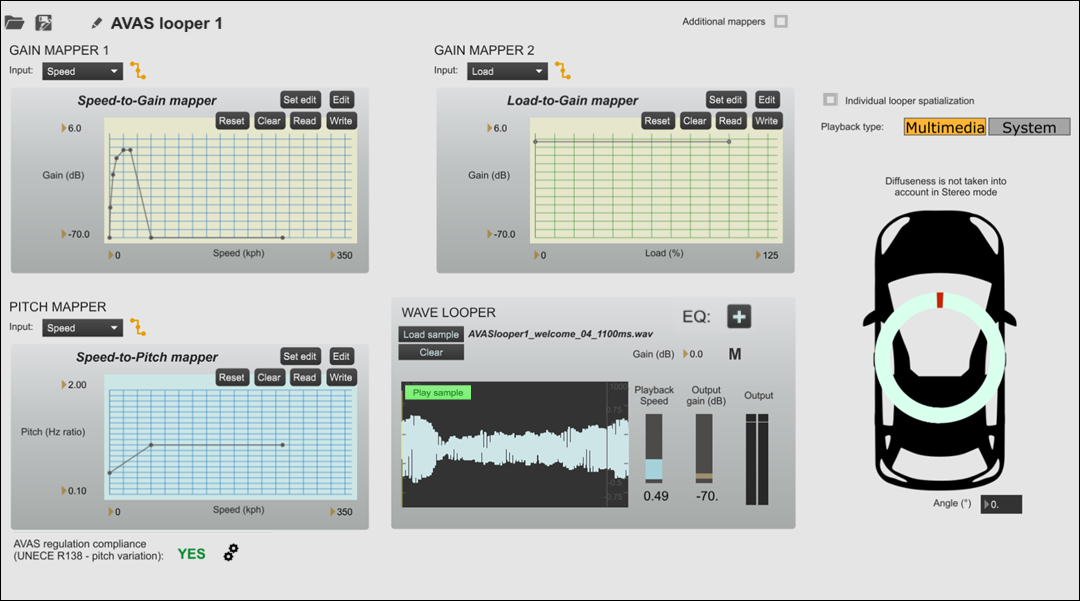
Note: If Individual looper spatialization is cleared, the looper will be spatialized in the same way as set up in the AVAS tab in the main ASDforEV window. -
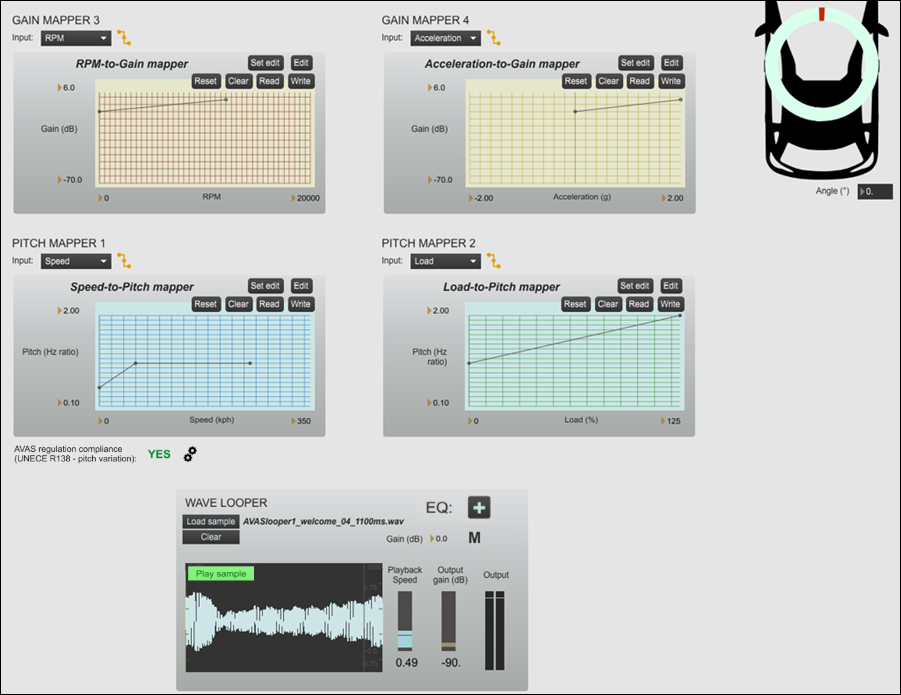
If needed, select Additional mappers to use 2 additional
gain mappers, and 1 additional pitch mapper (whose output multiplies that of the first pitch
mapper).
Note: If Speed is selected as the input of a pitch mapper, you can check if the pitch variation complies with the UNECE R138 regulation. The EU regulation on AVAS sounds enforces a minimal frequency shift of 0.8 % per kph between 5 and 20 kph. If you want to change the thresholds, open the Compliance Settings.
-
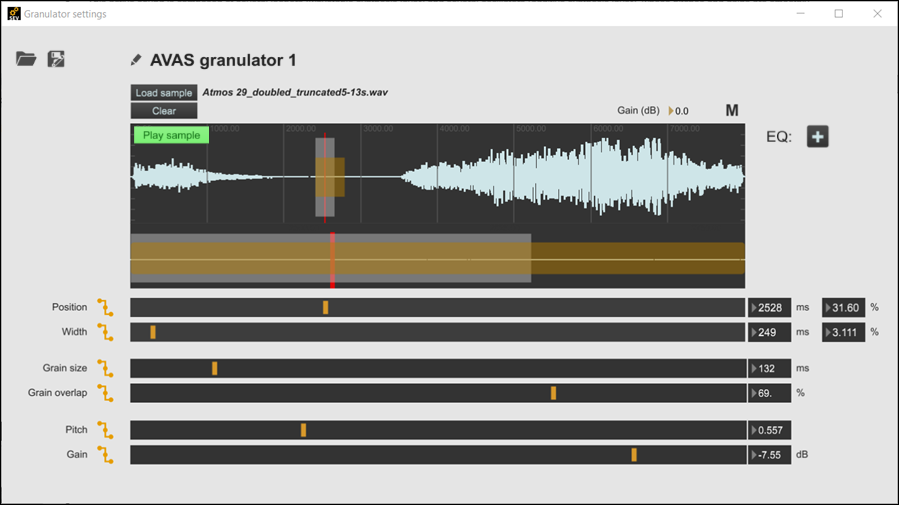
Click the Granular synthesis settings button to configure
the granulators. Granular synthesis is a type of synthesis where a sound sample
is subdivided into short, windowed sample grains (100 ms, for example)
that are selected randomly within a given part of the sample, and played
successively with some overlap. This method makes it possible to easily
synthesize complex and lively sounds, basically without any prior processing of
the loaded sample.
-
Click the
 button to activate a granulator.
-
Click the settings button next to the required granulator to open the
Granulator settings window.
-
Click the EQ
 button to edit the Parametric equalization settings for the granulator.
-
You can play the unaltered sample used for the granulator by clicking the
button.
Sample playback using this feature bypasses the mute states but is still subject
to the overall AVAS gain and project gain settings.
-
If required, click one of the
 buttons to configure the corresponding granulator parameter preprocessing
formula and how this parameter varies along with vehicle parameters:
Note: The sliders associated with these 6 parameters (as well as the number fields next to them) can also be handled manually. This allows you, for example, to identify the desired set of parameters corresponding to a particular driving phase. This is useful when working with a new sample and trying out different granular synthesis strategies to apply to this sound material.
buttons to configure the corresponding granulator parameter preprocessing
formula and how this parameter varies along with vehicle parameters:
Note: The sliders associated with these 6 parameters (as well as the number fields next to them) can also be handled manually. This allows you, for example, to identify the desired set of parameters corresponding to a particular driving phase. This is useful when working with a new sample and trying out different granular synthesis strategies to apply to this sound material. -
You can Load or Save an
individual granulator configuration by clicking or . See Saving and Loading Individual Players for more information.