


Configuring Vehicle Data Preprocessing
This procedure explains how to configure the vehicle data preprocessing.
Note: If you want to use data coming from
a driving simulator or from a vehicle via another device and/or UDP network protocol,
data must be sent to ASDforEV through the API, for more details
refer to the Ansys Sound: ASDforEV API Documentation.
-
Modify the current formula in any of these ways:
- Click the
 button
to reset the formula to the default "simple routing" state.
button
to reset the formula to the default "simple routing" state. - Click the
 button to disconnect the control from any external counterpart.
 - Click the
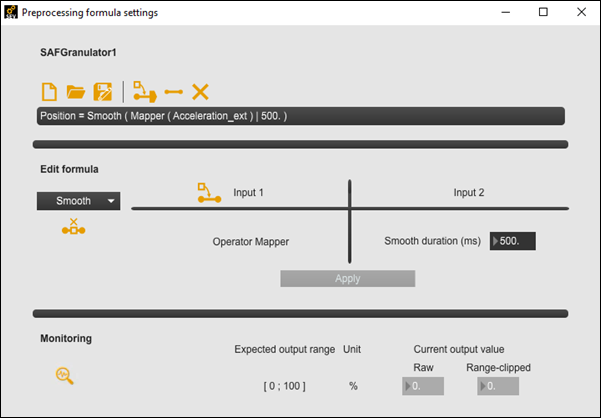
 button or click in the Current preprocessing field to
open the Preprocessing Formula Settings window
(below) in order to change the formula's settings (such as constant values)
or define a new formula.
button or click in the Current preprocessing field to
open the Preprocessing Formula Settings window
(below) in order to change the formula's settings (such as constant values)
or define a new formula.
- Click the
-
If you wish to create a new formula, press the New
button
 to open the Preprocessing formula
definition window:
to open the Preprocessing formula
definition window:
From left to right, select operators, choose externals, and set constant values. The window will adapt while you create the formula, and (at any given point) only buttons related to allowed formula items will be accessible.
- At the start, the formula only displays the control for the left term of the formula, while the right term of the formula is a ? symbol that must be filled by either an operator or an external (for direct routing).
- After each operator or input selection, enter the next input
following the formula rules detailed in Vehicle Data Preprocessing Formulas. Depending on the case, possible
inputs might be:
- Either of the proposed operators
- An external in the proposed dropdown menu
- A constant value set in the number box
- If an external or a constant value is set, it must then be validated by pressing the >> button.
- At any time, you may press the Clear button to clear the current formula (whether complete or not) and start over.
- Pressing the Cancel button or the Close button at the top right of the window will cancel any entered formula and close the Preprocessing formula definition window. The previously used formula is then restored.
Note: Mapper data is not set during this step. It can be set after the formula is created. (See If the formula contains Mapper(s) below and Editing a Mapper in a Preprocessing Formula for further details.)Once the formula is complete, that is, when all inputs of all successive selected operators are defined, click the Validate button to validate the formula.
-
You can load a previously saved formula by clicking the
Load button
 .
.
-
You can save a newly created or a modified formula by clicking the
Save button
 .
Note: You can use these Save and Load buttons to reuse previously-defined formulas for different controls. If necessary, you can change the externals and constant values used in a loaded formula using the procedure outlined in step 7 below.
.
Note: You can use these Save and Load buttons to reuse previously-defined formulas for different controls. If necessary, you can change the externals and constant values used in a loaded formula using the procedure outlined in step 7 below. -
You can click the
 button to
open the Insert an operator window, allowing you to
insert a new operator (and any associated external and constant inputs) in front
of the entire formula (that is, at the end of the whole preprocessing
chain).
button to
open the Insert an operator window, allowing you to
insert a new operator (and any associated external and constant inputs) in front
of the entire formula (that is, at the end of the whole preprocessing
chain).
-
You can set a simple routing by clicking the
button.
-
You can disconnect this parameter by clicking the button.
-
You can edit the formula by inserting or deleting operators, and modifying each
operator’s external and constant inputs in the Preprocessing formula
settings window as follows:
- Choose the corresponding operator from the Formula edition dropdown menu. Operators in the menu are listed in the order that they appear in the formula, from left to right.
- If a dropdown menu is presented for either input, select an alternative external input from the menu list to replace the current one.
- If a number box is presented for input 2, enter a new value to replace the current one.
- Click the Apply button to apply any changes to external or constant inputs.
-
Click the
 button next to one of the inputs to open the Insert an
operator window, allowing you to insert a new operator (and
any associated external and constant inputs) between that input and the
currently-selected operator.
button next to one of the inputs to open the Insert an
operator window, allowing you to insert a new operator (and
any associated external and constant inputs) between that input and the
currently-selected operator.
-
Click the
 button to remove the currently-selected operator. This will reconnect
Input 1 to the removed operator's parent
operator, discarding Input 2.
button to remove the currently-selected operator. This will reconnect
Input 1 to the removed operator's parent
operator, discarding Input 2.
-
Click the
 button to swap the order of the inputs to the currently-selected
operator. This can be used to ensure that the correct input is discarded
when removing an operator using the
button (above).
button to swap the order of the inputs to the currently-selected
operator. This can be used to ensure that the correct input is discarded
when removing an operator using the
button (above).
-
You can click the
 button
to open the Testing a Preprocessing Formula window to observe the
real-time interaction between the formula input parameters and the output.
button
to open the Testing a Preprocessing Formula window to observe the
real-time interaction between the formula input parameters and the output.
The vehicle data preprocessing configuration is complete.
Note: The entire set of defined preprocessing formulas is
automatically saved when saving a preset. Upon loading that preset again, these
preprocessing formulas will be loaded automatically. You can also save the whole
vehicle data preprocessing configuration at any time by clicking the Save
preprocessing button. The preprocessing formulas that are saved either
by clicking the Save preprocessing button or by saving a
preset do not include the preset selection preprocessing formula. This formula,
however, is included when Saving a Project.