The ICEM CFD system launches Ansys ICEM CFD. This application extends Ansys meshing capabilities with robust and varied geometry import, the ability to efficiently mesh large or complex models with extended meshing controls, advanced interactive blocking tools for structured or unstructured mesh generation, extended mesh diagnostics, advanced interactive mesh editing, and output to a wide variety of solver formats including CFD, FEA, and neutral formats.
Ansys ICEM CFD can input geometry in almost any format, whether a commercial CAD design package, third-party universal database, scan data, point data, or even combinations of CAD, facets, and mesh. It includes a variety of "patch independent" meshing methods which are able to work with dirty cad and does not require that surfaces be formed into solids or that flow volumes be extracted. It does include a wide range of interactive geometry, blocking and mesh editing tools that can be used to generate advanced or high quality meshes for any application.
The data-integrated ICEM CFD component system, or "Ansys ICEM CFD Add-in", enables you to launch ICEM CFD from Ansys Workbench and use it to build a project, with the option of adding upstream data from Geometry, Mesh, Mechanical Model, or combined Geometry and Mesh system components. You can also use ICEM CFD to provide data to downstream component systems, such as Ansys Forte, Ansys CFX, Ansys Polyflow, FENSAP-ICE, and Mechanical APDL.
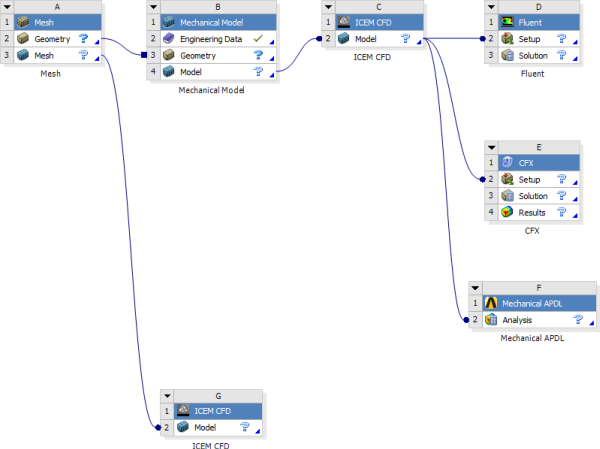
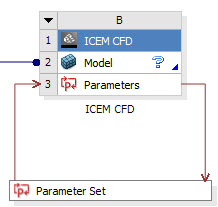
The ICEM CFD component system contains the following cells.
| Cell | Description |
|---|---|
| System header | Identifies the component type and provides access to standard Workbench context menu options. |
| Model | Modifies some aspects of the project and opens the project in
ICEM CFD. The Model cell context menu items include the following:
|
| Parameters (optional) | Displays and allows you to edit input and output parameters for ICEM CFD. |
Note: Scripts written in ICEM CFD may not be parametric with upstream or downstream projects. Care should be taken to write scripts whose functions do not exceed the capabilities of the upstream or downstream component systems.
You can create an ICEM CFD component system in Workbench using any of the following methods:
Double-click the ICEM CFD system template in the Toolbox.
Drag-and-drop the ICEM CFD system template onto the Project Schematic.
Right-click a Geometry or Mesh system and select > .
Import a standalone ICEM CFD project into Workbench.
Updating a project in Workbench brings the entire ICEM CFD system up to the most current status, including upstream and downstream data.
Changes that require you to update your ICEM CFD project include changes to upstream data and changes you make in the ICEM CFD editor. When changes are made, the cell in the Project Schematic window indicates that an update is required. Note, however, that changes made in the ICEM CFD editor will not cause the system to go out of date until the project, tetin file (geometry), blocking file, and/or Replay file are saved.
The actions taken by Workbench depend on whether the following conditions are met:
Blocking exists.
A Replay file exists.
Blocking parameters are set.
Other input parameters are set.
The following table describes the actions performed by ICEM CFD according to these conditions:
| Blocking | Replay File | Blocking Input Parameters | Other Input Parameters | Actions performed by ICEM CFD |
|---|---|---|---|---|
| No | No | No | No |
|
| Yes | No | No | No |
|
| No | No | No | Yes |
|
| No | Yes | No | Yes |
|
| No | Yes | Yes | Yes |
|
| Yes | No | Yes | Yes |
|
| Yes | Yes | Yes | Yes |
|
ICEM CFD saves the unstructured mesh and project only if the ICEM CFD project is closed and you update from Workbench. If the ICEM CFD project is open, you must manually save the unstructured mesh and project.
Meshing input parameters are set before the Replay file is run; blocking Input parameters are set after a replay file is run, but only if blocking exists after the replay file is run.
If no Replay file exists, the default mesher is determined by the presence or absence of blocking: if no blocking exists in the project, tetra is the default. Conversely, if blocking exists in the project, hexa is the default mesher.
Updating a Project
To update a project and refresh upstream and downstream data, right-click the Model cell and select Update.
Note: If available, Update uses the ICEM CFD Replay file to update the ICEM CFD project.
The data-integrated ICEM CFD interface has been modified to provide additional functionality that enhances the integration of ICEM CFD and Workbench.
One-click menus that enable you to control basic project and Replay Recording functions.
Note: If you create Workbench input parameters and want to step through the script line-by-line or using a line range, you must open the dialog from this menu.
The Workbench Replay Control dialog enables you to test and edit Replay scripts created within Workbench.
You can ensure that you are working within the data integrated environment by checking the Message window within ICEM CFD. The first line identifies that the application is integrated in the Workbench framework.

One-Click Menus

The following one-click menu options are available in the Toolbar when you open ICEM CFD from Workbench:
: Saves the entire project, including Workbench data.
: Refreshes the upstream data in the ICEM CFD project.
: Brings the entire ICEM CFD system up to the most current status, including upstream and downstream data.
: Begins recording the commands needed to generate a custom meshing process. All of the steps in the mesh development process are recorded, including blocking, mesh size, edge meshing, boundary condition definition, and final mesh generation. See Replay Scripts in the Ansys ICEM CFD Help Manual. After you click the Start Replay Recording icon, the icon changes to the Stop Replay Recording icon. You can click this icon to stop recording.
You can also click the arrow to choose Pause Replay Recording, Run Replay File, Delete Replay File, and Replay Control, which opens the Workbench Replay Control dialog.
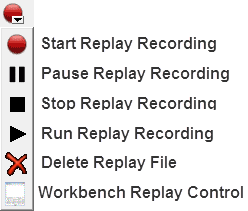
Note: If you create Workbench input parameters and want to step line by line or using a line range through a replay file, you must use the item from this menu to start the Workbench Replay Control dialog.
Output Mesh: You can choose to save the ICEM CFD mesh output to one of several formats including Forte, CFX, Polyflow, Ansys Meshing, or FENSAP-ICE projects.

Workbench Replay Control Dialog
The Replay Control dialog helps you create, test, and edit script files by performing operations in Ansys ICEM CFD and recording the equivalent Tcl/Tk commands in a Replay file. You can then use the dialog to step through and edit the script.
The Workbench Replay Control dialog works exactly the same as the standalone Replay Control dialog, with two key exceptions:
The Workbench Replay Control dialog supports Workbench input parameters and allows you to step through them.
The dialog automatically loads the current Replay script file (ICM.rpl) instead of opening a file browser.
For more information, see the Replay Scripts in the Ansys ICEM CFD Help Manual.
Using input parameters in Workbench enables you to pass data to ICEM CFD, while output parameters allow you to receive data back from ICEM CFD. The interaction of parameters between applications provides you with greater flexibility and capabilities to run optimization and what-if scenarios. For more information about using parameters in Workbench, see Working with Parameters and Design Points.
Parameters may be set globally or individually, with individual parameters taking precedence over global values.
You can perform the following operations involving parameters:
Clicking the box to the right of certain Meshing Input parameters enables you to select whether the parameter is controlled from within ICEM CFD or from within Workbench. A "P" in the check box indicates that it has been selected as a Workbench input parameter. If the check box is empty, you can control the input from within ICEM CFD.
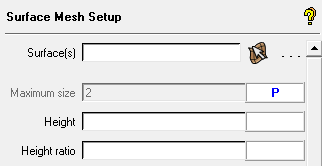
You can set the following input parameters in Workbench:
Global Mesh Size (See Global Mesh Size in the Ansys ICEM CFD Help Manual ).
Shell Meshing (See Shell Meshing Parameters in the Ansys ICEM CFD Help Manual).
Volume Meshing (See Volume Meshing Parameters in the Ansys ICEM CFD Help Manual).
Prism Meshing (See Prism Meshing Parameters in the Ansys ICEM CFD Help Manual).
Surface Mesh Setup (See Surface Mesh Setup in the Ansys ICEM CFD Help Manual).
Curve Mesh Setup (See Curve Mesh Setup in the Ansys ICEM CFD Help Manual).
Edge Params (See Edge Params in the Ansys ICEM CFD Help Manual).
Vertex Location (See Set Location in the Ansys ICEM CFD Help Manual).
Tip:
If you create Workbench input parameters and want to step line by line or using a line range through a replay file, you must use the item from the One-Click menu to start the Workbench Replay Control dialog.
For Surface Mesh Setup, Curve Mesh Setup, and Edge Params, you can set parameters for all existing surfaces, curves, or edges at once; in addition to setting a parameter for a single surface, curve, or edge.
Parameterized edges and vertices (location) can be easily located in the graphics display. Use > , under in the Display Tree to color all parameterized edges red. Similarly, > will color the parameterized vertex number red.
Setting General Input Parameters
To set input parameters in Workbench:
In ICEM CFD, select an input parameter.
Select the check box next to the parameter.
To confirm the selection, click .
A P in the check box indicates that the parameter has been created for Workbench.
Note: You will not be able to edit the parameter within ICEM CFD unless you click the check box again and deselect the parameter.
In Workbench, double-click the project’s Parameters cell.
Edit the parameter values in the Outline of Schematic: Parameters pane.

Switch to the Project tab.
You can now update the project using the new parameter settings.
Setting the parameters for a single curve, surface, or edge
To set single curve, surface, or edge parameters in Workbench:
In ICEM CFD, open the Surface Mesh Setup, Curve Mesh Setup, or Edge Params parameters from the Tab menu.
At the top of the Parameters window, click .
To select the curve, surface, or edge for which you want to set parameters, click the Left Mouse button
Click the Middle Mouse button to complete the selection.
The surface, curve, or edge you selected are listed in the selection entry.

Select the check box next to the parameter you want as the input parameter.
To confirm the selection, click .
A P in the check box indicates that the parameter has been created for Workbench.
Setting the Parameters for All Existing Curves, Surfaces, or Edges
To set single curve, surface, or edge parameters in Workbench:
In ICEM CFD, open the Surface Mesh Setup, Curve Mesh Setup, or Edge Params parameters from the Tab menu.
Leave the surface, curve or edge selection field empty (do not select any surface, curve or edge).
Select the check box next to the parameter you want as the input parameter.
To confirm the selection, click .
A P in the check box indicates that the parameter has been created for Workbench.
The Part Mesh Setup parameters allow you to specify the mesh parameters for different parts of a geometry.
For more information, see Part Mesh Setup in the Ansys ICEM CFD Help Manual.
To create a Workbench mesh parameter for a part:
Switch to the Mesh tab.
Click the Part Mesh Setup icon.
In the Part Mesh Setup dialog, select a part and assign non-zero values to one or more of its parameters.
Click the Parameter column for the part.
A dialog asks you to confirm that you want to create a Workbench parameter for each value you have changed.
Note: If any Workbench parameters are already set for the part, a dialog will ask if you want to delete that Workbench parameter.
Parameters assigned as Workbench parameters are highlighted in blue.

To delete a parameter, click in the Parameter column. A dialog asks you to confirm that you want to delete each individual Workbench parameter in the row.
As with ICEM CFD, the Apply inflation parameters to curves and Remove inflation parameters from curves options affect Workbench parameter behavior as well. The current value of Apply inflation parameters to curves is saved to the project file/.aienv_options file, so it is always available in GUI or Batch mode.
You can add prism meshing parameters using the Part Mesh Setup dialog box.
To set parameters for prism meshing:
Switch to the Mesh tab.
Click the Part Mesh Setup icon.
In the Part Mesh Setup dialog box, select a part and select the check box in the Prism column.
Click the Parameter column for the part.
A dialog asks you to confirm that you want to create a Workbench parameter for Part PARTNAME: Prism.
Note: If any Workbench parameters are already set for the part, a dialog asks if you want to delete that Workbench parameter.
You can set Workbench output parameters to:
List unstruct mesh and pre-mesh blocking quality metrics
List the number of mesh errors and possible problems
List the number of element and block types created.
You set the output parameters within the ICEM CFD application, then view them in either Workbench or ICEM CFD.
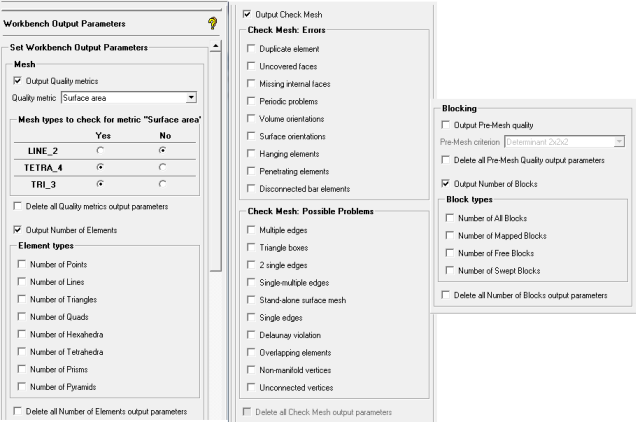
Setting Output Parameters
To set the output parameters:
In ICEM CFD, select > > .
Optionally, select the Output quality metrics check box to select quality metrics.
Use the Quality Metrics drop-down menu to select the metric you want to set.
Click the radio buttons to select the mesh types to check for the metric.
Optionally, select the Output number of elements check box and select the check boxes next to the element types where you want an output.
Optionally, select the Output Check Mesh check box and select the check boxes next to the errors you want to have tallied in the output results.
ICEM CFD performs an analysis as part of the meshing process and list the results in the Output window and in the Workbench Parameters window.
To set the blocking output parameters, select the Output Pre-Mesh Quality and Output Number of Blocks check boxes.
For more information about pre-mesh quality, see Determining the Pre-Mesh Quality in the Ansys ICEM CFD User's Manual.
For more information about Hexa Block types, see Hexa Block Types in the Ansys ICEM CFD User's Manual.
Deleting Output Parameters
To set the output parameters:
In ICEM CFD, select > > .
In the Workbench Output Parameters window, select one or more of the following options, as required:
Click .
Setting user-defined parameters provides flexibility and control over the meshing operation. For example, parameters that cannot be applied as single input parameters can be individually set with user-defined parameters.
Note: See the Ansys ICEM CFD Programmer's Guide for information about using user-defined parameters with replay scripting.
Setting User-Defined Input Parameters
To set user-defined input parameters:
In ICEM CFD, select > > .
In the Workbench User Defined Input/Output Parameters window, select the Create Input Parameter check box.
Enter a value for Parameter name.
Enter a value for Parameter. This field must not be empty.
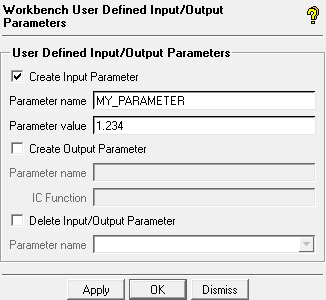
Click or .
You can edit this value in the Outline of Schematic: Parameters pane.
Setting User Defined Output Parameters
To set user-defined output parameters:
In ICEM CFD, select > > .
In the Workbench User Defined Input/Output Parameters window, select the Create Output Parameter check box.
Enter a value for Parameter name.
Enter a value for IC Function.
The IC Function must start with
ic_geo_oric_uns_oric_hex_and must return an integer or a float value.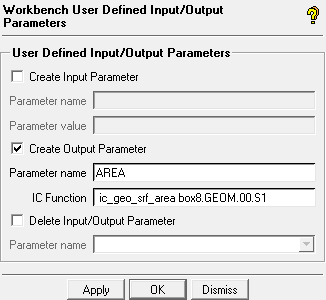
Note: See the Ansys ICEM CFD Programmer's Guide for information about IC functions.
Click or .
Use this procedure to delete any input or output parameter, whether user-defined or otherwise.
To delete parameters:
In ICEM CFD, select > > .
In the Workbench User Defined Input/Output Parameters window, select the Delete Input/Output Parameter check box.
Using the drop-down menu, select the name of the parameter you want to delete.
Click or .
This example illustrates how you can use user-defined parameters to test different meshing scenarios for a simple box:
To add a data-integrated ICEM CFD component system to the Workbench Project Schematic, in the Toolbox, double-click ICEM CFD.
To open ICEM CFD, double-click the Model cell.
First, create an input parameter, ZSIZE, that you can manipulate from Workbench.
Select > > .
Click Create Input Parameter.
Name the parameter
ZSIZEand set Parameter Value to2.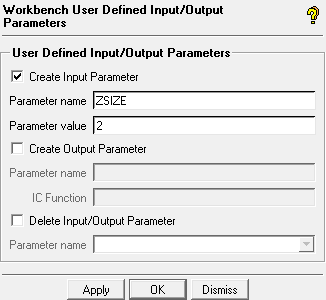
Click OK.
Now create a box model to perform a meshing operation on. Record the process so the operation can be performed again when you update it from Workbench.
Click Start Replay.
Switch to the Geometry tab.
Select Create/Modify Surface.
In the Create/Modify Surface window, select .
Select Box and click .
Switch to the Mesh tab.
Select Compute Mesh.
Select Volume Mesh and click .
To use autosizing for the mesh size, click .
Click Stop Replay Recording.
To save the project, select > .
Next, edit the script to use the input parameter.
From the One-Click Replay Recording menu, select Workbench Replay Control.
Click .
Change Line 16 (or whichever line is appropriate) from
ic_vid_objectbox8 GEOM 00 {0 0 0} 1 1 1toic_vid_object box8 GEOM 00 {0 0 0} 1 1 [ic_wb2_get_parameter user_defined ZSIZE]Select > .
Close the Edit window.
Click save the file as ICM.rpl.
Click .
Do not close ICEM CFD.
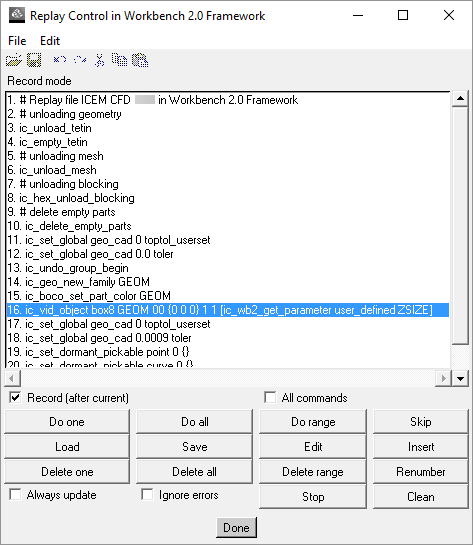
Now you can change the input parameter through Workbench.
In the Workbench Project Schematic, double-click the Parameters cell of the ICEM CFD component.
Change the value of ZSIZE to 5.
Return to the Project tab.
Right-click the Model cell and select Update.
You can watch the Replay script run using the new parameter in the ICEM CFD interface. Each time you change the ZSIZE parameter in Workbench, a new part will be generated and meshed with the new ZSIZE parameter value.
When you create a project that transfers ICEM CFD data downstream to a Static Structural system, data that is applied to the geometry, such as load data, is not transferred to the structural system. To work around this limitation, you can use an External Model system as a bridge between the two systems and then manually set the connections between them.
To transfer an ICEM CFD project to Static Structural:
To start with an ICEM CFD component, do one of the following:
To select an existing ICEM CFD project, select > .
Drag an ICEM CFD component system onto the Project Schematic and then click the model to open the ICEM CFD Add-In and create your model.
Drag an External Model system from the Toolbox and drop it on the ICEM CFD system.
Note that they are connected through the Model cell.
Drag a Static Structural system from the Toolbox and drop it on the Project Schematic as a standalone system.
Tip: If you drag the Static Structural system and drop it on the External Model system, the two cells link Model to Engineering Data, and model information is not passed downstream.
Drag the Model cell from the External Model system and drop it on the Model cell of the Static Structural system.
Right-click the Model cell of the ICEM CFD system and select from the context menu.
Right-click the Model cell of the External Model system and select from the context menu.
The model is now ready to use within Static Structural.


