The following sections describe how start Ansys Fluent:
Important:
Ensure your graphics driver is up-to-date to avoid issues with graphics displays (such as the display coming upside-down).
If your %HOMEDRIVE% environment variable is set to a network drive and you experience issues such as delays in the Fluent Launcher appearing, add a copy of the preferences file to the %HOMEDRIVE% network location (
%HOMEDRIVE%%HOMEPATH%\.fluentconf\24.2.0\preferences). Refer to Setting User Preferences/Options for additional information on the preferences file location.
You specify the licensing level using the Capability Level drop-down list in the Fluent Launcher. The feature availability at the different licensing levels is discussed in Program Capabilities.
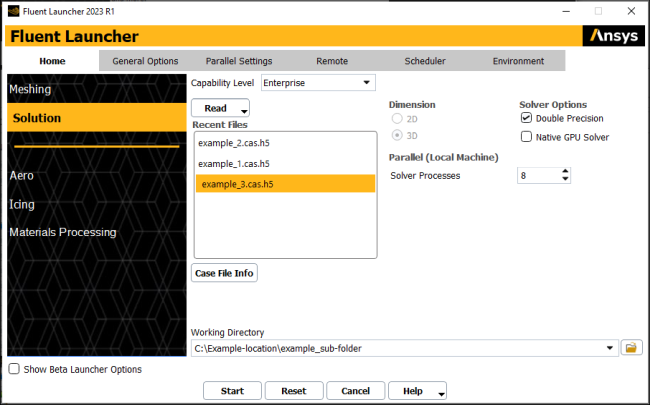
You can interactively specify Ansys Fluent dimension, display, processing and other options using the Fluent Launcher.

To start the Fluent Launcher, do one of the following:
Start Ansys Fluent from the Linux or Windows command line with no arguments.
Start Ansys Fluent from the Windows Start menu.
Start Ansys Fluent from the Windows desktop or Quick Launch bar.
Any options set in the Fluent Launcher will be retained for your next session.
Select the workspace you plan to use (the dividing line in the launcher separates the general-purpose Meshing and Solution workspaces from the application-specific option):
Meshing—See Introduction to Meshing Mode in Fluent and subsequent chapters for further details about using the Fluent Meshing workspace.
Solution—See Graphical User Interface (GUI) and subsequent chapters for further details about using the Fluent Solution workspace.
Aero—See Fluent Aero in the Fluent Workspaces User's Guide for further details about using the Fluent Aero workspace.
Icing—See Fluent Icing in the Fluent Workspaces User's Guide for further details about using the Fluent Icing workspace.
Materials Processing—See Fluent Materials Processing Workspace in the Fluent Workspaces User's Guide for further details about using the Fluent Materials Processing workspace.
You can enable Show Beta Launcher Options to expose additional workspaces and settings that are not yet considered "full" features. These are documented in the Fluent Beta Features Manual.
Important: The available workspaces depends on your licensing level. To learn more about your licensing options, refer to the ANSYS Licensing documentation or speak with your sales representative.
Select a case| case and data | mesh | journal file to start with or specify the Dimension of the simulation you intend to perform. Beginning with a journal file allows you to automatically load the case, compile any user-defined functions, iterate until the solution converges, and write results to an output file. Click the highlighted case | mesh | journal file in the Recent Files list to undo the selection of a starting file. Click to see the following case or mesh file properties:
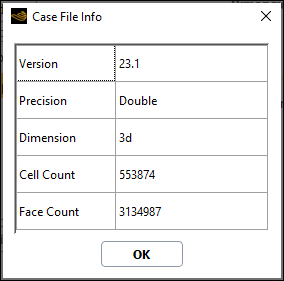
Fluent version the file was last saved in
Precision
Dimension
Total number of cells (
.cas.h5and.msh.h5only)Total number of faces (
.cas.h5and.msh.h5only)
Note: Selecting a case file from the Recent Files list only loads the case file (after clicking ), even if there is an associated data file in the same directory.
Select your required Solver Options.
Choose to perform solution calculations in Double Precision mode, if desired. (Default is single-precision mode) See Single-Precision and Double-Precision Solvers to help with your decision.
Note: The Meshing workspace is always run in Double Precision. This option applies for the Solution workspace only.
Enable Native GPU to run the Fluent solver on one or more GPUs. For more information on starting the Fluent GPU solver using the Fluent Launcher see Starting the Fluent GPU Solver Using the Fluent Launcher.
Select your Parallel (Local Machine) options.
Set Meshing Processes to 1 to restrict the meshing calculations to a single processor core.
Set Solver Processes to 1 to restrict the solution calculations to a single processor core.
Set Meshing Processes more than 1 to allow multiple simultaneous processes. Note that increasing the number of meshing processes also increases the solver processes to the same processor count. See Setting Parallel Options in Fluent Launcher for additional information.
Set Solver Processes more than 1 to allow multiple simultaneous processes. See Setting Parallel Options in Fluent Launcher for additional information.
If Native GPU Solver is enabled:
Set CPU Processes to more than 1 to allow multiple simultaneous processes.
Set the number of GPUs (if your machine has a graphics card with more than one GPU) by clicking ... next to the name of the card to see the individual available GPUs.
Important: The maximum number of GPUs used will be either the number of selected GPUs or the number of CPU processes, whichever count is smaller.
Specify the path of your current working directory using the Working
Directory field or click ![]() to browse through your directory structure. Selecting a file from
the Recent Files list automatically updates the working directory to the
location of the selected file, however you can change to another location, if
desired.
to browse through your directory structure. Selecting a file from
the Recent Files list automatically updates the working directory to the
location of the selected file, however you can change to another location, if
desired.
Note: a Uniform Naming Convention (UNC) path cannot be set as a working directory. You need to map a drive to the UNC path (Windows only)
Click the Help drop-down to reveal links to: Documentation, News, Tutorials, Online Resources, and Videos.
Important: Fluent Launcher also appears when you start Ansys Fluent within Ansys Workbench. For more information, see the separate Ansys Fluent in Workbench User's Guide.
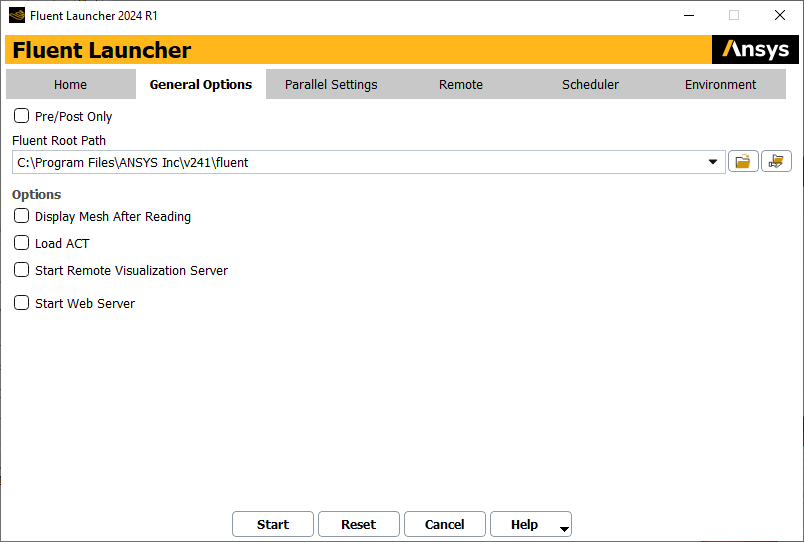
Set file and path options using the General Options tab in Fluent Launcher.
Enable Pre/Post Only to run Ansys Fluent with only the setup and postprocessing capabilities available. The default Ansys Fluent full solution mode allows you to set up, solve, and postprocess a problem, while Pre/Post Only will not allow you to perform calculations.
Specify the location of the Ansys Fluent installation on your system using the Fluent Root Path field, or click
 to browse through your directory structure. Try to use the UNC path if
applicable.
to browse through your directory structure. Try to use the UNC path if
applicable.Note: The
 button automatically converts a local path to a UNC path if any
matching shared directory is found (Windows only). Once set, various fields in
Fluent Launcher (for example, parallel settings, etc.) are automatically populated with the
available options, depending on the Ansys Fluent installations that are available.
button automatically converts a local path to a UNC path if any
matching shared directory is found (Windows only). Once set, various fields in
Fluent Launcher (for example, parallel settings, etc.) are automatically populated with the
available options, depending on the Ansys Fluent installations that are available.Choose to Display Mesh After Reading (disabled by default). This option is applicable only to volume meshes and not surface meshes. All of the boundary zones will be displayed except for the interior zones of 3D geometries.
Note: You can override this option on a file-by-file basis using the Display Mesh After Reading option in the Select File dialog box that opens when you are reading in a file.
Enable the Load ACT option to load Ansys ACT. For additional information on ACT, see Customizing Fluent.
Enable Start Remote Visualization Server to launch the Fluent workspace as a server so that you can launch the Fluent Remote Visualization Client and connect to this Fluent session. Refer to Remote Visualization and Accessing Fluent Remotely in the Fluent Workspaces User's Guide to learn more about this option.
Enable Start Web Server to access settings for the Fluent web service so that you can use the Fluent Web Server and remotely connect to a Fluent session. Refer to Remotely Accessing Your Simulations Using Ansys Fluent's Web Interface to learn more about the web interface.
Both single-precision and double-precision versions of Ansys Fluent are available on all computer platforms. For most cases, the single-precision solver will be sufficiently accurate, but certain types of problems may benefit from the use of a double-precision version. Several examples are listed below:
If your geometry has features of very disparate length scales (for example, a very long, thin pipe), single-precision calculations may not be adequate. Note that nodal coordinates are always stored in double precision (even for the single-precision version of Ansys Fluent), so they are not a concern in this regard.
If your geometry involves multiple enclosures connected via small-diameter pipes (for example, automotive manifolds), mean pressure levels in all but one of the zones can be quite large (since you can set only one global reference pressure location). Double-precision calculations may therefore be necessary to resolve the pressure differences that drive the flow, since these will typically be much smaller than the pressure levels.
For conjugate problems involving high thermal-conductivity ratios and/or high-aspect-ratio meshes, convergence and/or accuracy may be impaired with the single-precision solver, due to inefficient transfer of boundary information.
For multiphase problems where the population balance model is used to resolve particle size distributions, which could have statistical moments whose values span many orders of magnitude.
Note: Ansys Fluent allows only a period to be used as a decimal separator. If your system is set to a European locale that uses a comma separator (for example, Germany), fields that accept numeric input may accept a comma, but may ignore everything after the comma. If your system is set to a non-European locale, numeric fields will not accept a comma at all.
Ansys Workbench accepts commas as decimal delimiters. These are translated into periods when data is passed to Ansys Fluent.
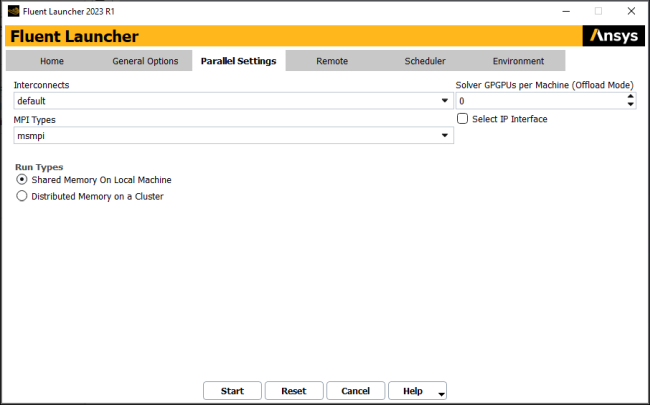
The Parallel Settings tab allows you to specify settings for running Ansys Fluent in parallel.
(Meshing workspace only) Enter the number of processes to be used for meshing under Meshing Processes.
(Meshing and Solution workspaces only) Enter the number of processes to be used for solution under Solver Processes. On Linux with the Intel MPI, additional processes will be spawned as necessary when you change to solution mode, in order to bring the total number of processes to this value; this must be set to a value greater than or equal to Meshing Processes. For details on this dynamic spawning, see Dynamically Spawning Processes Between Fluent Meshing and Fluent Solution Modes.
(Meshing and Solution workspaces only) If your machine is equipped with General Purpose Graphics Processing Units you can also specify Solver GPGPUs per Machine (Offload Mode). This setting is useful if you plan to use the accelerated Algebraic Multigrid (AMG) solver and/or the accelerated Discrete Ordinates (DO) solver (for details, see Using General Purpose Graphics Processing Units (GPGPUs) With the Algebraic Multigrid (AMG) Solver and Accelerating Discrete Ordinates (DO) Radiation Calculations, respectively).
Refer to Parallel Processing for details on parallel processing using Fluent and Starting Parallel Ansys Fluent Using Fluent Launcher for additional details parallel process configuration options on this tab.
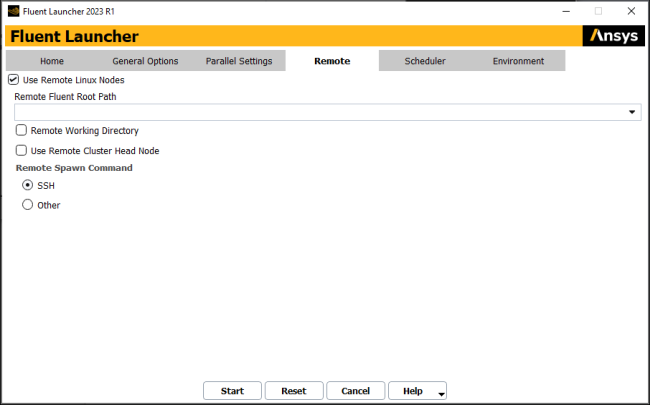
The Remote tab (Figure 4.3: The Remote Tab of Fluent Launcher) allows you to specify settings for running Ansys Fluent parallel simulations on Linux clusters, via the Windows interface.
For additional information about this tab, see Setting Additional Options When Running on Remote Linux Machines.
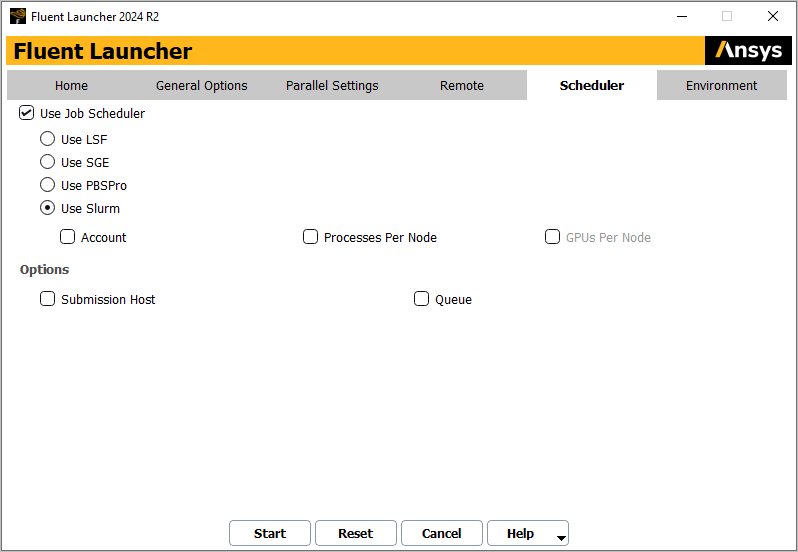
Enable Use Job Scheduler in the Scheduler tab (Figure 4.4: The Scheduler Tab of Fluent Launcher (Windows Version)) to specify settings for running Ansys Fluent with various job schedulers (for example, the Microsoft Job Scheduler for Windows, or LSF, SGE, PBS Pro, and Slurm on Linux).
For additional information about this tab, see Setting Parallel Scheduler Options in Fluent Launcher.
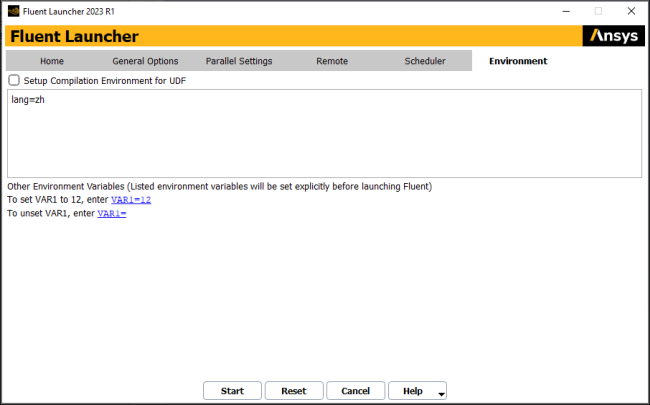
The Environment tab (Figure 4.5: The Environment Tab of Fluent Launcher) allows you to specify compiler settings for compiling user-defined functions (UDFs) with Ansys Fluent (Windows only). The Environment tab also allows you to specify environment variable settings for running Ansys Fluent.
Specify a batch file that contains UDF compilation environment settings by selecting the
Set up Compilation Environment for UDF check box (enabled by default).
Once selected, you can then enter a batch file name in the text field. By default, Fluent Launcher
uses the udf.bat file that is located in the directory where
Ansys Fluent is installed. It is recommended that you keep the default batch file, which is
tested with MS Visual Studio C++ and Clang compilers (for supported versions, see Compiler Requirements for Windows Systems), as well as the built-in compiler (Clang) included with the
Fluent installation. For more information about compiling UDFs, see the separate Fluent Customization Manual.
Under Other Environment Variables, enter or edit license file or
environment variable information in the text field. For example,
FLUENT_AFFINITY=<x> specifies the process binding (affinity)
setting, in the same manner as the -affinity=<x> command line
option (see Parallel Options for details). Using the
Default button resets the default value(s).
There are two ways to start Ansys Fluent on a Windows system:
From the Windows menu, click
This option starts Fluent Launcher (see Starting Ansys Fluent Using Fluent Launcher). The Fluent Launcher may also be accessed via an icon on your desktop or in the Quick Launch bar.
Note: If the default "ANSYS 2024 R2" program group name was changed when Ansys Fluent was installed, you will find the Fluent menu item in the program group with the new name that was assigned, rather than in the ANSYS 2024 R2 program group.
From a Command Prompt window, type
fluent
       version
, whereversionis replaced with one of the four options specifying the dimension and precision of the solver.2dfor the 2D, single-precision solver.3dfor the 3D, single-precision solver.2ddpfor the 2D, double-precision solver.3ddpfor the 3D double-precision solver.
For additional information on starting Fluent from the command prompt, see Command Line Startup Options.
Important: To be able to start Ansys Fluent from the command prompt, be sure the path to your Ansys Fluent home directory is in your command search path environment variable by executing the
setenv.exeprogram located in the Ansys Fluent directory (for example,C:\Program Files\ANSYS Inc\v242\fluent\ntbin\win64).
Tip: You can also specify the number of processors or start Ansys Fluent in meshing mode from the Command Prompt.
To specify the number of processors, type
fluent version -tx, replacingversionwith the desired solver version andxwith the number of processors. For example,fluent 3d -t4to run the 3D version on 4 processors.To start in meshing mode, add the command line option
-meshing. For example,fluent 3d -meshingto start in meshing mode.Both parallel and meshing mode may be combined. You must specify the number of meshing processes using
-tmy. For example,fluent 3ddp -meshing -tm4will start Ansys Fluent in meshing mode with 4 meshing processes. When switched to solution mode, the solver will be 3D, double precision and run 4 processes. It is not possible to switch from meshing mode to solution mode with a different number of processes on Windows, so if you need to run the calculation with a higher number of processes you must start a new session.
There are two ways to start Ansys Fluent on a Linux system:
Start Fluent from the command line without specifying a version, and then use Fluent Launcher to choose the appropriate version along with other options. See Starting Ansys Fluent Using Fluent Launcher for details.
Start the appropriate version from the command line by typing
fluent version, whereversionis replaced with one of the four options specifying the dimension and precision of the solver.2dfor the 2D, single-precision solver.3dfor the 3D, single-precision solver.2ddpfor the 2D, double-precision solver.3ddpfor the 3D double-precision solver.
Tip: You can also specify the number of parallel processors or start Ansys Fluent in meshing mode from the command line.
To specify the number of processors, type
fluent version -tx, replacingversionwith the desired solver version andxwith the number of processors. For example,fluent 3d -t4to run the 3D version on 4 processors.To start in meshing mode, add the command line option
-meshing. For example,fluent 3d -meshingto start in meshing mode.Both parallel and meshing mode may be combined. You must specify the number of meshing processes using
-tmy. For example,fluent 3ddp -meshing -tm4 -t8will start Ansys Fluent in meshing mode with 4 meshing processes. When switched to solution mode, the solver will be 3D, double precision and run 8 processes; note that dynamically spawning additional processes in solution mode is only available on Linux with the default MPI.
Note: Ansys Fluent automatically selects the best graphics driver and defaults to the X11 driver
when it does not detect the required graphics support. You can use the
HOOPS_PICTURE environment variable to force a particular graphics
driver, if you feel it is necessary to use an alternate driver.
Table 4.1: Available Command Line Options for Linux and Windows Platforms lists the available command line arguments for Linux and Windows. More detailed descriptions of these options can be found in the following sections.
To obtain information about available startup options, you can type fluent
-help before starting up Fluent.
Table 4.1: Available Command Line Options for Linux and Windows Platforms
| Option | Platform | Description |
|---|---|---|
-act | all | Load ACT on Fluent startup. |
-affinity=<x> | all | Specifies the process binding (affinity) setting, as described in Parallel Options. |
-app=flremote | all | Launches the Remote Visualization Client. |
-appscript=<scriptfile> | all | Runs the specified script in the specified application (must be used with
the -app=<x> startup option. |
-case <file path> [-data] | all | Reads the specified case file after Fluent launches; if you include
-data in the command line, the data file with the same name as the
case file is read as well. For example: fluent 3ddp -case
c:\example_location\example.cas.h5 -data |
-ccp <x> | Windows only | Uses the Microsoft Job Scheduler, where
<x> is the head node name. |
-cflush | Linux only | Ensures that the file cache buffers are flushed. |
-cnf=<x> | all | Specifies that <x> is the hosts file or
(for Linux) machine list. |
-command="<TUI command>" | all | Executes the specified text command (<TUI
command>) at Fluent startup. |
-driver <name> | all | Sets the graphics driver (available drivers vary by platform, and
include opengl, opengl2,
x11, and null for Linux and
opengl, opengl2,
dx11, msw, and
null for Windows). |
-env | all | Show environment variables. |
-g | all | Run without the GUI or graphics. |
-gpgpu=<n> | Linux and Win64 only | Specifies the number of GPGPUs per machine that should be used for AMG acceleration and/or DO acceleration. Only available in parallel. |
-gpu[=<n>} | all | Run with the GPU Solver. You can optionally specify which devices to
use; for example, -gpu=1,2,4. |
-gr | all | Run without graphics. |
-gu | all | Run without the GUI but with graphics. You cannot interact with the displayed graphics objects. |
-gui_machine=<hostname> | Linux only | Specifies that <hostname> is used for
running Cortex (the process that manages the GUI and graphics). |
-h<heap size> | all | Specifies the heap space for Cortex (the process that manages the GUI and graphics) |
-help | all | Display command line options. |
-hidden | Windows only | Run in minimized mode. |
-host_ip=<host:ip> | all | Specifies that the IP interface <host:ip>
is to be used by the host. |
-i <journal> | all | Reads the specified journal file(s). Read multiple journals at once as
follows: -i example1.jou -i
example2.jou -i example3.jou ...
|
-license=<x> | all | Specify the capability level for when Fluent launches;
<x>={enterprise | premium}. |
-meshing | all | Start Fluent in meshing mode (you must specify Fluent as either 3d or 3ddp). |
-mpi=<mpi> | all | Specifies that the MPI implementation is
<mpi> (for example, intel). |
-mpitest | all | Launches an MPI program to collect network performance data and prints to console (Linux) or to the working directory (Windows). |
-nm | all | Do not display mesh after reading. |
-p<ic> | all | Specify interconnect; <ic>={default | eth |
ib} |
-pcheck | Linux only | Check the network connections before spawning compute nodes. |
-platform=<x> | Linux only | Loads a binary that is specially ported for a particular platform, as described in Performance Options. |
-post | all | Run the Ansys Fluent postprocessing-only executable. |
-r | all | List all releases installed in the current directory. |
-r<x> | all | Run release <x> of Ansys Fluent. |
-remote_node=<hostname> | Linux only | Specify the machine to be used for executing mpirun to launch the node
processes; if =<hostname> is omitted, the first node in the
hosts file will be used. |
|
| Linux only | Run Ansys Fluent under a scheduler;
<scheduler> can be set to lsf (LSF),
pbs (PBS Professional), sge (Altair Grid
Engine (formerly UGE and formerly SGE), or slurm (Slurm). |
|
| Linux only | Specifies that the account is set to
<account> when running under Slurm. |
|
| Linux only | Ensures the use of environment variables when using custom scheduler scripts. |
-scheduler_gpn=<x> | Linux only | Sets the number of graphics processing units (GPUs) per cluster node to
<x> when running under Slurm with the Fluent native GPU
solver. |
-scheduler_headnode=<head-node> | Linux only | Specifies the scheduler job submission machine name or (for SGE) the SGE qmaster. |
-scheduler_list_queues | Linux only | Lists all available queues. |
-scheduler_nodeonly | Linux only | Specifies that Cortex and host processes are launched before the job submission and only the parallel node processes are submitted to the scheduler. |
|
| Linux only | Enables an additional option <opt> that is
relevant for the selected scheduler; this command line option can be included multiple
times. |
|
| Linux only | Sets the parallel environment to <pe> when
running under SGE. |
|
| Linux only | Sets the number of node processes per cluster node to
<x> when running under Slurm. |
|
| Linux only | Sets the scheduler queue or partition to
<queue>. |
|
| Linux only | Sets the scheduler standard error file to
<err-file>. |
|
| Linux only | Sets the scheduler standard output file to
<out-file>. |
|
| Linux only | Enables a job-scheduler-supported native remote node access mechanism when running under SGE or PBS Professional. |
|
| Linux only | Sets the working directory for the scheduler job to
<working-directory>. |
-setenv="<var>=<value>" | all | Sets the environment variable <var> to
<value>. |
|
|
all | Run Ansys Fluent and start the remote visualization server. You can provide a path before the server info filename to specify where the file is created. |
-stream | Linux only | Prints the memory bandwidth. |
-t<x> | all | Specifies that the number of processors is
<x>. |
-tm<x> | all | Specifies that the number of processors for meshing is
<x>. |
-ws | all | Starts the web service with default settings. |
-ws=<x> | all | Starts the web service with a session name
<x>. |
-ws-port=<x> | all | Specifies the port number <x> for starting
the web server. |
-ws-portspan=<x> | all | Specifies the port span <x> for starting
the web server. |
-ws-js-url=<x> | all | Specifies the job service URL <x> for
registering the web server |
fluent -act loads Ansys ACT at Fluent startup. For
additional information about ACT in Fluent, see Customizing Fluent.
fluent -app=flremote launches either the Fluent Launcher or the
specified dimension of Fluent (for example, 3ddp), along with the Fluent Remote
Visualization Client. For additional information about the Fluent Remote Visualization
Client, refer to Remote Visualization and Accessing Fluent Remotely in the Fluent Workspaces User's Guide.
fluent -appscript, allows you to specify a script that will run
in the specified application (-appscript must be used in conjunction
with -app).
Note: Fluent automatically selects the best graphics driver for the given runtime
environment, unless you choose a specific graphics driver with the fluent
-driver command line option.
(Windows only) The OpenGL
graphics driver is deprecated and in some instances may cause Ansys Fluent to close unexpectedly.
It is recommended that you have a good supported graphics card to ensure the best
performance.
fluent -driver allows you to specify the graphics driver to be
used in the session. When enabling graphics display, you have various options: on Linux, the
available drivers include fluent -driver opengl2, fluent
-driver opengl, and fluent -driver x11; on Windows, the
available drivers include fluent -driver opengl2, fluent
-driver opengl, fluent -driver dx11, and
fluent -driver msw (the latter instructs Ansys Fluent to use the Operating
Systems Windows driver). For both Linux and Windows, you can disable graphics display using
fluent -driver null. For a comprehensive list of the drivers available
to you, open a Fluent session, enter the
display/set/rendering-options/driver text command, and then press the
Enter key at the driver> prompt. For more details
about using the driver options, see Hiding the Graphics Window Display.
Note: For any session that displays graphics in a graphics window and/or saves picture files,
having the driver set to x11, msw, or
null will cause the rendering / saving speed to be significantly
slower.
fluent -gui_machine=<hostname> will run Cortex on a
specified machine (<hostname>) rather than automatically on the
same machine as that used for compute node 0. If you just include
-gui_machine (without =<hostname>),
Cortex is run on the same machine used to submit the fluent command.
This option is only available when running on Linux, and may be needed to ensure optimal
graphics performance when running Fluent under a scheduler / load manager (using the
-scheduler=<scheduler> option, as described in Scheduler Options).
Important: (Exceed onDemand Only) When you are using the -gui_machine flag
you must also use -setenv="CORTEX_PRE=ssrun" to specify the server
side rendering to ensure accelerated graphics performance.
For example: fluent 3ddp -t2
-setenv="CORTEX_PRE=/opt/Exceed_connection_server_13.8_64/bin/ssrun"
-scheduler=<scheduler> -scheduler_queue=<queue>
-gui_machine=<hostname>
Note that the path to ssrun may be different for your specific
environment.
fluent -g will run Cortex without graphics and without the
graphical user interface. This option is useful if want to submit a batch job.
fluent -gr will run Cortex without graphics. This option can
be used in conjunction with the -i <journal> option to run a job
in "background" mode.
fluent -gu will run Cortex without the graphical user
interface but will open graphics windows and display graphics objects. You cannot interact with
the displayed graphics objects.
To start Fluent and immediately read a journal file, type fluent -i
<journal>, replacing <journal> with the name
of the journal file you want to read.
To start Fluent and immediately read a case file, type fluent <dimensions
and precision> -case <path to case>, replacing <path to
case> with the path to and name of the case file you want to read.
To start Fluent and immediately read a case and data file, type fluent
<dimensions and precision> -case <path to case> -data, replacing
<path to
     case>
with the path to and name of the case file you
want to read. The data file must be in the same directory as the case file and its name must
exactly match that of the case file (except for the .dat file
extension).
To start Fluent at a specific capability level (licensing level), type
fluent <dimensions and precision> -license=<enterprise or
     premium>
.
fluent -h<heap size> will update the heap space for Cortex
processes to the specified size. For example, fluent 3ddp -h50000000.
The default heap size is 18000000. Increasing the heap size
will also increase Fluent's memory usage, which could negatively impact machine performance.
Note that you cannot decrease the heap size below the default value of
18000000.
fluent -nm will run Cortex without displaying the mesh in
the graphics window.
Important: Download graphics card driver updates directly from the graphics card vendor's website, for example www.nvidia.com. Do not use the "Update Driver" feature offered by the operating system as these can sometimes update to an older version of the driver.
fluent -meshing specifies that Fluent opens in meshing mode
rather than the default solution mode. See Introduction to Meshing Mode in Fluent for further details
about the meshing mode.
-cflush specifies that memory is allocated in such a way as to
ensure that all of the associated file cache buffers are flushed. This may resolve processing
performance issues. For more details, see Clearing the Linux File Cache Buffers.
-platform=<x> loads a binary that is specially ported for a
particular platform. When <x>=intel, an
AVX2 optimized binary is used that enhances performance when running on processors that support
the AVX2 instruction set (available only on Linux).
-stream prints the memory bandwidth, using a variant of the
STREAM benchmark. This information can be helpful in determining if your memory is set up in an
optimal manner.
These options are used in association with the parallel solver.
-affinity=<x> specifies the process binding (affinity)
settings. The default behavior is optimized for the respective run scenarios. The available
choices for this option depends upon the platform on which you are running:
When running on Linux, you have the following choices:
If
<x>=off, Fluent allows the message passing interface (MPI) to manage process binding. This corresponds to the default behavior.If
<x>=core, Fluent assigns each process to an individual core in an optimized manner.If
<x>=sock, Fluent assigns processes to all cores in sockets rather than the individual cores.
When running on Windows, you have the following choices:
If
<x>=1, Fluent manages the affinity, assigning each process to an individual core. This corresponds to the default behavior with shared memory on a local machine.If
<x>=off, Fluent allows the message passing interface (MPI) or the scheduler to manage process binding. This corresponds to the default behavior with distributed memory on a cluster or when running under the Microsoft Job Scheduler.If
<x>=numa, each process is assigned to all cores in a non-uniform memory access (NUMA) node while spreading the processes over the most possible NUMA nodes.
-ccp <x> (where <x> is the
name of the head node) runs the parallel job through the Microsoft Job Scheduler as described
in Starting Parallel Ansys Fluent with the Microsoft Job Scheduler.
-cnf=<x> (where <x> is the
name of a hosts file or a list of Linux machines) spawns a compute node on each of the
specified machines. For details, see Starting Parallel Ansys Fluent on a Windows System Using Command Line Options or
Starting Parallel Ansys Fluent on a Linux System Using Command Line Options.
-gpgpu=<n> specifies the number of
general purpose graphics processing units (GPGPUs) per machine to be used in offload mode for
AMG acceleration and/or DO acceleration. For more information, see Using General Purpose Graphics Processing Units (GPGPUs) With the Algebraic Multigrid
(AMG) Solver and Accelerating Discrete Ordinates (DO) Radiation Calculations, respectively.
-gpu[=<n>} specifies that the native GPU Solver is run, and
you can specify which graphics processing units to use as needed; for example,
-gpu=1,2,4. For further details, see Starting the Fluent GPU Solver from the Command Line.
-host_ip=<host:ip> specifies the IP interface to be used by
the host process.
-mpi=<mpi> specifies that
<mpi> is to be used for the MPI. You can skip this flag if you
choose to use the default MPI.
-mpiopt=<x> allows you to specify any additional MPI flags
(<x>) to be included in the run (Linux only).
-mpitest runs the mpitest program instead of Ansys Fluent to
test the network.
-p<ic> specifies the use of parallel interconnect
<ic>, where <ic> can be any of
the interconnects listed in Starting Parallel Ansys Fluent on a Windows System Using Command Line Options or Starting Parallel Ansys Fluent on a Linux System Using Command Line Options.
-pcheck checks the network connections before spawning compute
nodes (Linux only).
By default, the mpirun command (which launches the node processes) is executed on the
compute node where the host process is spawned. You can use
-remote_node=<hostname> to specify a different machine for the
execution of this command. If =<hostname> is omitted, the first
node in the hosts file will be used. (Linux only)
-ssh specifies that SSH should be used to spawn remote processes.
(Beginning with Ansys Fluent R16.0, SSH is used by default. This option is included primarily for
backward compatibility with existing launch scripts, etc.)
-t<x> specifies that <x>
processors are to be used. For more information about starting the parallel version of
Ansys Fluent, see Starting Parallel Ansys Fluent on a Windows System or Starting Parallel Ansys Fluent on a Linux System.
-tm<x> specifies that <x>
processors are to be used for meshing. This value must be less than or equal to the number of
processes specified with -t<x>.
fluent -post will run a version of Fluent that allows you to
set up a problem or perform postprocessing, but will not allow you to perform calculations.
Running Ansys Fluent for pre- and postprocessing requires you to use the
-post flag on startup. To use this option on Linux, launch
Ansys Fluent by adding the -post flag after the version number, for
example,
fluent 3d -post
To use this same feature from the graphical interface on Windows or Linux, select the Pre/Post Only option in the General Options tab of Fluent Launcher, as described in Starting Ansys Fluent Using Fluent Launcher.
The -sifile=<name>.txt option starts Ansys Fluent and the
server that is necessary for running the remote visualization client. For additional
information on remote visualization, refer to Remote Visualization and Accessing Fluent Remotely.
Note: You can specify the location for the server info file prior to the filename, for example
-sifile=D:/example_folder/server_info_example_name.txt. If you do not
provide a file path before the file name and you do not provide a path using the
SERVER_INFO_DIR environment variable, then the file is saved in your
working directory.
The -scheduler=<scheduler> option allows you to specify
that your Linux session is run under a scheduler / load manager, where
<scheduler> can be one of the following:
lsf: this allows you to run Ansys Fluent under IBM Spectrum LSF software, and thereby take advantage of the checkpointing features of that load management tool. For further details, see Part I: Running Fluent Under LSF.pbs: this runs Ansys Fluent under Altair PBS Professional, and allows you to use the features of this software to manage your distributed computing resources. For further details, see Part II: Running Fluent Under PBS Professional.sge: this runs Ansys Fluent under Altair Grid Engine (formerly UGE, formerly SGE) software, and allows you to use the features of this software to manage your distributed computing resources. For further details, see Part III: Running Fluent Under SGE.slurm: this runs Ansys Fluent under Slurm, and allows you to use the features of this software to manage your distributed computing resources. For further details, see Part IV: Running Fluent Under Slurm.
Note: You can use the -scheduler=<scheduler> option along with
-gui_machine=<hostname> or
-gui_machine (described in Graphics and Files Options), in order to ensure optimal graphics performance.
When running under Slurm, -gui_machine=<hostname> or
-gui_machine is also needed to allow dynamic spawning (which is
described in Dynamically Spawning Processes Between Fluent Meshing and Fluent Solution
Modes), as well as the combination of Slurm
+ Open MPI + distributed memory on a cluster.
If you use custom scheduler scripts instead of relying on the standard Fluent option
(-scheduler=<scheduler>), your environment variables related to
the job scheduler will not be used unless you include the
-scheduler_custom_script option with the Fluent options in your
script.
Other options are available when you use a scheduler:
You can specify the scheduler job submission machine name or (for SGE) the SGE qmaster using
-scheduler_headnode=<head-node>(by default it islocalhost).You can list all available queues using
-scheduler_list_queues, Note that Fluent will not launch when this option is used.You can specify a queue / partition using
-scheduler_queue=<queue>.You can use
-scheduler_nodeonlyto specify that Cortex and host processes are launched before the job submission and that only the parallel node processes are submitted to the scheduler.You can enable an additional option for the scheduler using
-scheduler_opt=<opt>. Note that you can include multiple instances of this option when you want to use more than one scheduler option.You can specify the name and directory of the scheduler standard error file using
-scheduler_stderr=<err-file>(by default it is saved asfluent.<PID>.ein the working directory, where<PID>is the process ID of the top-level Fluent startup script).You can specify the name and directory of the scheduler standard output file using
-scheduler_stdout=<out-file>(by default it is saved asfluent.<PID>.oin the working directory).You can specify the working directory for the scheduler job using
-scheduler_workdir=<working-directory>, so that scheduler output is written to a directory of your choice rather than the home directory or the directory used to launch Fluent.When running under Altair Grid Engine software, you can set the parallel environment using
-scheduler_pe=<pe>.When running under Slurm, you can set the account using
-scheduler_account=<account>and specify the number of node processes per cluster node (rather than leaving it to the cluster configuration) using-scheduler_ppn=<x>. When using the Fluent native GPU solver, you can specify the number of graphics processing units (GPUs) per cluster node using-scheduler_gpn=<x>(by default,<x>=0).You can enable a job-scheduler-supported native remote node access mechanism using
-scheduler_tight_couplingin Linux when running under SGE or PBS Professional. Note that if you enable this option, it is not used if the Cortex process is launched after the job submission (which is the default when not using-scheduler_nodeonly) and is run outside of the scheduler environment by using the-gui_machineor-gui_machine=<hostname> option. For details about the MPI / job scheduler combinations that are supported for this tight coupling, see Running Fluent Using a Load Manager.
The -command="<TUI command>" option allows you to specify
that a single text command (<TUI command>) is executed at
Fluent startup. The text command must be complete, that is, it cannot rely on further user
input in the console after launching. Up to 10 instances of this option can be included, and
the text commands will be executed in the order they are entered. When this option is used
along with the -i <journal> option, the text commands are
executed before the journal.
For example, you could enter the following to read a case and start a calculation:
fluent 3d -command="file/read-case file_name.cas"
     -command="solve/initialize/initialize-flow" -command="sol iter 10"
.
Typing fluent <version> -r, replacing
<version> with the desired version (2d
or 3d, or for double precision, fluent or
3ddp), will list all releases of the specified version.
fluent -r<x> will run release
<x> of Ansys Fluent.
Typing fluent <version> -env, replacing
<version> with the desired version, will list all environment
variables before running Ansys Fluent.
Including the -setenv="<var>=<value>" option sets the
environment variable <var> explicitly to
<value> before launching Ansys Fluent. Note that you can include as
many instances of this option as you need to set all of the relevant environment variables. You
can also unset an environment variable by entering
-setenv="<var>=".
The following command line options (in either Windows or Linux) can be used when Ansys Fluent is involved in a system coupling simulation.
-schost="<x>" (where <x> is
the name of the host machine, in quotes) specifies the host machine on which the coupling
service is running (to which the co-simulation participant/solver must connect).
-scport=<y> (where <y> is
the port number) specifies the port on the host machine upon which the coupling service is
listening for connections from co-simulation participants.
-scname="<z>" (where <z> is
the name of the participant, in quotes) specifies the unique name used by the co-simulation
participant to identify itself to the coupling service (see Server File in the System Coupling User's Guide for more
information).
The general syntax for invoking Ansys Fluent for system coupling is:
fluent 3d –schost=host name in quotes
–scport=port number
–scname=name of the solver in quotes
For instance:
fluent 3d –schost="machine1.domain.com" –scport=1234 –scname="Solution1"
Once Ansys Fluent loads the case, initialize the solution using the following command:
s i i
Once your case is initialized, start the system coupling by typing the following command in the Ansys Fluent text user interface (TUI):
(sc-solve)
For more information, see Performing System Coupling Simulations Using Fluent, as well as the System Coupling User's Guide.
There are other startup options that are not listed when you type the fluent
-help command. These options can be used to customize your graphical user
interface. For example, to change the Ansys Fluent window size and position you can either
modify the .Xdefaults file described in Customizing the Graphical User Interface, or you can
simply type the following command at startup:
fluent <version> -geometry <XX>x<YY>+<xx>-<yy>
where <XX> and <YY> are the
width and height in pixels, respectively, and
+<xx>-<yy> is the position of the
window.
Therefore, typing fluent 3d -geometry 700x500+20-400 will start
the 3D version of Ansys Fluent, sizing the Ansys Fluent console to 700x500 pixels and positioning
it on your monitor screen at +20-400.
There are additional Qt command line startup options for modifying the graphical stylesheet and more, which can be found in Qt documentation.
By default, Fluent will abort during startup if it is not completed within 10 minutes, in order to avoid wasting resources. Note that this aborting will not happen in the following rare circumstances:
when running in
-node_onlymode while submitting to a job schedulerwhen running under Microsoft job scheduler in non-batch mode
when running with mixed Windows / Linux mode and the nodes are submitted to a job scheduler
If your startup is aborted, you should check your networks and computers to make sure they
are available and operating appropriately. If you believe the systems are good, you can extend
the time allowed before aborting by setting <x>
to a number of seconds greater than 600 by performing the following:
launch with the following environment variable:
FLUENT_START_COMPUTE_NODE_TIME_OUT=<x>launch with the following command line option:
-setenv="FLUENT_START_COMPUTE_NODE_TIME_OUT=<x>"


