


The following sections describe how to start the GPU solver in Fluent solution mode:
To start the Fluent GPU Solver from the Fluent Launcher:
Open the Fluent Launcher. Refer to Starting Ansys Fluent Using Fluent Launcher in the Fluent User's Guide for additional information on opening the Fluent Launcher.
Select Enterprise from the Capability Level drop-down list.
Important: The Fluent GPU Solver is only available at the Enterprise licensing level.
Select Solution in the top-left selection list.
Under Solver Options, enable the Native GPU Solver option.
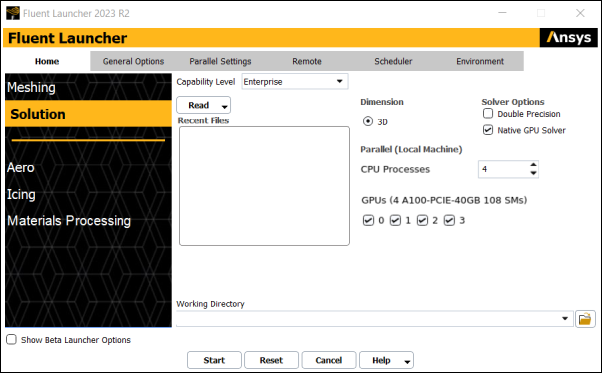
If you have multiple GPUs installed on your machine and intend to use the Fluent GPU Solver with multiple GPUs, enable the IDs of the GPUs you would like to use. To check which IDs are associated with the GPUs on your machine, you can open a command prompt window and enter the
nvidia-smicommand. Note that for each additional GPU used by the GPU solver, an additional CPU process is required and will be added under Parallel (Local Machine).(Optional) Under Parallel (Local Machine), you can increase the number of CPU Processes to use multiple CPU compute nodes in parallel during case setup and postprocessing. Note that the number of CPU Processes specified must be greater than or equal to the number of GPUs specified.
CPU Processes are only used for case setup and postprocessing and are not involved with the GPU solver calculation. For more information on using the GPU solver with multiple CPU processes see Using CPU Processes for Setup and Postprocessing
(Optional) Select a Case | Case and Data | Mesh | Journal to start. Selecting any of these starting files and launching the Fluent GPU Solver automatically loads the selected file. The button also becomes .
Click .
For Windows, prior to starting the Fluent GPU Solver from the command line, ensure
that the path to your home directory is in your command search path environment variable by
executing the setenv.exe program located in the Ansys Fluent directory
(for example, C:\Program Files\ANSYS
Inc\v232\fluent\ntbin\win64).
Note: For Linux, the best graphics driver is selected automatically, and the X11 driver is
used by default when the required graphics support is not detected. If you feel it is
necessary to use an alternate driver, you can include the
-setenv="HOOPS_PICTURE=
driver_name
" command line option, where driver_name is
the preferred graphics driver.
Important: Using the Fluent GPU Solver is only available at the Enterprise licensing level.
Once your working directory path is specified, you can execute the
nvidia-smi command in the command prompt window. This will
display the GPUs available on your machine as well as their current usage. Each GPU on your
machine will have an ID of 0 to 7 after
executing nvidia-smi.
C:\Program Files\ANSYS Inc\v231\fluent\ntbin\win64> nvidia-smi
+-----------------------------------------------------------------------------+
| NVIDIA-SMI 496.13       Driver Version: 496.13       CUDA Version: 11.5     |
|-------------------------------+----------------------+----------------------+
| GPU  Name            TCC/WDDM | Bus-Id        Disp.A | Volatile Uncorr. ECC |
| Fan  Temp  Perf  Pwr:Usage/Cap|         Memory-Usage | GPU-Util  Compute M. |
|                               |                      |               MIG M. |
|===============================+======================+======================|
|   0  Quadro P4000       WDDM  | 00000000:D5:00.0  On |                  N/A |
| 46%   35C    P8    11W / 105W |   3463MiB /  8192MiB |      1%      Default |
+-------------------------------+----------------------+----------------------+

+-----------------------------------------------------------------------------+
| Processes:                                                                  |
|  GPU   GI   CI        PID   Type   Process name                  GPU Memory |
|        ID   ID                                                   Usage      |
|=============================================================================|
|  No running processes found                                                 |
+-----------------------------------------------------------------------------+
The command to launch the GPU solver (with single precision) within the solution mode of Ansys Fluent resembles the following format:
fluent 3d -tn -gpu
Alternatively, you can replace 3d with
3ddp to use the GPU solver with double precision.
Depending on the number of GPUs available on your machine, n
may represent either the number of CPU processes only, or both the number of CPU processes
and the number of GPUs. Note that the GPU solver uses multiple CPU processes for case setup
and postprocessing only (see Using CPU Processes for Setup and Postprocessing for
details). The value of n will specify the CPU and GPU configuration
for the GPU solver as follows:
If only one GPU is available on your machine, the GPU solver will use one GPU and the value of
nwill only specify the number of parallel CPU processes.If multiple GPUs are available on your machine and the value of
nis less than the number of available GPUs, the above command will specify the GPU solver to usenCPU processes andnGPUs. By default, the GPU solver will usenGPUs in the order they were listed by thenvidia-smicommand.If multiple GPUs are available on your machine and the value of
nis greater than or equal to the number of available GPUs, the above command will specify the GPU solver to usenCPU processes and all of the GPUs available on your machine.
Note: When running on Linux, to specify a multi-node GPU
configuration, the number of GPUs selected depends on both
-tn as well as the
-scheduler_ppn = m command
line option used for Linux OS. The
-scheduler_ppn = m command
specifies the number of processes to be allocated for each
node while -tn specifies the total
number of GPUs. For example if you have 32 processes and
want to run on two nodes, entering -t32
-scheduler_ppn=16 will specify two
nodes, with 16 processes for each node.
You can manually specify the GPU solver to use specific GPUs available on your machine
by setting -gpu equal to the IDs of the GPUs you want to use. For
example, entering fluent 3d -t3 -gpu=1,2,4 will launch the GPU
solver using the second, third, and fifth GPUs on your machine, which have IDs of
1, 2, and 4,
respectively.