The following modeling topics are discussed in this section:
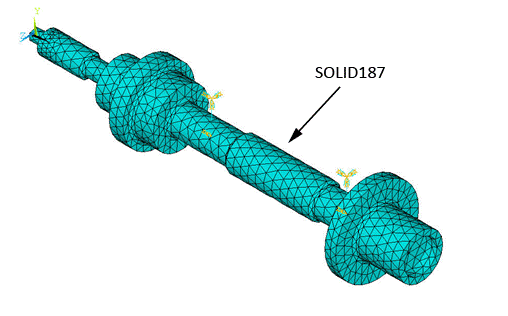
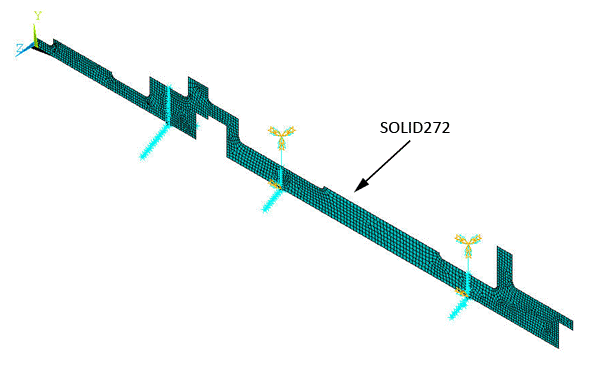
The 3D model is meshed with SOLID187 elements, as shown in the figure below. The default settings of SOLID187 elements are used.
The following process uses the Ansys Workbench product to extract the 2D axisymmetric geometry the 3D geometry:

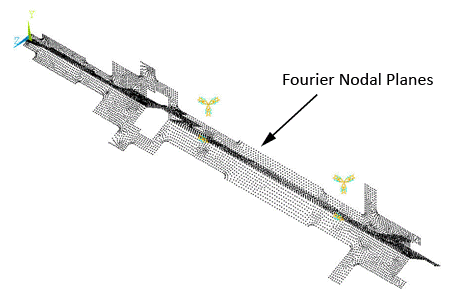
The extracted 2D geometry is then meshed with the general axisymmetric SOLID272 elements as shown in the figure below.
For modeling, three Fourier nodal planes along the circumferential direction are considered with KEYOPT(2) = 3 as pictured in the figure below.
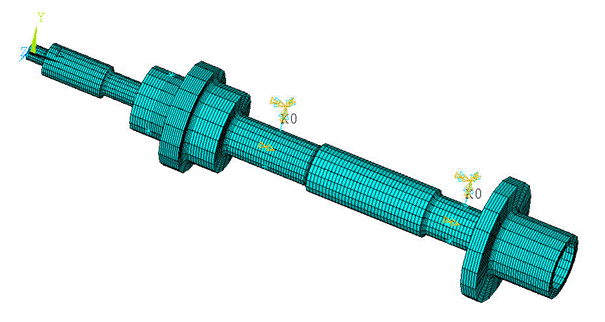
The 3D mesh is generated based on the 2D mesh of master planes using the axis of symmetry of the rotor model. It is defined using the SECTYPE and SECDATA commands as follows:
!  Define the axis of symmetry

SECT, 1, axis
SECDATA, 1, x1,y1,z1, x2,y2,z2	!  Coordinates to define the axis of symmetry
Finally, using the axis of symmetry and the NAXIS command, the 3D mesh is automatically generated as shown in the figure below.
The following modeling topics are available:
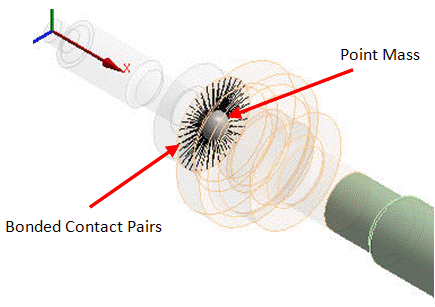
The rigid disk is modeled as a concentrated mass using MASS21 element as shown in the figure below. KEYOPT(3) = 0 is used to define the 3D mass with rotary inertia.
Following is the general process for modeling the rigid disk:
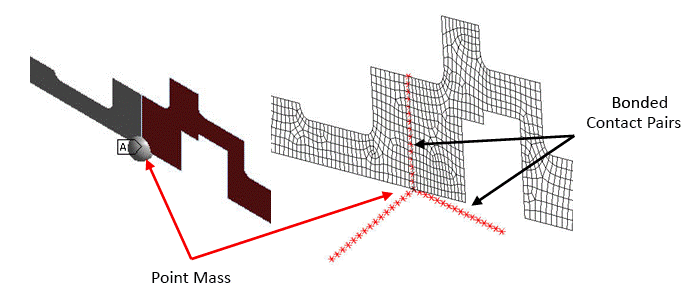
Create the contact pairs at the interface corresponding to the location of the rigid disk (the geometry is sliced beforehand at this location).
Mesh the contact surfaces of the 3D solid model with CONTA174 elements, and contact surfaces of the 2D axisymmetric model with CONTA175 elements.
Define a pilot node scoped to the surfaces.
Create a point mass at this pilot node.
In the case of the 3D solid model, bonded surface-to-surface contact pairs are used to define contact between the cross sectional elements and the pilot node. The pilot node is located at the center of the cross section. The cross sectional elements and/or contact surfaces are meshed using CONTA174 elements (3D 8-node surface-to-surface contact) as shown in the figure above.
Similarly, for the 2D axisymmetric model, bonded node-to-surface contact pairs are used to define contact between the cross sectional nodes and the pilot node. CONTA175 elements (2D/3D node-to-surface contact) are used to mesh the cross sectional nodes and/or contact surfaces as shown in the figure below.
The Multipoint Constraints (MPC) algorithm is used for bonded contact through KEYOPT(2) = 2 when modeling both contact pairs.
TARGE170 elements are used to mesh the pilot node in both models. All degrees of freedom (DOF) of this pilot node are constrained through KEYOPT(4) = 111111.
The following input fragments show the steps involved in creating the contact pairs for the 2D axisymmetric model:
/prep7

et, 1, conta175                 ! Define Contact 175 element
et, 2, targe170                 ! Define Target 170 element
keyopt, 2, 2, 1                 ! Don't fix the pilot node
keyopt, 2, 4, 111111            ! Constrained all DOFs
keyopt, 1, 12, 5                ! Bonded Contact
keyopt, 1, 4, 0                 ! Rigid RBE3 style load
keyopt, 1, 2, 2                 ! MPC style contact

nsel, s, loc, x, 89.01          ! Select nodes at the user specified location
nplot
cm, contactp1, node

type, 1
real, 1
mat, 1

/com, Creating bonded contact pairs for defining Point Mass

nn = 0
*get, numn, node,, count
*do, i, 1, numn                !  Loop to create contact elements on selected nodes
nn =  ndnext(nn)
e, nn                          !  Create contact elements on node one by one
*enddo
allsel, all, all

*set, _npilot, 2               !  Set node 2 as a pilot node (user defined)
type, 2
mat, 1
real, 1
tshap, pilo
e, _npilot                     !  Create target element on pilot node
tshap
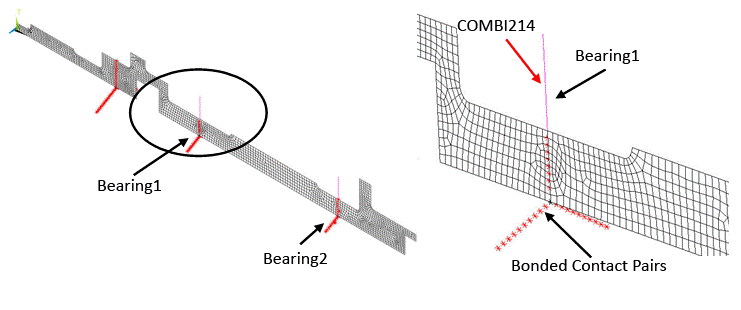
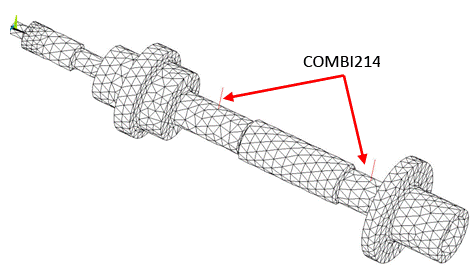
Bearings are used to support the rotor in the lateral direction. Two identical undamped and linear orthotropic bearings were modeled using COMBI214 elements, as shown in the figure below and in Figure 14.13: Bearings Modeled with COMBI214 Elements (2D Axisymmetric Model).
KEYOPT(2) = 1 is used to define the elements in a plane parallel to the YZ plane. The DOFs of these elements are then UY and UZ.
The X, Y, and Z axes should be added to the following figure (see Figure 14.4: 3D Geometry for the directions).
Following is the general process for modeling the bearings:
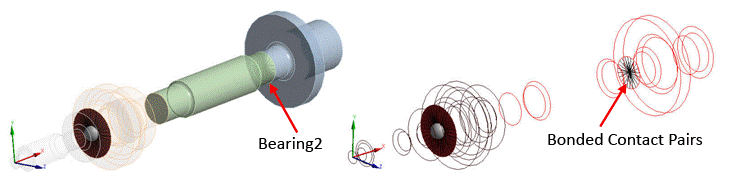
Create the contact pairs at the bearing locations (the geometry is sliced beforehand at these locations).
Mesh the contact surfaces with CONTA174 elements for the 3D solid model, and CONTA175 elements for the 2D axisymmetric model.
Create nodes at the center of the cross section of the rotor at each bearing location (at the pilot node locations). It will represent the second node of the bearing.
Create the COMBI214 elements using these nodes and the pilot nodes.
The contact pairs shown in the figure below must be created to model the bearings. The contact pairs are modeled in a similar fashion to the disk modeled in the previous section.
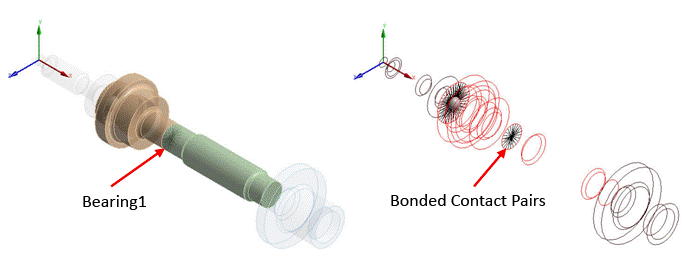
To model an orthotropic bearing, an additional node is created at the center of the cross section of the rotor at the bearing location. This node is then connected to pilot node using COMBI214 elements. To visualize this element, offset the node along the Y-direction without altering the results as shown in the figure below and in Figure 14.11: Bearings Modeled with COMBI214 Elements (3D solid model).