The Viewports feature enables you to split the Geometry window into multiple windows, up to four, and perform independent actions in each window.
Got to a section topic:
Display Options
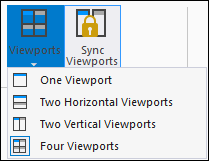
As illustrated, the Viewports drop-down menu enables you to display one, two (horizontally or vertically), or four viewports in the Geometry window.
By default, the Geometry window displays one viewport/window. Once you select to display two or more viewports, the currently selected object displays in all viewport windows. You activate a viewport window by selecting it (clicking in the window or on the title bar). Once active, you can change the selected object, move your model, change property settings or scoping for the selected object, etc., independent of the other viewport windows displayed. For example, you can view loading conditions, results, Named Selections, contact conditions, and make changes to each separately.

Note: A figure can be viewed in a single viewport only. If multiple viewports are created with the figure in focus, all other viewports display the parent of the figure.
Synchronize Viewports
The ribbon group also includes the Sync Viewports option. The default setting is active. It enables you to synchronize the display in each window to reorient/move (pan, zoom, rotate) your model in each window simultaneously. When you have multiple orientations configured with the Sync Viewports option inactive and then you activate it, the viewport window that you select and manipulate first, becomes the window that all the other windows synchronize to.
Capture Viewport Images
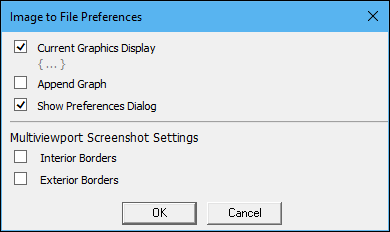
The Images drop-down menu of the Insert group on the Home tab includes the option . This option acts the same as the Image to File option. It enables you to save the contents (viewports) of the Geometry window as an image file. When you select the option, a dialog displays that enables you to change image details such as resolution, appearance, and magnification.
Note: You can change the default settings for the dialog's options using the properties of the Image Export group of the Graphics category of the Options dialog.
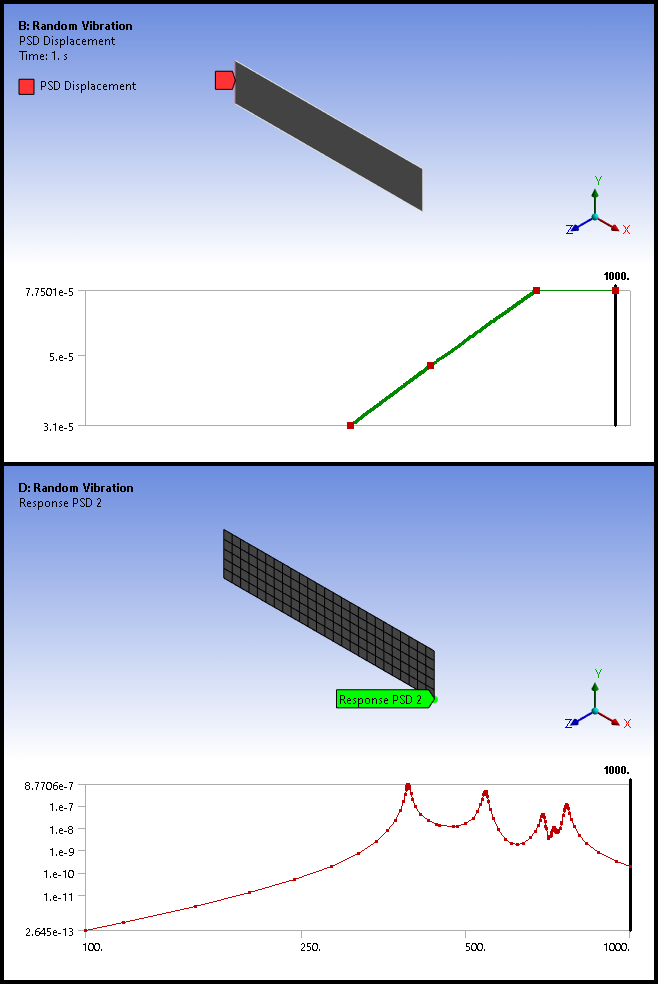
The dialog also includes the options Interior Borders and Exterior Borders under the Multiviewport Screenshot Settings title that enables you to add borders around and in-between the viewports you capture. The following images show a comparison of these options when turned on and off.
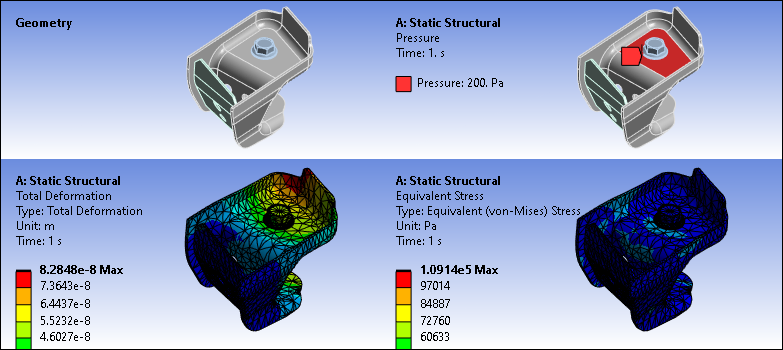
Append Graph Window Data
In addition, the dialog contains the check box . As shown here, the application adds the content of the Graph window in the lower left-hand corner of the image. If there is no corresponding data in the Graph when this option is selected, the captured image is appended with a graph that includes no data.