


By default, Ansys Fluent displays the Design Point Table in the Parametric Study View.
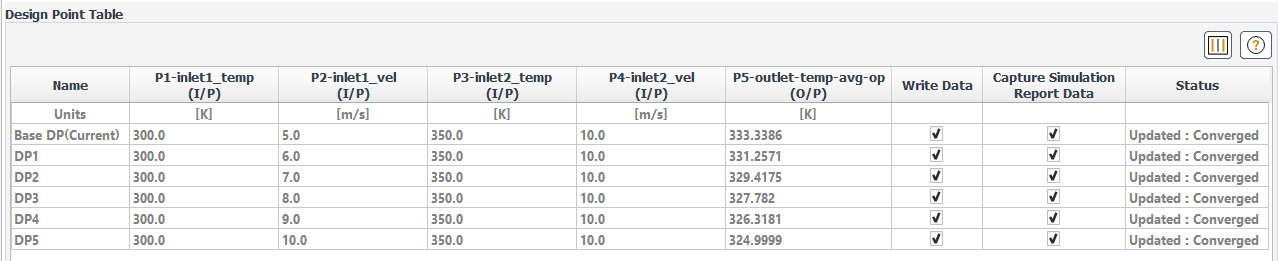
The table provides:
Values for the design point input/output parameters. Table cells for input and output parameters expect numerical values, and automatically highlight any improper string entries.
Options for whether or not to Write Data during the design point update. By default, this option is not enabled for newly added design points, and must be enabled manually for data to be written during the solution. Alternatively, you can set the Write Data by Default preference accordingly (see Setting Preferences for Parametric Studies).
Options for whether or not to Capture Simulation Report Data for use in the design point's simulation report.
Status of the design point's run progress.
Customization options such as hiding (and re-exposing) table columns (see Customizing the Design Point Table).
- 46.6.1. Customizing the Design Point Table
- 46.6.2. Updating Design Points
- 46.6.3. Adding Design Points
- 46.6.4. Operating on Design Points
- 46.6.5. Importing and Exporting Design Point Tables
- 46.6.6. Saving Journals When Updating Design Points
- 46.6.7. Accounting for Mesh Morphing During Parametric Updates
- 46.6.8. Parametric Design Point Process Details and Case Change Considerations
You can customize the design point table by showing and hiding
specific columns. You can use either the Select Visible Columns
icon (![]() ) in the
design point table, or use the Manage Visible Columns option from
the context menu on a particular cell.
) in the
design point table, or use the Manage Visible Columns option from
the context menu on a particular cell.

This displays the Set Visible Columns dialog box:
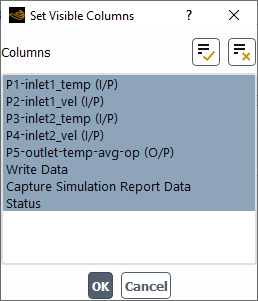
The Set Visible Columns dialog box allows
you select or deselect all or some of the columns in the design point table that you
want to hide or expose in the table. All currently exposed column names are selected in
the Columns list. Click a particular column name to deselect it
from the list of visible columns. Use the ![]() icon to select all columns.
Likewise, use the
icon to select all columns.
Likewise, use the ![]() icon to deselect all columns. Once your selection(s) have been made, click
OK to save your settings, dismiss the dialog box, and return to the
design point table. The table now displays only the columns designated to be
visible.
icon to deselect all columns. Once your selection(s) have been made, click
OK to save your settings, dismiss the dialog box, and return to the
design point table. The table now displays only the columns designated to be
visible.
You have the ability to update the current design point in your study, or to update all design points in your study. In either case, Ansys Fluent will perform the calculations and update the results based on the parametric value(s).
Using the Update Options in the Ribbon, you can update your design point solutions either in the same session of Ansys Fluent (Sequential), or by invoking a new session (Concurrent).
Note: Performing concurrent updates is not available when using the CFD-Pro license level. If a parametric project is opened using the CFD-Pro license level that was previously configured using both concurrent updates and/or remote updates, Fluent will display a corresponding warning and the study will proceed to open using sequential updates instead.
Note: When remotely updating a design point, there is an intentional delay (180 seconds) between the time when the design point calculations are complete and the time when the results are available and the status is updated.
To better control how the design points are updated, use the Sequential option or the Concurrent option under Update Options in the Parametric tab of the Ribbon.
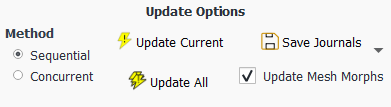
Running Sequential Sessions
By default, Ansys Fluent uses the Sequential option to update the design points in the currently open Fluent session. Design points that are marked as Needs Update, Interrupted. and Queued in Fluent in the Design Point Table are sequentially updated one after another. The current session remains busy while the design point update is in progress.
Interrupting a design point update while using the Sequential option is the same as interrupting a regular Fluent session using the Stop button. If you had multiple design points and had selected Update All, you will be prompted to determine if you want to interrupt only the current running design point, or if you wanted to stop all the design points that otherwise would have been updated as a part of Update All.
Running Concurrent Sessions
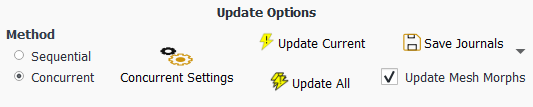
Use the Concurrent option to start a new Fluent session in batch mode where journaling is utilized to update the design points in that Fluent session. The new session uses the same mode and precision as the current session.
Adjust the settings for concurrent runs by clicking Concurrent Settings in the ribbon to display the Concurrent Settings dialog where you can change the number of design points and/or change the number of cores for each, as well as specify licensing options.

A single session is created to update a single design point, so there is a one-to-one relationship between the design points and the sessions that are launched. Fluent uses parallel processing so that multiple design points can be updated simultaneously. You can provide the Number of Design Points, thus providing the number of parallel design points to update. In addition, you can provide the Number of Cores per Design Point, thus specifying the number of cores to allocate for each design point run. The current Fluent session remains available and you can continue using the current session for other work. Note that the new session that gets launched uses the same number of nodes as the base session (that is, the current Fluent session).
To run concurrent design point updates using distributed memory, use the Submission Endpoint drop-down menu to choose or register a job submission endpoint location URL.
Note: Keep in mind that Fluent allows you to:
Run concurrent sessions on the local machine (shared memory), and
Perform concurrent updates on a distributed memory cluster. As a requirement, a Distributed Compute Gateway endpoint needs to be deployed and configured with suitable HPC Configurations. For more information, see Distributed Compute Gateway User's Guide.
To create a new job submission endpoint and its location:
Select the Register a New Endpoint option in the Submission Endpoint drop-down list.
Enter a Name for the new endpoint.
Enter a valid URL.
Click the Register Endpoint button to officially register the location and to add its name and URL to the Submission Endpoint drop-down list.
Note: To remove a registered submission endpoint, select the endpoint in the Submission Endpoint drop-down list and click Delete Endpoint. Note, however, that you cannot delete the
localhostendpoint.
The first time you select and access a registered endpoint URL, you will be prompted for a valid user name and password, and once connected, the available Queues are populated in the Concurrent Settings dialog box where you can pick the queue of your choice.
In addition, you can specify the License Type for your concurrent runs. You can choose from Solver Licenses such that the concurrent runs would employ standard Fluent licensing.
Alternatively, you can select HPC Parametric to use either standard HPC parametric licensing or optiSLang licensing, depending on the value of the optiSLang License Type. For instance:
Set the license type to None to use standard HPC parametric licensing.
Set the license type to Premium or Enterprise to use Ansys optiSLang licensing. You can then select the number of optiSLang licenses that you want to use.
Note: Starting at the 2024 R1 release, the certificates required by HPC services for
performing concurrent design point updates inside a Fluent parametric study are
no longer packaged in
the\v241\RSM\bin\HPCServices\certificates folder. Because
of this packaging change, even performing concurrent design point updates on a
local machine requires that you now must first generate the necessary
certificates. See Obtaining and Installing an SSL Certificate for more
information.
Click the Licensing Calculator to open the Ansys Parametric Licensing Calculator web site in your Guide, where we discuss the Concurrent Settings dialog:browser where you can determine your specific licensing requirements for your parametric run.
Note: The parametric study checks out the specified number of optiSLang licenses even if fewer licenses could have been used to meet the parametric study licensing needs.
Note: The Concurrent option applies to running concurrent Fluent sessions on either distributed memory machines or the same shared memory machines.
Note: The base case is the case that is used for all the Design Points updates. When you perform any changes to the case (which is not already present in a base case) then you can create a new parametric study, reset a current study, or discard the changes you have introduced.
To start updating your concurrent design point session(s), click the Update Current or the Update All buttons in the Ribbon. The Status of your sessions will change to Queued in the design point table. When updating design points using distributed memory, the number of design points assigned to be Queued is based on the number of concurrent design points that you have set. The remaining design points are assigned to be Queued in Fluent and are submitted to the cluster for updating once all Queued design points are completed. Once queued, you can check the status of the runs by clicking the Refresh Status button in the Ribbon, and the status in the design point table will change accordingly.
While your concurrent session's design point(s) are being updated (that is, when the status is either Queued, Queued in Fluent or Updating...), you can use the following context menu options:
Stop Selected Design Point Update: interrupts only the selected design point.
Stop All Updating in Concurrent Session: interrupt all design points.
Show Status in Web Browser: directly launches a web browser to view the run status of the selected design point in an HPC Web portal.
Note that you can set the Enable Auto Refresh of the Status of the Design Point preference accordingly (see Setting Preferences for Parametric Studies). This preference must be enabled when updating design points concurrently using distributed memory. Fluent will monitor and retrieve the latest status of submitted design point status from the cluster and, based on that information, determines how and when to submit the next design points. In addition, when the concurrently submitted design point is in the Updating... status, the Show option is available in the context menu where you can access and display transcript, residuals and monitors for the selected design point.
In addition, note that you can submit the concurrent design points, close the current Fluent session, later launching a Fluent session, open that project and you will see the updated status of the submitted design points using the Refresh Status button in Ribbon (see Monitoring and Viewing Design Point Update Status for additional information). After the concurrent design points are submitted, the current session is no longer connected with those design points and therefore you can close the current session, if desired. When submitting design points using distributed memory, the base Fluent session needs to remain open until all the design points are updated - unlike on shared memory machines where you are able to close the base Fluent session after clicking Update All.
Note: Currently, by default, the concurrent sessions will consume standard Fluent solver licenses.
While the GPU solver (see Using the Fluent Native GPU Solver) supports updating parametric studies sequentially for variations in supported parameters, you can also update design points concurrently for locally defined sessions.
When the Native GPU Solver option is enabled in the Fluent Launcher for the base Fluent session, the Concurrent Settings dialog will show the Use Native GPU Solver check box, allowing you to make use of GPU resources for concurrent design point updates defined locally (that is, running on a single shared-memory machine equipped with one or more GPGPU accelerators where the parametric study was initialized).
In the case of multiple GPU cards, instead of sharing the GPU cards across the design points, Fluent runs one design point on a single GPU. So, for local concurrent runs, Fluent will continue iterating over the available GPUs and spawn the design points one by one on each of the GPUs.
For example, if you selected 4 GPUs in the Fluent launcher and 4 concurrent design points, Fluent starts the first design point on the first GPU, the second design point on the second GPU, and so forth.
If you set the number of concurrent design points to be more than the number of the available GPU cards, then the design points will share some of the GPU cards.
To update the current design point, use the Update Current option under Update Options in the Parametric tab of the Ribbon.
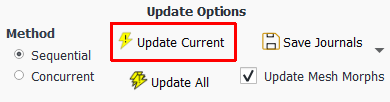
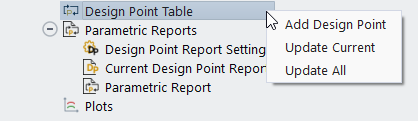
You can also use the context menu in the Parametric Study View to update the current design point. Right-click the Parametric Studies/Design Point Table tree item and select Update Current from the menu that opens.
![]() Parametric Study View
→ Parametric Studies → Design Point
Table
Parametric Study View
→ Parametric Studies → Design Point
Table ![]() Update Current
Update Current
To update all design points in your parametric study, use the Update All option under Update Options in the Parametric tab of the Ribbon.
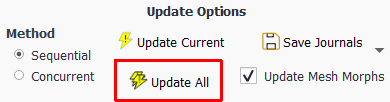
You can also use the context menu in the Parametric Study View to update all the design points. Right-click the Parametric Studies/Design Point Table tree item and select Update All from the menu that opens.
![]() Parametric Study View
→ Parametric Studies → Design Point
Table
Parametric Study View
→ Parametric Studies → Design Point
Table ![]() Update All
Update All
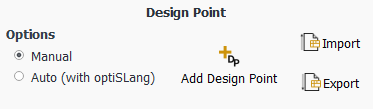
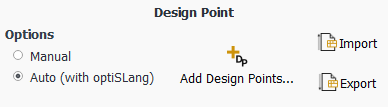
Design points can be manually added to your parametric study or automatically added to your study using Ansys optiSLang.
You can manually add design points to your parametric study by changing the values for various input parameters. To manually add a new design point to the Design Point Table, enable the Manual option and select the Add Design Point option under Design Point in the Parametric tab of the Ribbon.
You can also use the context menu in the Parametric Study View to add a design point. Right-click the Parametric Studies/Design Point Table tree item and select Add Design Point from the menu that opens.
![]() Parametric Study View
→ Parametric Studies → Design Point
Table
Parametric Study View
→ Parametric Studies → Design Point
Table ![]() Add Design Point
Add Design Point
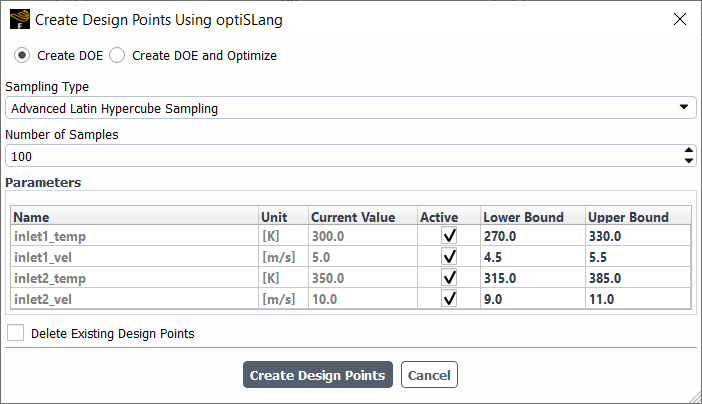
If Ansys optiSLang is installed, design points can be automatically added to your parametric study using optiSLang's Design of Experiments methods. To automatically add a new design point to the Design Point Table, enable the Auto (with optiSLang) option and select the Add Design Points... option under Design Point in the Parametric tab of the Ribbon.
This displays the Create Design Points Using optiSLang dialog box where you can add design points to your study and set various optiSLang-specific properties to optimize your analysis. From here, you can choose to create your design of experiments with or without full optimization.
In the Create Design Points Using optiSLang dialog, you can choose to create your design of experiments using the Create DOE option:
From here, you have the following options:
- Sampling Type
Allows you to choose from a variety of optiSLang sampling algorithms, where available choices depend on your optiSLang licensing level. For instance, by default, the following types are available:
Koshal Linear
Koshal quadratic
Full Factorial
Full combinatorial
Central composite
Star Points
When using the optiSLang Pro license, however, the following types are also available:
D-optimal linear
D-optimal quadratic
D-optimal customizable
Plain Monte Carlo
Latin Hypercube Sampling
Advanced Latin Hypercube Sampling
Space filling Latin Hypercube Sampling
Sobol Sequence
- Number of Samples/Number of Levels
Allows you to choose the number of samples for your assortment of design points. This field is dependant on the selected Sampling Type and may be read-only and restricted to certain values for some types.
- Number of Designs
For some Sampling Types, the number of designs cannot be known ahead of time. In such cases, Fluent displays the non-editable Number of Designs field and the Calculate button. Use the Calculate button to have optiSLang determine the Number of Designs based on the number of levels passed and the number of input and output parameters.
- Table
Displays the currently available input variables. Table properties include the input variable Name, Unit, Current Value, whether it is Active or not, Lower Bound (minimum value), and Upper Bound (maximum value). Only the Lower Bound and the Upper Bound values are editable and, by default are equivalent to +/- 10% of the Current Value.
Note: If you deselect the Active field for an input parameter, its Lower Bound and Upper Bound are set to its Current Value which will then be used as a default value for that parameter.
- Delete Existing Design Points
Allows you to remove all existing design points once the Create Design Points button is selected and the dialog dismissed.
Once your choices and selections have been made, click Create Design Points to add your design points to the parametric analysis.
Note: When processing design points, Fluent needs to know the location of the
Ansys optiSLang installation. Depending on whether you are working on the Windows or
Linux platforms, this location may be defined differently in different
circumstances. For instance, in most cases, optiSLang can be detected if it is
installed on the same machine or in the same directory as defined by the
AWP_ROOT environment variable. In other cases,
optiSLang can be detected if it is installed on some other location, another
machine, or elsewhere in a network as defined by the
OPTISLANG_EXE and the
OPTISLANG_HOME environment variables.
On both Windows and Linux platforms, Fluent searches for the location of
optiSLang by first checking the AWP_ROOT environment
variable, followed by OPTISLANG_EXE and then finally
OPTISLANG_HOME.
Refer to Parametric Study Text Commands for more
information regarding using the equivalent text command interface (TUI) commands
under the parametric-study/design-points/auto-create/
menu.
In the Create Design Points Using optiSLang dialog, you can choose to create and optimize your design of experiments using the Create DOE and Optimize option (when using an optiSLang Pro license):

From here, you have the following options:
- Parameters Table
Displays the currently available input variables. Table properties include the input variable Name, Unit, Current Value, whether it is Active or not, Lower Bound (minimum value), and Upper Bound (maximum value). Only the Lower Bound and the Upper Bound values are editable and, by default are equivalent to +/- 10% of the Current Value.
Note: If you deselect the Active field for an input parameter, its Lower Bound and Upper Bound are set to its Current Value which will then be used as a default value for that parameter.
- Criteria
You can choose to create a table of objective-based and/or constraint-based criteria for your optimization study.
For objective-based criteria, select Objective and click Add Objective to add a row to the Criteria table.
For constraint-based criteria, select Constraint and click Add Constraint to add a row to the Criteria table.
Once added, you can adjust the Name, view its Type, assign an availableExpression, specify a Criteria (as either <= or >= for constraint-based criteria or as either MIN or MAX for objective-based criteria) and set a value for the Limit accordingly.
To remove an entry in the table, right-click the row's Type cell and select Delete from the context menu.
- Optimization Options
You can choose from either the AMOP optimization algorithm and its default settings or the One-Click optimization option and its default settings. In each case, you can keep the default settings, or you can select Configure Settings to access additional optimization settings for each algorithm. See Configuring optiSLang AMOP Settings or Configuring optiSLang One-Click Settings for more details.
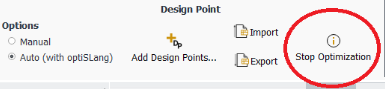
When your settings are complete, you can click the Run Optimization Study to perform the optimization operations according to your settings.
As the optimization study is being run, Fluent and optiSLang communicate with each other to create and update multiple design points. optiSLang sends new design of experiment information to Fluent while Fluent creates and updates the design points accordingly.
For sequential runs, you can interrupt the run by using the Stop button at the bottom right of the interface. For concurrent runs, you can select the Stop Optimization button in the Parametric ribbon.
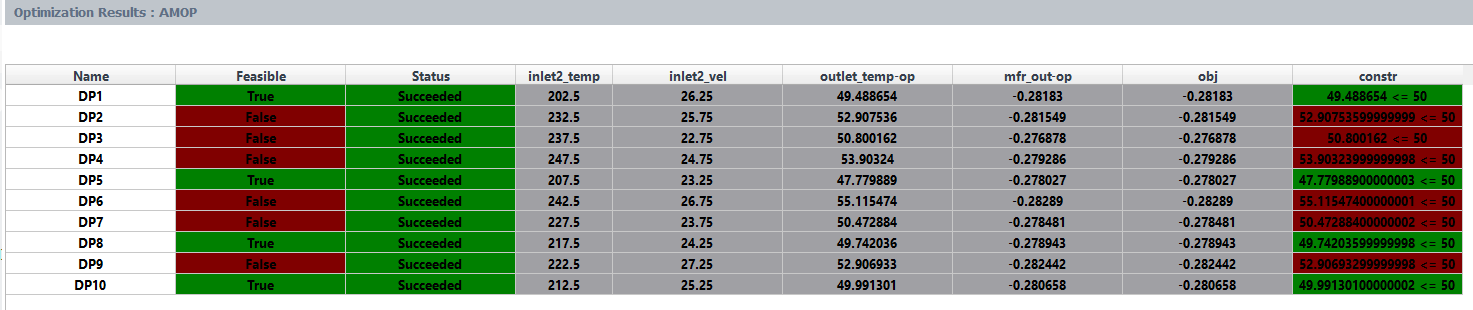
Once complete, a table summarizing the results of the optimization is available in Fluent.
Figure 46.2: An Example of the Optimization Results Table (AMOP) describes an example of a results table for an AMOP analysis that contain columns for objectives and constraints and design points that do not meet the constraints are highlighted in red.
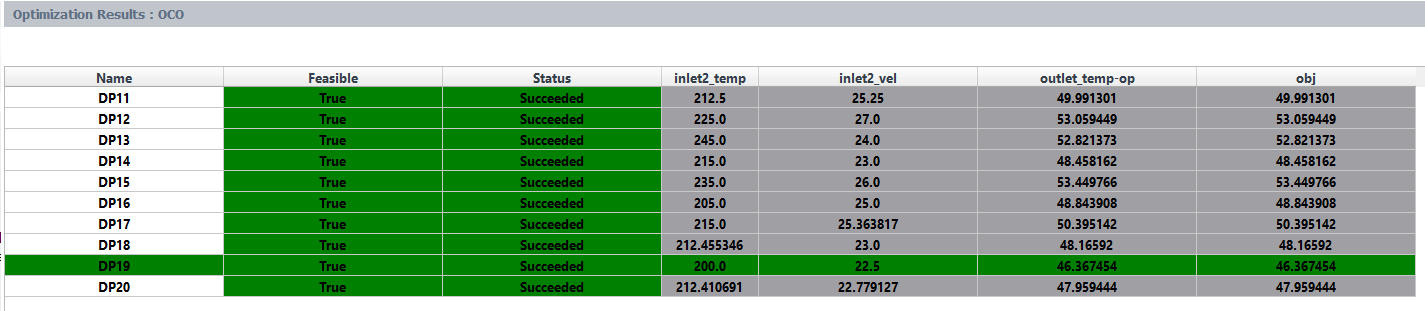
Likewise, Figure 46.3: An Example of the Optimization Results Table (OCO) describes another example of a results table for an OCO analysis where the best design is highlighted in green.
Parametric designs can be analyzed further using the Data Export options (Open OMDB in Postprocessor or Export Optimization Results into CSV) that are available in the optiSLang Capabilities category of the Parametric Ribbon. See Exporting Parametric Designs to optiSLang for more information.
Upon re-opening a parametric project that already has an optimization study defined, when you subsequently revisit the Create Design Points Using optiSLang dialog and select the Create DOE and Optimize option, Fluent retrieves the optimization settings from optiSLang and you are provided with an option to view the optimization results table again.
Note: Using the Create DOE and Optimize option requires an optiSLang Pro license.
Note: Since the optiSLang server does not retain the outputs from any already completed designs from a particular batch, if you choose to stop processing a batch of design point updates, the individual design point status will be designated as failed in Fluent, even for those design points that were previously successful.
Refer to Parametric Study Text Commands for more
information regarding using the equivalent text command interface (TUI) commands
under the
parametric-study/design-points/auto-create/optimize/
menu.
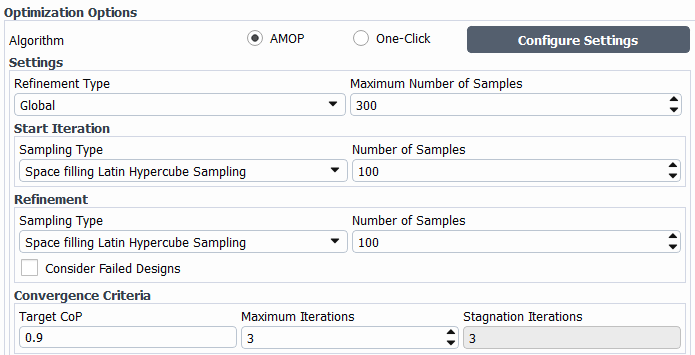
The following options are available for AMOP configuration in optiSLang. For additional details, see Adaptive Metamodel of Optimal Prognosis (AMOP) Node in the optiSLang documentation.
Settings: general algorithm settings.
Refinement Type: choose from either Global or Local refinement. Global refinement adds new data points using a global sampling. Local refinement adds new data points in regions where the best improvement of the criteria is expected.
Maximum Number of Samples: Sets the total number of samples.
Start Iteration: settings relevant to the initial iteration.
Sampling Type: Specifies the sampling method or deterministic design of experiment scheme for the initial iteration. All DOE schemes are available.
Number of Samples: Specifies the sample number.
Refinement: settings relevant to refinement.
Sampling Type: (Global refinement type only) Specifies the sampling method for the refinement iterations. Only random sampling schemes are available.
Number of Samples: (Global refinement type only) Specifies the sample number for each iteration of the refinement sampling method.
Importance of Sample Density: (Local refinement type only) Only the sample density is considered in the generation of refinement points.
Importance of Local CoP: (Local refinement type only) The refinement points are created in regions with large local approximation errors.
Importance of Optimization Criteria: (Local refinement type only) The objective functions and constraints are considered for new refinement points. In case of single and multiple objectives, the region with expected maximum improvement of the objective functions are refined. If only constraints are defined, the refinement points are created in regions, where the constraints are expected to be fulfilled.
Number of Samples per Iteration: (Local refinement type only) Number of designs in the local refinement iterations.
Consider Failed Designs: Positions of previous failed designs are considered in the global and local refinement procedures. If unchecked, their positions are ignored in the density estimate.
Convergence Criteria: settings relevant to convergence.
Target CoP: Sets the minimum Coefficient of Prognosis (CoP), required for all selected responses. If this value is reached, the AMOP algorithm has converged. In the global refinement, the global CoP values of all responses are considered. Tn the local approach the minimum local CoPs of all samples are used as error measure for the local CoP refinement.
Maximum Iterations: The algorithm stops at the maximum number of iterations, if the convergence criterion is not reached. This number considers the initial and the refinement iterations.
Stagnation Iterations: Considered in the local criteria-based refinement for single-objective optimization. The refinement stops if no improvement of the best design is obtained within the specified number of iterations.
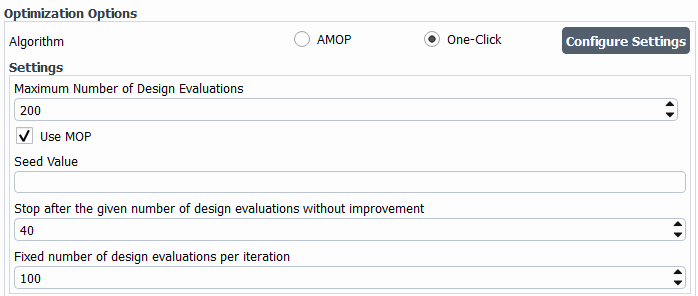
The following options are available for One-Click (OCO) configuration in optiSLang. For additional details, see One-Click Optimization (OCO) in the optiSLang documentation.
Settings: settings relevant to the OCO algorithm.
Maximum Number of Design Evaluations: Maximum number of design evaluations to compute before stopping.
Use MOP: Accelerate convergence and save the number of evaluations using the MOP. Deactivate when dealing with computational inexpensive evaluations.
Seed Value: Specify a seed value to be used by any algorithms containing stochastic components, instead of a randomly generated value.
Stop after the given number of design evaluations without improvement: Stops the optimization when no improvement of the best individual is seen after this number of design evaluations and the minimum number of design evaluations has been generated.
Fixed number of design evaluations per iteration: Defines the number of design evaluations generated per iteration. When set to no value, the number of design evaluations can vary from one iteration to another one. The maximum allowable value is
999.
During the course of setting up and running your design point study, you can access various operations for any given design point(s) through the context menu:
Set As Current lets you load the selected design point into the current session. The Set As Current (No Data) option is to inform you that this design point cannot be loaded as the current design point since there is no data yet available.
Update Selected Design Point lets you update the currently selected design point(s).
Delete Design Point lets you remove the selected design point(s) from the table.
Duplicate Design Point lets you add a new design point by copying the values of the input parameters of the selected design point. This can only be performed on a single design point at a time.
Clear Data and Edit Values lets you remove the generated data for the selected design point(s).
Show lets you see the Transcript, Monitor plots, and Residual plots for the selected design point.
Change Status To: lets you toggle the design point's status between "Needs Update" and "Do Not Update".
Using the Design Point category of the Parametric Ribbon, use the Import and Export buttons to import and export comma-separated value (CSV) data for your parametric study.
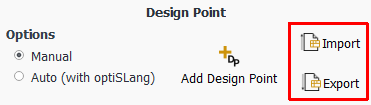
Use the Import option to import an existing CSV file directly into the parametric table.
Note: When importing design point data, keep the following in mind:
If design point data matches your existing design point table, you are prompted to either overwrite the existing matching design point data, or to append the data to the existing design point table.
Any data related to the Name column are ignored. Design point names are managed by Ansys Fluent.
Any data related to the Units column are ignored. Only design point values are imported, regardless of any specified units, however, a warning will be displayed when the units in the imported CSV file do not match with the units of the currently loaded case.
Regardless of the Status of the design points in the imported CSV file, upon import, the status of all design points is set to Needs Update.
The column headings in the imported CSV file must exactly match the names of the input parameters, otherwise they are not considered and the remaining columns (excluding Write Data, Capture Simulation Report Data) are ignored.
If there are no corresponding columns for Write Data and Capture Simulation Report Data in the imported CSV file, then their values are initialized to the default values for the imported design points, where, by default, Write Data is not enabled and Capture Report Data is enabled. Alternatively, you can set the Write Data by Default preference accordingly (see Setting Preferences for Parametric Studies).
Use the Export option to export the contents of your design point table to an external
.csvfile. Exporting design point data will write all data from all columns to the specified file.
Using the Design Point category of the Parametric Ribbon, use the Save Journals drop-down to customize how any journals are created for any design point that needs to be updated. You can then submit these journals to a job scheduler or run the journals in different Fluent session(s).
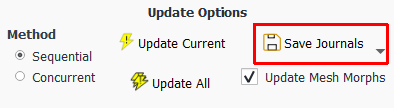
Use the Separate Journal... option to create a separate journal file for each design point that needs to be updated.
Use the Single Journal... option to create a single journal file for all design points that need to be updated.
You can also choose the same options from the context menu for selected design point(s) in the design point table (when their status is Needs Update).
Note: Since Fluent saves data into the project directory when updating the design point(s), ensure that the project directory is accessible from the appropriate machine when submitting journal files to a job scheduler or running the journals in different Fluent session(s).
Note: Saving journal files is not available when using the CFD-Pro license level.
If your parametric analysis contains any mesh morphing capabilities, you can incorporate any mesh morphing operations into the parametric updates by selecting the Update Mesh Morphs check box in the Update Options category of the Parametric Ribbon.
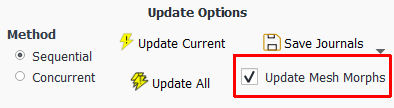
When enabled, this option executes any configured morphing definitions that are specified in the Parameterize and Explore in the Design Ribbon. If there are any defined input parameters attached to mesh morphing definitions, then Fluent executes the mesh morphing operation(s) after updating the parameter values and before solution initialization.
Note: Mesh morphing should only be performed either by enabling the Update Mesh Morphs checkbox in the Parametric Ribbon, or by using the Automatically Initialize and Modify Case option in the Calculation Activities task page.
Parametric runs can be better understood by looking at what takes place at the beginning and the end of updating the initial design point and all subsequent design points.
Initially, as the first design point ("Base DP") starts updating, Ansys Fluent:
Creates a copy of the current case, and assigns it to be the "base case". In addition, the design point's simulation report template is retained, in case the design point must be reset later. Any changes, therefore, that are performed before the initial design point get updated (such as adding new contours, adding new parameters, making changes to the settings, and so on), and will be captured for all subsequent design points.
Opens the transcript.
Sets the current working directory to the initial design point.
Note: You must initialize and define all post processing quantities that you wish to capture for the complete study. In addition, you must update the base case's design point report settings to include all desired design point quantities that are to be included for all the design points.
As the initial design point ("Base DP") completes its update, Ansys Fluent:
Writes the case and data for the design point. If Use Base Data (in the context menu of the Parametric Study View) is enabled, then Fluent also assigns the design point's data to the base case.
Captures the simulation report data for the design point (through the Capture Simulation Report Data column of the design point table).
Closes the transcript.
As for any other design points that are part of your study, when they are first being updated, Ansys Fluent:
Checks if you have made any changes to the currently loaded case after the solution is complete. If there are changes, Fluent prompts you to determine if you would like to create a new study, discard the changes, or reset the study and its design points and use these changes. This is done to make sure that all design points are consistent.
Loads the base case, applies the new parameters, initializes or reads the base case ("Base DP") data if requested, and continues the calculations.
Depending on how you are initializing and updating your design point data, additional actions may be involved. See Initializing Design Point Data for more information.
Likewise, as your study's other design points are completing their updates, Ansys Fluent:
Captures the simulation report data and writes the data file, if requested (through the Capture Simulation Report Data and the Write Data columns of the design point table).
Updates the design point status.
Closes the transcript.
Note: You should use relative path for all input and export files so that they will be written inside the current design point folder.
Note: At times, a data file can be used for initialization (for example, when using the Use Solution Data From File option in the Automatic Solution Initialization and Case Modification dialog). In such cases, the parametric study resets the time step, iterations, and residuals, but the study itself uses the actual solution data.
You have the choice of initializing your design point data using data from either the current case settings, the base design point's data, or from previously updated design points. You can access this choice by using the context menu in the Parametric Study View portion of the Outline View.
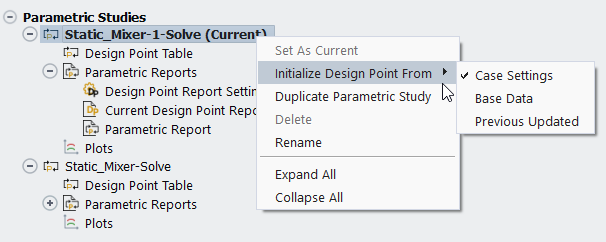
The options to initialize the design points are as follows:
Case Settings: assigns the design point's data to the case settings.
Base Data: assigns the design point's data to the base case.
Previous Updated: assigns the design point's data to the data from the previously updated design point.
When you enable Previous Updated, you are choosing to initialize your design point data using the previously updated design points, the behavior is dependant on how you update your design points (see Updating Design Points).
Sequential Update
When you update the design points sequentially, Fluent checks for the previous design point's data that is available in order to initialize the current design point. If there is no previous design point data, then the case settings are utilized instead. So, when sequentially updating the design points (for example DP1, DP2, DP3, etc.), the data of the first design point (DP1) is used to initialize the second design point (DP2). Likewise, the data of the second design point (DP2) is used to initialize the data for the third design point (DP3), and so forth.
Concurrent Update (Local)
When you update the design points concurrently in a local environment, Fluent retrieves the most recently updated design point information to be used for all submitted design points.
Concurrent Update (Remote)
When you update the design points concurrently in a distributed cluster environment, since design points are submitted in batches (based on the number of concurrent design points that you have set), Fluent retrieves the data such that every batch of design points will use the data of any of the design points from the previously updated batch. In other words, Fluent retrieves the data file directly on the endpoint, and uses it to initialize the case of the current design point. If the data file cannot be found, then the case settings are used for initialization instead. In addition, when this option is enabled, Fluent does not explicitly transfer any data file from the base session to the endpoint.
All of these options are only available before or after updating the base design point.
Note: When the Previous Updated option is enabled, Fluent will always write the data for the design points, regardless of whether the Write Data option is enabled or not in the design point table.
In some cases, you can re-use the case file prior to updating your design points. Specifically, for sequential runs of studies that contain only operating condition parameter changes and when there are no mesh changes (such as dynamic mesh, mesh morphing, and/or mesh adaption), use the Read Case Before Each Design Point Update context menu option in the Parametric Study View to control how you manage design point updates using the case file.
Setting this option to Yes (the default), Fluent reads the case and does not use the already loaded case file.
Setting this option to No allows Fluent to not read any additional case file and to re-use the already loaded case and simply re-initialize the study or continue your work as needed, depending on the design point initialization method (see Initializing Design Point Data). The following scenarios are supported, and the behavior can vary based on the design point initialization method. The following list describes the scenarios and the behavior, such that:
If you initialize the workflow from the case file (Case Settings), after updating parameters, Fluent initializes and resets.
Read Case Before Each Design Point Update = Yes Read Case Before Each Design Point Update = No Set the design point to be updated as the current design point. Set the design point to be updated as the current design point. Read the base case. Apply the input parameter values. Apply the input parameter values. Initialize a case (even if data is loaded in the session). Initialize a case. Solve. Solve. If you initialize the workflow from the base design point (Base Data), Fluent will read the base design point and continue.
Read Case Before Each Design Point Update = Yes Read Case Before Each Design Point Update = No Set the design point to be updated as the current design point. Set the design point to be updated as the current design point. Read the base case. Read the base design point data. Read the base design point data. Apply the input parameter values. Apply the input parameter values. Solve. Solve. If you initialize the workflow from a previously updated design point (Previous Updated), Fluent will continue using the data from the previously updated design point.
Read Case Before Each Design Point Update = Yes Read Case Before Each Design Point Update = No Set the design point to be updated as the current design point. Set the design point to be updated as the current design point. Read the previous case. For concurrent updates only since, for sequential updates, the previous case is already loaded in the session. Apply the input parameter values. Read the previous data. For concurrent updates only since, for sequential updates, the previous data is already loaded in the session. Solve. Apply the input parameter values. Solve.
For an already up-to-date base design point, Fluent provides some flexibility for managing your work when making any changes to your study's additional case file(s).
When adding or deleting any input or output parameters, or when you change some case settings and try to make another design point as current, Fluent prompts you to determine if you would like to create a new study, discard the changes, or reset the study and its design points and use these changes.
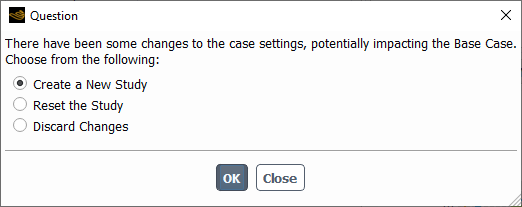
When updating your design points, if you have made any explicit changes to an otherwise up-to-date base case (other than changing input variable settings using the design point table), Fluent prompts you to determine if you would like to create a new study, discard the changes, or reset the study and its design points and use these changes.
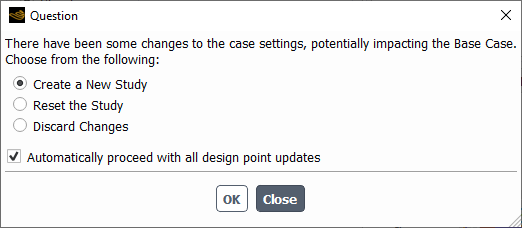
If you choose to Create a New Study or to Reset the Study, you also have the option to Automatically proceed with design point updates, using the corresponding check box (since you were already in the process of updating the design points).
Note: This dialog box also appears in two scenarios after the base design point is updated:
when adding or deleting any input or output parameters, and
when you have changed one or more case settings and proceed to make any other design point the current design point.
In either of the scenarios, the dialog does not include the option to Automatically proceed with design point updates.