The process for using submodeling is as follows:
The steps are explained in detail next.
The first step is to model the entire structure and analyze it.
To easily identify this initial model, it is referred to as the coarse model. This does not mean that the mesh refinement is coarse, only that it is relatively coarse compared to the submodel.
The analysis type may be static (steady-state) or transient and follows the same procedure as described in the individual analysis guides. Some additional points to keep in mind are listed below.
Jobname - Use different job names for the coarse model and the submodel as a precaution against overwriting files, and to easily refer to files from the coarse model during cut-boundary interpolation. To specify a job name, use one of these methods:
Element Types -- Only solid and shell elements support the submodeling technique. Your analysis may include other element types (such as beams added as stiffeners), but the cut boundary should only pass through the solids or shells.
A special technique called shell-to-solid submodeling allows you to build your coarse model with shell elements and your submodel with 3D solid elements. This technique is discussed in Shell-to-Solid Submodels.
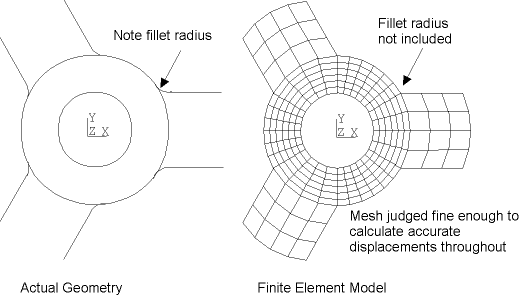
Modeling -- In many cases, the coarse model need not include local details such as fillet radii, as shown in the following figure. However, the finite element mesh must be fine enough to produce a reasonably accurate degree of freedom solution. This is important because the results of the submodel are almost entirely based on interpolated degree of freedom results at the cut boundary.
Files - Both the results file (Jobname.rst, Jobname.rmg, etc.) and the database file (Jobname.db, containing the model geometry) are required from the coarse-model analysis. Be sure to save the database after solving the coarse model, but before going on to create the submodel. To save the database, use either of these methods:
The submodel is completely independent of the coarse model; therefore, the first step after the initial analysis is to clear the database at the Begin level. To clear the database at the Begin level, use one of these methods:
Also, be sure to use a different job name for the submodel so that the coarse-model files are not overwritten. To specify a job name, use one of these methods:
Then enter PREP7 and build the submodel. Some points to remember are:
Use the same element type (solid or shell) that was used in the coarse model. Also, specify the same element real constants (such as shell thickness) and material properties. (Shell-to-solid submodeling allows you to switch from shell elements in the coarse model to 3D solid elements in the submodel.)
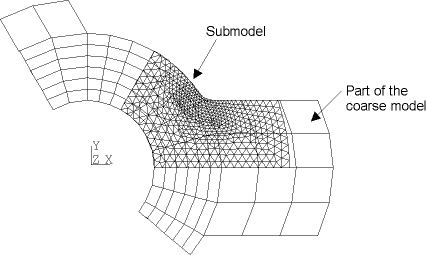
The location of the submodel (with respect to the global origin) must be the same as the corresponding portion of the coarse model, as shown in Figure 7.3: Submodel Superimposed Over Coarse Model.
Specify appropriate node rotations. Node rotation angles on cut boundary nodes should not be changed after they have been written to the node file in interpolation step 1 (see Perform Cut-Boundary Interpolation). To specify node rotations, use one of these methods:
Command(s): NROTATGUI:
Be aware that node rotation angles might be changed by application of nodal constraints (DSYM), by transfer of line constraints (SFL), or by transfer of area constraints (SFA), as well as by more obvious methods (NROTAT and NMODIF).
The presence or absence of node rotation angles in the coarse model has no effect upon the submodel.
Loads and boundary conditions for the submodel are covered in subsequent steps.
This is the key step in submodeling. You identify the nodes along the cut boundaries, and the program calculates the degree-of-freedom values (displacements, potentials, etc.) at those nodes by interpolating results from the full (coarse) model. For each node of the submodel along the cut boundary, the program uses the appropriate element from the coarse mesh to determine the degree-of-freedom values. These values are then interpolated onto the cut-boundary nodes using the element shape functions.
The following tasks are involved in performing the cut-boundary interpolation:
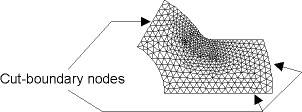
Identify and write the cut-boundary nodes of the submodel to a file (Jobname.node by default). You can do this in PREP7 by selecting nodes along the cut boundaries and then using one of these methods to write the nodes to a file:
Command(s): NWRITEGUI:Here is an example of issuing the NWRITE command:
NSEL,...          ! Select nodes along cut boundaries
NWRITE            ! Writes all selected nodes to Jobname.node
At this point, it is worthwhile to discuss temperature interpolation. In an analysis with temperature-dependent material properties, or in a thermal-stress analysis, the temperature distribution must be the same between the coarse model and the submodel. For such cases, you must also interpolate the temperatures from the coarse model to all nodes in the submodel. To do so, select all submodel nodes and write them to a different file using NWRITE,
Filename,Ext. Specify a file name; otherwise, your file of cut-boundary nodes will be overwritten. Step 7 shows the command to do temperature interpolation.Restore the full set of nodes, write the database to Jobname.db, and leave PREP7. You must write the database to Jobname.db because you need to continue with the submodel later.
To restore the full set of nodes, use one of these methods:
Command(s): ALLSELGUI:To write the database to Jobname.db, use one of these methods:
Command(s): SAVEGUI:To do the cut-boundary interpolation (and the temperature interpolation), the database must contain the geometry for the coarse model. Therefore, you must resume the database using one of the methods shown below, making sure to identify the name of the coarse-model database file:
Command(s): RESUMEGUI:For example, if the job name for the coarse-model analysis was COARSE, issue the command RESUME,COARSE,DB.
Enter POST1, which is the general postprocessor (/POST1 or menu path ). Interpolation can only be performed in POST1.
Point to the coarse results file (FILE or menu path ).
Read in the desired set of data from the results file (SET or menu path ).
Initiate cut-boundary interpolation. To do so, use one of these methods:
Command(s): CBDOFGUI:By default, the CBDOF command assumes that the cut-boundary nodes are on file Jobname.node. The program then calculates the cut-boundary degree-of-freedom values and write them in the form of D commands to the file Jobname.cbdo.
To do temperature interpolation, use one of these methods, being sure to identify the name of the file containing all submodel nodes:
Command(s): BFINTGUI:Interpolated temperatures are written in the form of BF commands to the file Jobname.bfin.
If real and imaginary data are involved, steps 6 and 7 must be performed twice. Issue the SET command to get the real data, followed by the interpolation step (CBDOF and/or BFINT). Issue the SET command with the field set to 1 to get the imaginary data, and repeat the interpolation step, this time writing the interpolated imaginary data to a different file.
For load-history-dependent problems, steps 6 and 7 can be performed multiple times at different data sets or substeps. The cut-boundary degree-of-freedom values of each data set will reside in the same file but in different data blocks, separated by a :CB
nnlabel (wherennis the cumulative iteration number of the results set used).All interpolation work is now done, so leave POST1 (FINISH) and restore the submodel database (RESUME or menu path ). (Be sure to use the submodel database job name.)
In this step, you define the analysis type and analysis options, apply the interpolated degree-of-freedom values (and temperatures), define other loads and boundary conditions, specify load step options, and obtain the submodel solution.
The first step is to enter the solution processor (/SOLU or menu path ).
Then define the appropriate analysis type (usually static) and analysis options.
To apply the cut-boundary degree-of-freedom constraints, simply read in the file of D commands (created by CBDOF) using one of these methods (for example, /INPUT,,CBDO):
Similarly, to apply the interpolated temperatures, read in the file of BF commands (created by BFINT) using one of these methods (for example, /INPUT,,BFIN):
If real and imaginary data are involved, first read in the file(s) containing the real data, specify whether degree-of-freedom constraint values and/or nodal body force loads are to be accumulated, and then read in the file containing the imaginary data.
Specify that degree-of-freedom constraint values are to be accumulated:
Specify that nodal body-force loads are to be accumulated:
Be sure to reset the DCUM and BFCUM commands to their default status before proceeding.
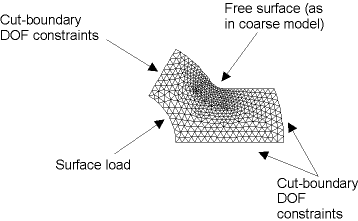
It is important that you duplicate on the submodel any other loads and boundary conditions that existed on the coarse model. Examples are symmetry boundary conditions, surface loads, inertia forces (such as gravity), concentrated force loads, etc. (see Figure 7.5: Loads on the Submodel).
Then specify load step options (such as output controls) and initiate solution calculations using one of these methods:
For most problems, exit the solution processor (FINISH) after the solution has completed.
For load-history-dependent problems, apply the cut-boundary degree-of-freedom constraints in the next data block in the file created by cut-boundary interpolation (CBDOF), and solve (SOLVE) as a new load step. Because it is a new load step, for any rate-dependent materials and transient analysis, the time value must match the time when cut-boundary interpolation occurred. This step can be repeated until all cut-boundary degree-of-freedom constraints are applied. Then, exit the solution processor.
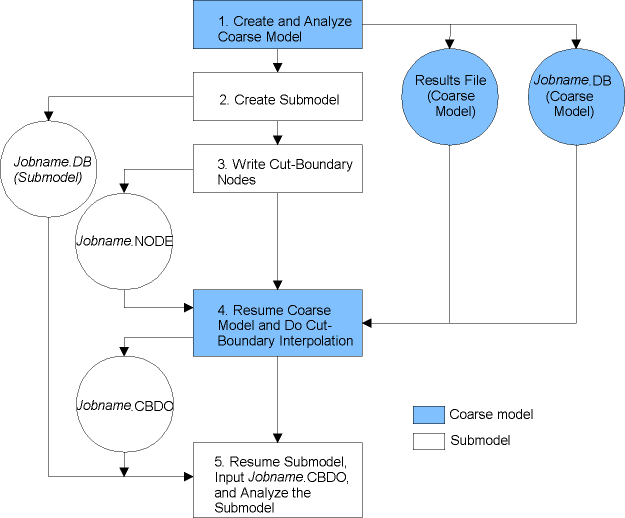
The overall data flow for submodeling (without temperature interpolation) is shown in Figure 7.6: Data Flow Diagram for Submodeling (Without Temperature Interpolation).
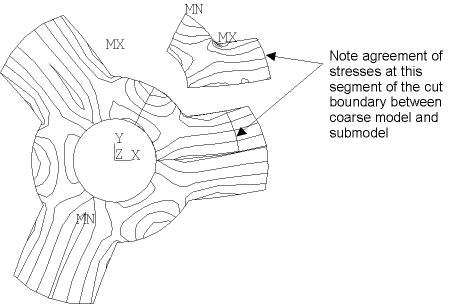
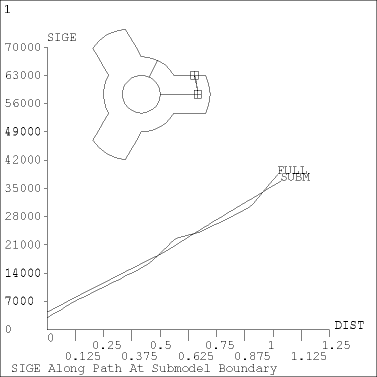
The final step is to verify that the cut boundaries of the submodel are far enough away from the concentration. You can do this by comparing results (stresses, magnetic flux density, etc.) along the cut boundaries with those along the corresponding locations of the coarse model. If the results are in good agreement, it indicates that proper cut boundaries have been chosen; otherwise, you will need to recreate and reanalyze the submodel with different cut boundaries further away from the region of interest.
An effective way to compare results is to obtain contour displays and path plots, as shown in Figure 7.7: Contour Plots to Compare Results and Figure 7.8: Path Plots to Compare Results.