


You can create or record a table of data in another application (such as a spreadsheet or logging program), save it to a delimited text file, and import the data file into the Mechanical application.
Table Data File Requirements
Table data files must comply with Table Requirements and Limitations. In addition, they must be in the following format:
Table data is stored in a delimited text file. Valid delimiters are commas (,), tabs, spaces, and semicolons (;).
Data files can optionally contain text header rows at the beginning of the file and text footer rows at the end of the file. However, the table import function ignores these headers and footers. Skip these rows when you import a file (as described below). Otherwise, these rows will be left blank.
When you import a table from a file, you must specify the units of measurement for its independent and dependent variables. These units can be from a single system of measurement or a mixture of different systems of measurement. However, Mechanical automatically converts all numeric values in the table to their equivalent values in the model's current units of measurement.
Create a Table by Importing a Data File
Create the table. Do one of the following:
Right-click the Model object or the geometry, then select > .
Right-click the Tables object, then select .
Click the Table from File icon
 on the
Table Context tab.
on the
Table Context tab.
The application automatically adds a Tables object (if one does not already exist) and creates a new table.
An Open dialog appears. Select the file that contains data for your table. Data files must be formatted as described in Table Data File Requirements.
After you select a data file, the Import From File dialog displays as shown below.
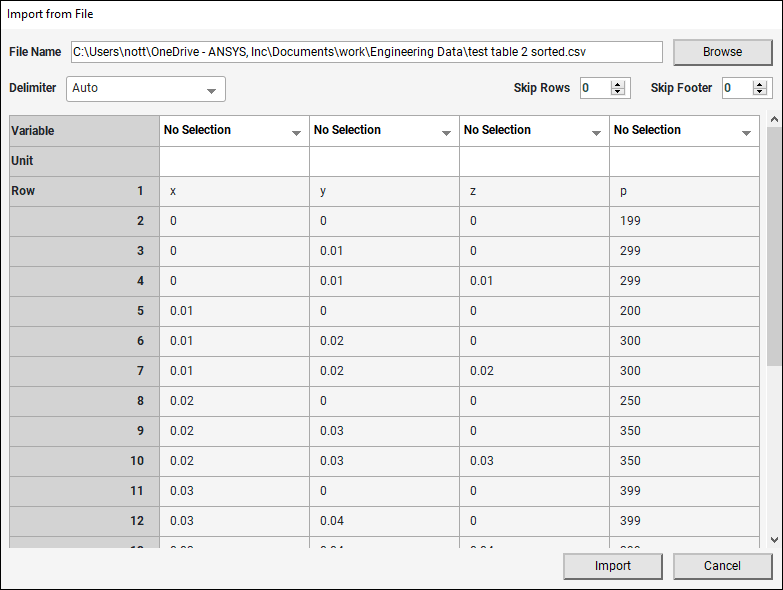
Choose the Delimiter that separates the entries in your data file.
Select (the default) to have the table import function automatically identify the delimiter character.
Select one of the following to manually identify the delimiter character: , , , or .
If your table has one or more rows of header text at the beginning of the file, set the Skip Rows option to skip these lines. The table import dialog highlights the skipped header rows in red.
If your table has one or more rows of footer text at the end of the file, set the Skip Footer option to skip these lines. The table import dialog highlights the skipped footer rows in red.
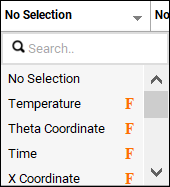
Select the Variable type for each column of data from the drop-down menu at the top of the column. Use the search box to filter variable types by name.
F next to the variable name indicates an independent (or primary) variable. A table must have at least one independent variable.
Note: Independent variables can include either Cartesian coordinates or cylindrical coordinates, but not both. If you select Y Coordinate as an independent variable, you cannot select Theta, and vice versa.
R next to the variable type indicates a dependent variable. A table must have at least one dependent variable.
See Table Requirements and Limitations for a discussion of independent and dependent variables in tables.
Select the Unit for each variable from the drop-down menu.
The available units correspond to the type of variable you selected. For instance, if you picked Temperature as the variable type, the Unit menu displays units of temperature: C (Celsius), K (Kelvin), F (Fahrenheit), and R (Rankine).
Note: Imported tables can have units from multiple unit systems. Mechanical automatically converts all table values to the unit system that is currently selected for the model.
When you finish, click the Import button. The application imports the table data and displays it in the Table worksheet.
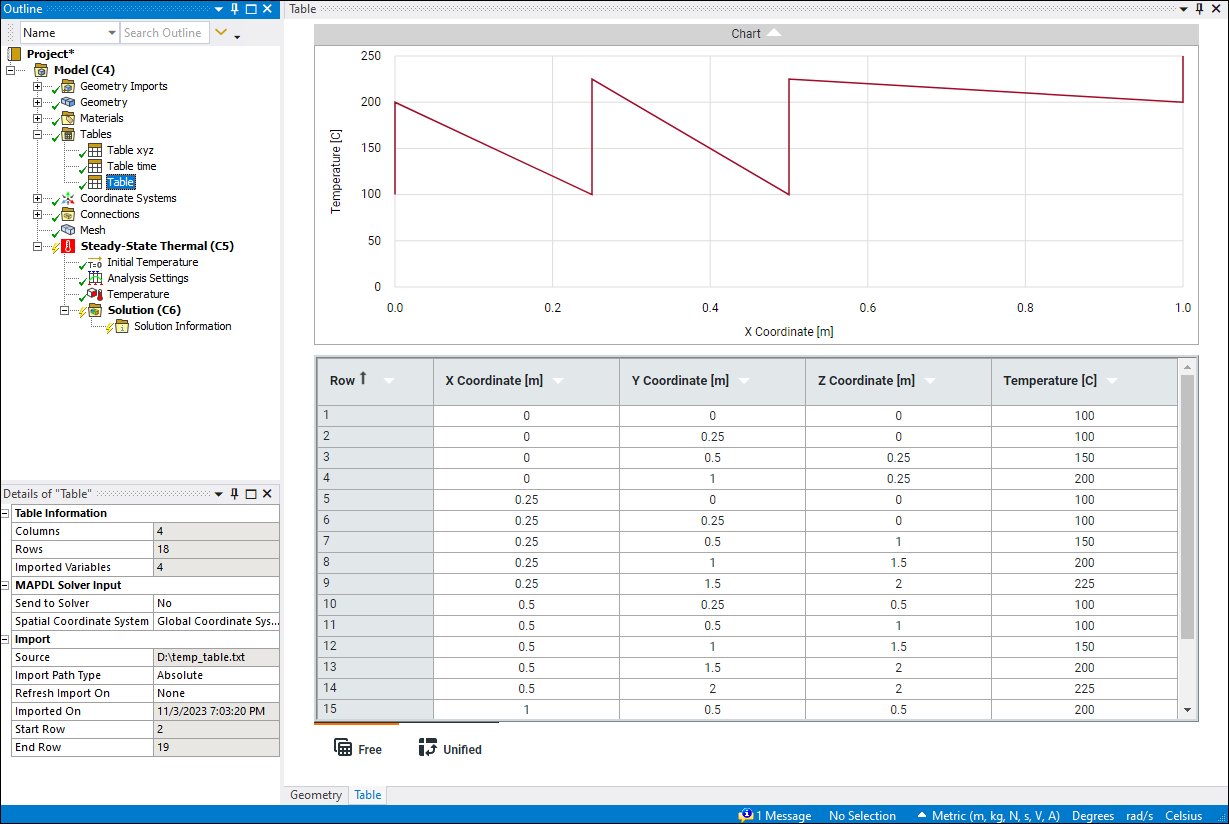
In the Details pane for the new table, you can optionally specify the following:
If your table contains X, Y or Theta, or Z coordinates, specify the table's coordinate system under Spatial Coordinate System.
You can define the table as an APDL scripting variable in the Send to Solver field and specify its variable name in the APDS Name field.
You can specify whether the table is reimported before the solution under Refresh Import On
For more information about these parameters, see View Table Details.