


This section describes the tools to manipulate (rotate, pan, and zoom) your model in the Geometry window.
Panning the Model
Selecting the Pan option on the Graphics toolbar enables you to vertically and horizontally reposition your model in the Geometry window. Simply select the Pan button on the toolbar and click your mouse within the Geometry window to give it focus. Then, hold the left mouse button and reposition your model. In addition, once you have given the Geometry window focus, you can use the arrow key to reposition your model.
Note: At any time while the Pan option is active, you can use the middle mouse button (or [Ctrl]+[Arrows Keys]) to rotate your model.
Rotating the Model
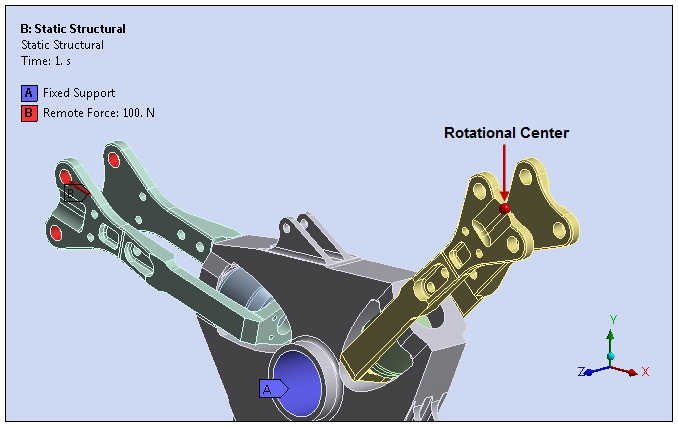
Selecting the Rotate option on the Graphics toolbar enables you to turn your model about a default or user-selected center using the left mouse button. This is a common application feature. By default, the rotational center is the center of your model.
To rotate about a specific point on the model, select a new point of rotation on your model with the left mouse button. This action re-centers your model in the Geometry window and displays a red sphere that indicates the newly selected center of rotation. From this position, you can rotate your model freely about the new rotation point. To restore the default rotation point, simply click off of the model.
- Rotation Using the Middle Mouse Button
You can also, at any time, rotate your model in the Geometry window using the middle mouse button. With the middle mouse button, you can select a location on you model, hold the middle mouse button, and rotate your model about that point. Clicking off of the model returns the rotational center to the application default. Using this method, the application does not recenter the model in the window based on the newly selected center of rotation.
Note: These middle mouse button options are always available when the Geometry window has focus.
- On Mouse Down Set
For the left mouse button, you may change the default setting for the Model Rotation Center option in the Graphics category of the Options preference to . Using this setting, with the Rotate feature active, the application does not recenter your model and you can immediately rotate it around the new point. When in this mode, your new selection becomes the default.
- Rotation Behavior Based on Cursor Location
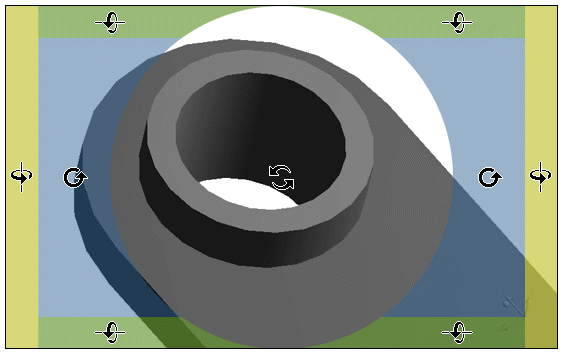
You may change the default setting for the Mouse Rotation Mode option in the Graphics category of the Options preference to . Using this setting, with the Rotate feature active, the application activates the roll, yaw, and pitch cursor options in the Geometry window, as described below.
Geometry Window Cursor Icon Description 
Free rotation.

Rotation around an axis that points out of the screen (roll).

Rotation around a vertical axis relative to the screen (yaw axis).

Rotation around a horizontal axis relative to the screen (pitch axis).
As illustrated below, the application displays these icons based upon where you position the cursor in the Geometry window.
- Model Orientation using the Triad
The Triad, located in the lower right corner of the Geometry window, enables you to reorient the position of your model based on a desired axis as well as reset the isometric view (light blue ball). If you move your cursor around the triad, you will see an arrow appear that shows the direction that corresponds to the position of your cursor (+x, -x, +y, -y, +z, -z). If you click the arrow, it changes your view so that the axis indicated by the arrow is facing outward.
Zooming In and Out on Your Model
There are a number of Zoom options available in the Graphics toolbar:
Selecting the button enables you to drag your left mouse button up and down in the Geometry window to zoom in and out on your model.
Selecting the button displays a box selection area when you to drag your left mouse button. The application zooms in on this area in the Geometry window. Note that the smaller area that you select with this tool, the smaller area that is zoomed in upon.
Note:
You can hold the Shift key and use the up and down arrow buttons respectively, to zoom in and out on your model.
You can zoom in or out by rolling the mouse wheel.