
Submitting a Job
Ansys Electromagnetics Desktop supports its own Remote Simulation Management (RSM) and Ansys Cloud Direct along with other High Performance Computing (HPC) software management programs (See: HPC Integration). The Simulation tab of the ribbon includes icons for setting HPC Options, creating and selecting analysis configuration, selecting the scheduler, submitting jobs, and monitoring jobs.
There are two ways that the GUI may be used to submit jobs. The first (and most common) mode requires that the Desktop (UI) process run on a host which is also a submission host for the job scheduler. This mode is called local mode or working mode.
The second mode is only supported on Linux in the Ansys Electromagnetics Suite. In the second mode, an administrator configures the RSM Service to act as an interface to the job scheduler, and starts the RSM Service on a submission host for the cluster. The user runs the Desktop (UI) process on another host (which may be called the post-processing host). To submit a job, the user specifies the host where the RSM Service is running, and the Desktop process connects to the RSM Service over the network to submit the job. In this mode, some configuration is required, and the RSM Service typically must run as a privileged user (for example, root), so that it can launch processes as any user. This mode is useful for cases in which the submission hosts are not able to run graphical processes.
For certain methods of resource selection for Windows HPC job submission, Ansys Electronics Desktop checks for nodes being online. In an auto-scaling cluster, nodes can fail the online check because they're not online until a job is running. An environment variable allows customers to bypass this check:
ANSYSEM_SKIP_NODE_ONLINE_CHECK
Set the variable value to 1 to disable the online check. Debug logging fully verifies what aspects of the cluster are causing this check to fail.
Job submission in Windows works without changing settings if environment variable ANSYSEM_SUBMIT_JOB_REQ_NODE_ONLINE is set with value 0. The installation doesn’t set this environment variable. ANSYSEM_SUBMIT_JOB_REQ_NODE_ONLINE accepted values: 0 or 1 (0 = disable; 1 = enable, i.e. require nodes to be online for submission). Default: 1 (i.e. if not set, Ansys Electronics Desktop requires nodes to be online for submission).
To submit a job:
- Prepare your design.
For HFSS, Ansys recommends you use HFSS > Design Settings to turn on S parameter export for frequency so that they can be downloaded quickly after the simulation is complete. They must be exported to default project path for download to work correctly.
- Open the Submit Job To window one of the following ways:
- On the Simulation tab, click the Submit icon.
- Select Tools > Job Management > Submit Job.
- Select
- Right-click a solution setup and select Submit Job. In this case, the information in the Submit Job To window will be pre-populated from the setup.
- From a Command window, use the -showsubmitjob command.
The Submit Job To window appears. The window header indicates your selected scheduler.
This window contains up to three tabs:
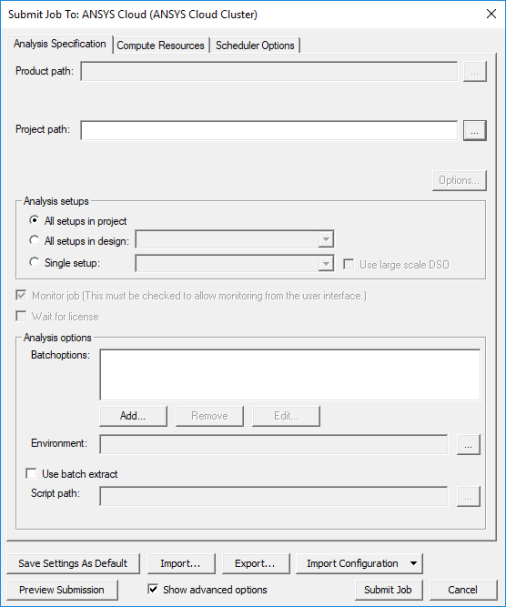
- Analysis Specification – allows you to specify the product path, project name, setup and analysis options, batchoptions, and environment variables (for advanced users).
- Compute Resources – allows you to specify whether to use automatic settings, and to set resource selection and job distribution parameters.
- Scheduler Options – allows you to specify the job name and priority. This tab does not appear if you have selected local RSM as the scheduler.
- On the Analysis Specification tab, specify your desired options.
The Product path and Project fields support mapped drives. Click the ellipses (...) to select files.
The project can be an archive. The project file pathname must be a UNC path that is accessible from each compute host used for Ansys Electromagnetics jobs. After clicking the Project path field's ellipsis button (...), a check box allows you to Use converted UNC path if mapped drive specified. If you select a project or product on a mapped drive, and check the option, the converted UNC path equivalent to the mapped drive pathname is used.
In the Analysis Setups area, select the radio button for All setups in project, All setups in design, or a single setup.
For Parametric setups, you have the option to select Use Large Scale DSO. See: Large Scale DSO for Parametric Analysis.
- Select the Compute Resources tab.

Options may vary slightly depending on your selected scheduler.
- If applicable, determine whether or not to Use multi-step submission.
- Determine whether or not to Use automatic settings.
Note:
Ansys strongly recommends using Automatic settings.
- Use the buttons in the Resource selection area to allocate resources. See: Job Management for Large Scale DSO.
- If you opted not to use automatic settings, you can also set Job distribution parameters. See: Distributed Analysis.
- If applicable, select the Scheduler Options tab and set the Job name and Priority.

- If desired, import or export job configurations.
- If desired, click Save Settings as Default to save the current settings and overwrite defaults. These settings are saved on a per-scheduler basis.
- If desired, click Show advanced options to see options for advanced users. See: Running Electronics Desktop from a Command Line.
- If desired, click Preview Submission to view the commands to be sent to the scheduler. Ansys Cloud Direct submissions contain queue (pool) configuration details, including the job's hourly cost in Ansys Elastic Units (AEUs).
The preview text can be copied to the clipboard.
- Click Submit Job to submit the job to your selected scheduler.