
Job Management Interface for Large Scale DSO
Large Scale DSO jobs run only in non-graphical batch mode, irrespective of the scheduler environment. This is in contrast to a Regular DSO job, which can run in graphical mode. This consideration implies that projects corresponding to Large Scale DSO job must be saved and closed prior to job submission. Secondly, the command to submit a Large Scale DSO job is only available through Tools > Job Management or via a command window, while a Regular DSO job can be run in an RSM environment by right-clicking directly on the parametric setup. The Job Management window is accessed by running Ansys Electromagnetics product Desktop on the designated Postprocessing Node of the cluster. The Desktop provides UI commands for scheduler selection, job submission and job monitoring/control.
When you have selected the scheduler, perform the following steps to submit a Large Scale DSO job:
- Set up and prepare the model on your local workstation. Right-click the desired solution setup and select Validate for Large Scale DSO.

- Correct any errors and save the project.
- Close Electronics Desktop.
- Copy the project (or folder, if the project references external files) from a personal workstation to a shared drive on cluster.
In the RSM environment, you must specify a machine list (See: HPC and Analysis Options).
In a Linux scheduler environment, a cluster must have a designated Postprocessing Node.
- Open a remote desktop session (or equivalent) on the node corresponding to the first machine in the machine list (the designated Postprocessing Node on Linux).
- Launch Electronics Desktop on that node and open the project.
- Verify that the model has been prepared correctly.
- Close the project.
- Submit the job one of several ways:
- Click Tools > Job Management > Submit Job.
- Click Project > Submit Job.
- Click
- Select the Simulation tab and click the Submit icon.
The Submit Job To window appears, on the Analysis Specification tab.
 Note:
Note:Options vary slightly depending on the selected scheduler. See: HPC Integration.
- Specify information for all fields:
- Most options will not be enabled until you select a Project path.
- Under Analysis setups, select setups for analysis.
For Large Scale DSO, select a Single setup from the drop-down menu and ensure the Use large scale DSO check box is selected.
- Determine whether to Use Electronics Pro, Premium, Enterprise product licensing, whether to Monitor job, and whether to Wait for license. If you wish to monitor jobs through Tools > Job Management, you must enable job monitoring.
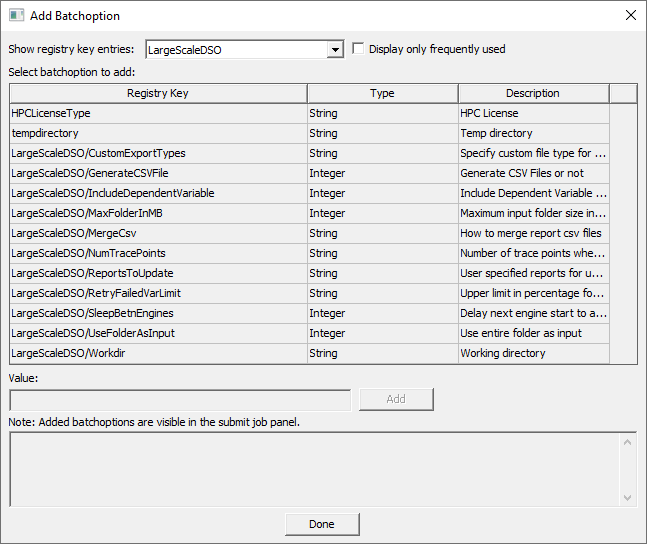
Add Batchoptions, if desired.
The following shows batchoptions specific to Large Scale DSO.
- Select the Compute Resources tab.
When available, Use automatic settings may be selected. If it is selected, also select the Number of variations to distribute.
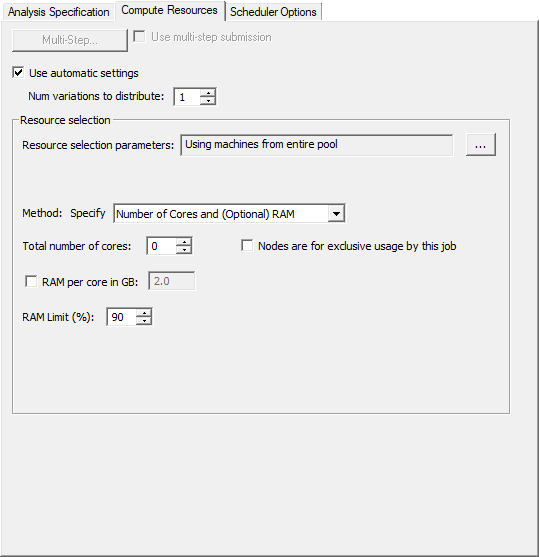
The values you specify represent minimal requirements for each condition that can interact in leading to the total resources the Scheduler derives from them. A submission preview shows the number of resources assigned.
When automatic settings are not available or not selected, additional options appear:
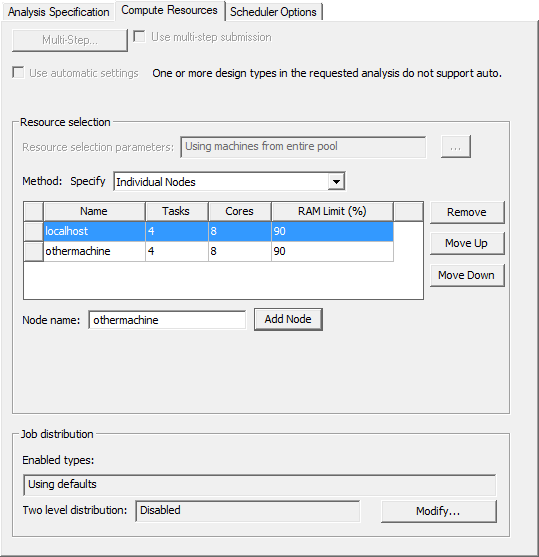
For RSM Large Scale DSO jobs submitted from the Job Submission panel, localhost must be the first node in the resource selection panel. Otherwise, the job will fail.
In the Job distribution area, you can enable or disable Two-level distribution by clicking Modify. See: Two-level Distribution Guidelines.
- If desired, click Preview Submission to view a summary of the commands to be sent to the scheduler. The text can be copied to the clipboard.
- To submit the commands to the scheduler, click Submit Job.
Note:
The RSM environment does not support queuing, so clicking Submit Job starts it immediately.
- If you enabled job monitoring, you can monitor the job via Tools> Job Management > Monitor Jobs. See: Monitoring Jobs.