
Ansys Electronics Desktop Windows
Ansys Electronics Desktop contains the following windows:
You can toggle the display of each window, auto-hide windows, or move and resize windows. Additionally, you can toggle the status bar or add ACT Extensions (Windows only).
Showing and Hiding Windows
To toggle the windows that comprise Ansys Electronics Desktop, use the View menu or the View tab on the ribbon.
From the View menu:
- Click a window to show or hide it.

From the View tab:
- Use the Docking Windows drop-down menu to show and hide windows.

You can also hide a window directly from the window:
- Click the X in the window title bar, or
- Right-click in the window title bar and select Hide.

The visibility setting of a window is retained from one desktop session to the next.
Auto Hiding Windows
Windows can be moved out of the way so that only their title bars show. When you hover over this title bar, the window appears. This mode is called Auto Hide.
To automatically hide a window until the cursor is hovered over it:
- Click the pin icon in the window title bar, or
- Right-click in the window title bar and select Auto Hide.
When a window is in Auto Hide mode, the pin icon flips on its side. Click the icon again to disable Auto Hide.

Moving and Resizing Windows
You can resize a window by clicking and dragging a vertical or horizontal window border. The cursor appearance changes to indicate when you're over a movable window border (as highlighted in yellow below):

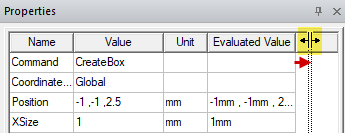
You can also click and drag the borders of columns within certain windows containing tabular data, such as the Properties window:
Major Ansys Electronics Desktop windows can be docked in various locations or can float over other windows. To move a window, click and drag the window's title bar. While dragging a window's location, several docking position icons appear on the screen.
By releasing the mouse button over the following icons, you can dock a window in the following four locations along the perimeter of the user interface:
| Left edge of user interface: |

|
| Right edge of user interface: |

|
| Top of user interface: |

|
| Bottom of user interface: |

|
Additionally, you can use the following group of five docking locations to position the window relative to another window:
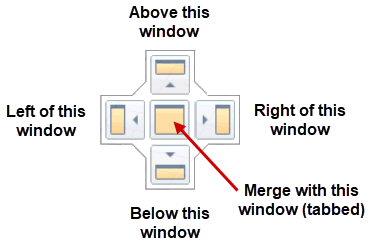
When you release the mouse button over the middle icon, the two windows are merged, with tabs at the bottom to select which one to view:

If the middle icon does not appear, it's because tabbed windows are not supported by one of the windows. For example, you cannot merge any window with the Modeler window.
If you release the mouse button while not over any of the above nine icons, the window stays in its current dragged location as a floating window.