
Working with the Nets Window
The Nets window is used to view and configure nets and collections of nets. It is a dockable window that can be resized and relocated. The Nets window is divided into three tabs:
- Nets – lists net and net classes.
- Differential – lists coupled positive and negative nets.
- Extended Nets – lists extended nets for use for SIwave SYZ with HFSS Regions simulations.
To show or hide the Nets window, click View > Nets. A check box appears next to this command if the Nets window is visible.

Nets Tab
The Nets tab contains two panes: an upper Classification pane and a lower Nets pane.
Classification Pane
A net classification (also called a class) is a collection of nets. Classifications are designed to group and organize nets by a common characteristic. A net can be in multiple classes at once. By default, there are two classifications: All and Power/Ground net class.
The Classification pane lists and manages net classes. When you select a class in the Classification pane, the nets assigned to that class are listed in the Nets pane.
The Classification pane’s shortcut menu offers the following actions:
- New – opens the Add Net Class window for net class creation (see below).
- Edit – opens the Net Class Properties window for net class modification (see below).
- Delete – deletes the selected net class(es).
- Select – in the layout editor, selects the net classes selected in the classification pane.
- Show – in the layout editor, shows the net classes selected in the classification pane.
- Show (Hide All Other) – in the layout editor, shows the net classes selected in the classification pane and hides all other net classes.
- Hide – in the layout editor, hides the net classes selected in the classification pane.
- Create Ports – creates ports on all nets in the selected net classes.
- Remove Ports – removes ports from all nets in the selected net classes.
Nets Pane
The displayed nets may be filtered using Perl Regular Expression syntax. In the Nets pane, the right-click menu contains additional options:
- Add to Power/Ground – adds one or more selected nets to Power/Ground.
- Delete – deletes the selected net(s).
- Lists – opens a list of all nets in the Design List window.
- Remove from Power/Ground – removes one or more selected nets from Power/Ground.
- Create Differential Pair – with two nets selected, groups them as a differential pair (see below).
Selecting New from the right-click menu opens the Add Net Class window. Enter a name and description (optional) for the new net class and click OK.

Selecting Edit from the right-click menu opens the Net Class Properties window. Use this window for net class modification.

Differential Pairs
Each Differential Pair is composed of a positive net and a negative net. From the Nets window, you can view and create Differential Pairs.
Viewing Differential Pairs
Click the Differential tab to display a list of Differential Pairs.

Creating Differential Pairs
Select two nets in the Nets list and right-click to create a new Differential Pair.

From the Differential Pairs list, you can select a pair, open the right-click menu and select:
- Swap – swaps the positive and negative net.
- Edit – opens the Edit Differential Pairs window.
- Expand All – expands all Differential Pairs.
- Collapse All – collapses all Differential Pairs.

Edit Differential Pairs Window
From the Edit Differential Pairs window, you can delete pairs or auto detect Differential Pair with postfixes of the positive and negative nets that are provided. Enter differentiators to identify the positive and negative parts of pairs. Use Append to grid contents to add any new pairs to the list in the grid and Replace grid contents to replace existing pair with newly identified pairs.

Extended Nets Tab
Extended nets are used to indicate a logical equivalence among multiple nets. This is useful when two nets can be considered electrically equivalent, but are not physically connected. For example, routing for a data signal may have a short trace between a series termination resistor and pin. While the net assignment for traces on either side of the resistor are different, logically they are equal and can therefore be grouped into an extended net.
Extended nets are collections of nets that are similar to net classifications but with subtle differences. A net can be in only one extended net at a time, in contrast to being in multiple classifications simultaneously. There are also no default extended nets and no ports are associated with extended nets.
Extended nets are used for SIwave SYZ with HFSS Regions simulations. If an HFSS region contains capacitors, inductors, or resistors that connect two different signal nets, these signal nets must be defined as extended nets. SIwave needs this definition to know how to pull in required nets and auto generate ports in the region.
The Extended Nets tab contains two panes: an upper Extended Nets pane and a lower Nets pane.

Extended Nets Pane
The Extended Nets pane lists all extended nets. Use it manage the extended nets. When an extended net is selected in the Extended Nets pane, the nets assigned to that extended net appear in the Nets pane. The entry <All> lists all nets in the Nets pane including entities not in a net. <All> is not an extended net. The Extended Nets pane’s shortcut menu offers the following actions:
- New – creates a new extended net.
- Auto Identify – automatically identifies new extended nets in the Auto Identify Settings window.
- Edit – changes the selected extended net.
- Delete – deletes the selected extended nets.
- Select – selects the members of the extended nets in the Layout editor.
- Show – shows the members of the selected extended nets in the Layout editor if hidden.
- Show (Hide All Other) – shows the members of the selected extended nets in the Layout editor while hiding all other nets.
- Hide – hides the members of the selected extended nets in the Layout editor.
Create an Extended Net
- In the Extended Nets pane, right click and click New to open the Add Extended Net window.
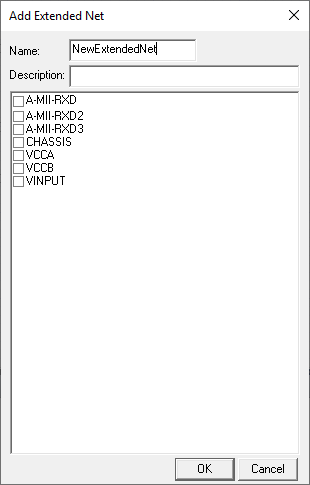
- Enter a name and optional description.
- Select the nets that will make up the extended net.
- Click OK.
Editing an Extended Net
- In the Extended Nets pane, right click and select Edit to open the Extended Net Properties window.
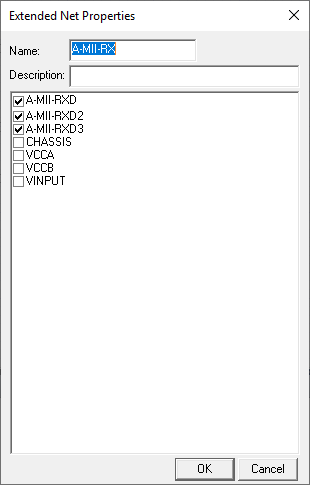
- Change the name and optional description.
- Select the nets that will make up the extended net.
- Clear the nets that should not be in the extended net.
- Click OK.
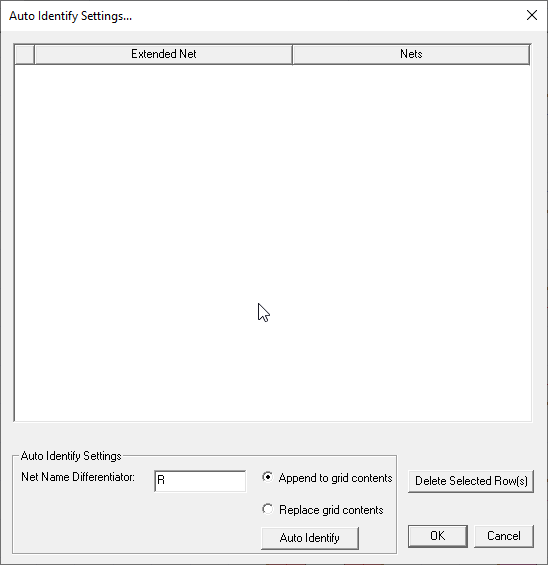
Auto Identify Settings window
From the Auto Identify Settings window, you can automatically detect and create extended nets, rename extended nets, or delete extended nets. Existing nets are listed in the grid. Enter a differentiator to identify extended nets. Use Append to grid contents to add any new extended nets to the list in the grid and Replace grid contents to replace existing extended nets with newly identified ones.
Nets Pane
The Nets pane displays the members of the extended nets that are selected in the Extended Nets pane. These nets can be filtered using regular expressions. In the Nets pane, the short menu offers these actions:
- Show – shows the selected nets in the Layout editor if any are hidden.
- Show (Hide All Other) – shows the selected nets in the Layout editor while hiding all other nets.
- Show all nets – shows all nets in the Layout editor.
- Hide – hides the selected nets in the Layout editor.
- Delete – deletes the selected nets from the project. Members of the net remain in the project.
- Fit Selected – zooms the Layout editor into show the selected nets.