Projects can be imported and exported to/from the tool as an MPRX file (.mprx file extension). This type of archive file contains always the complete project content in a consistent way, partial export is not supported. The MPRX can serve as backup, it can be shared in a file based content management system, or shared through other channels (e.g. mail, network drives).
A project archive can be imported in different ways:
Select "File | Import Project..." from the top menu. Note that there is also a generic "Import..." in the same menu which should not be used (see Import of projects using the Eclipse wizard for details)
Use the "Import project" button on the top action bar. A file dialog will let you select an MPRX file.
Drag and drop an MPRX file form the Windows file explorer into the Model Browser. Make sure you drop into a free spot and not into another project
The import operation for a project cannot be executed if the workspace already contains a project with the same name. Note that projects are identified by names stored in the archive, which can be different from the .mprx filename! Please cancel the import operation and rename the existing project in the workspace in order to restart the import.
Exporting of projects is supported by the "Export project" button on the top action bar.
Please note that this section describes the generic export of projects using the default Eclipse Export/Import-wizard. This wizard provides a number of options and features which can not be applied to medini analyze projects. We recommend to use the direct MPRX file import/export. In case you have a good reason to use the standards wizards, please follow the instructions in this section carefully in order to avoid any problems.
In order to transfer a project to another computer or just to archive an existing project medini analyze allows to export projects.
After selecting "File->Export..." the Export-Wizard will be shown:
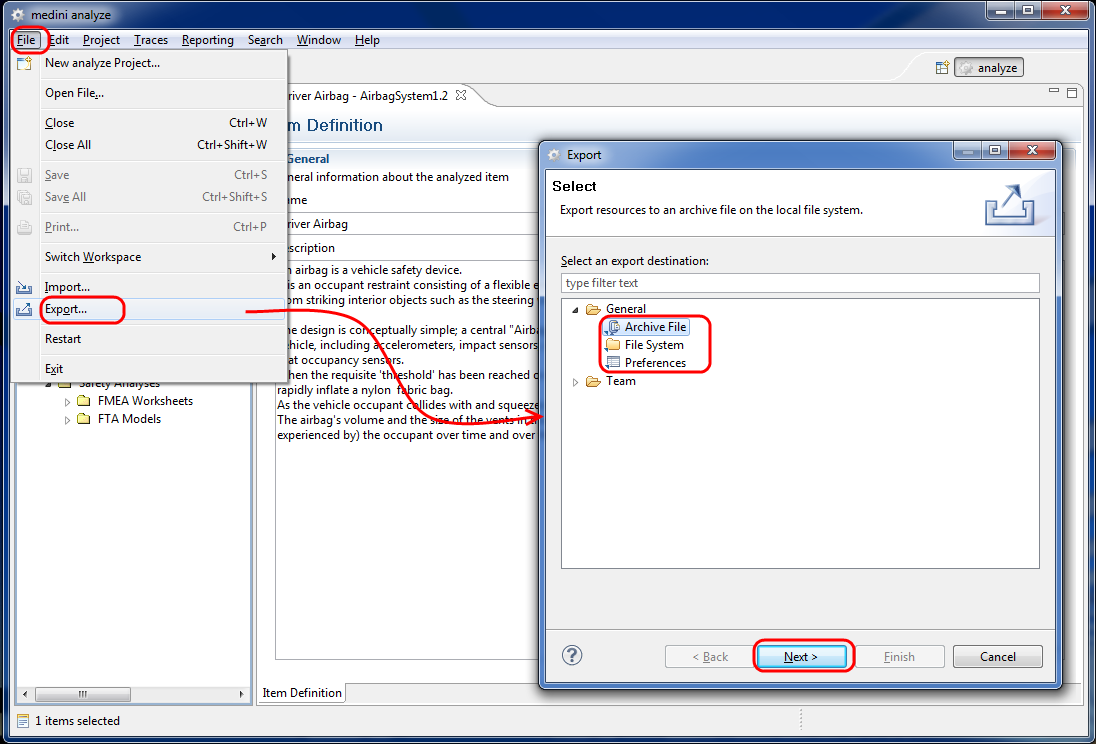
After selecting the folder "General" you can choose now among three options for the export:
Archive file: The content of the project will be stored in an archive file in zip-format
File system: The content of the project will be exported into a directory structure
Preferences: Only the current preferences will be exported (i.e. the setting which you made in the medini analyze preferences menu).
For each of these options the export wizard will show a special page to select the detailed options for the export operation.
In case of an export to an archive file you have to select the project which shall be exported and the format of the archive file (zip or tar). Moreover, you have to provide the name for the archive file.
In the top part of the wizard page on the left hand side all open projects currently in the workspace are listed. Please mark the check-box for the projects which you want to export. This will automatically mark also all project content on the top-right side of the wizard.
Note, do not deselect any of the automatically selected content as it may result in an incomplete export and thus make the re-import impossible!
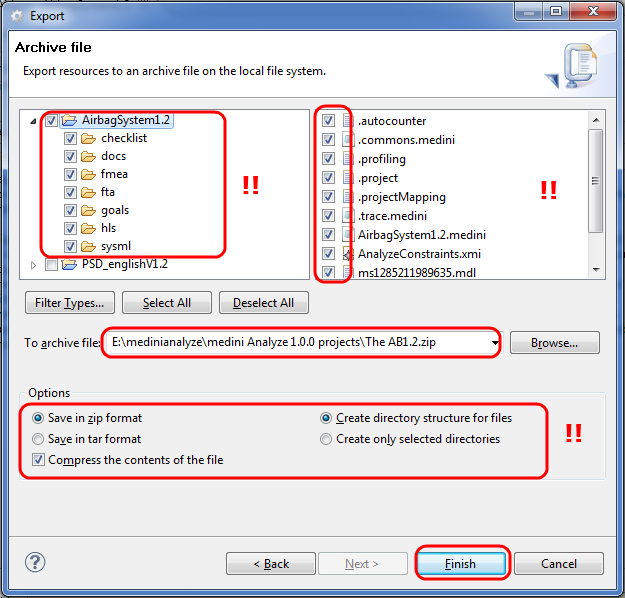
After providing a name for the archive file and clicking on "Finish" the selected project(s) will be exported into the chosen destination as a zip-File. You can now make the zip-File available to any other user (e.g. by sending it by email).
The export to File-System operation is very similar. Here you just have to select the root directory instead of an archive file name. Again, do not make any changes in the wizard with the exception of the selection of the projects which shall be exported and the specification of a target directory name.
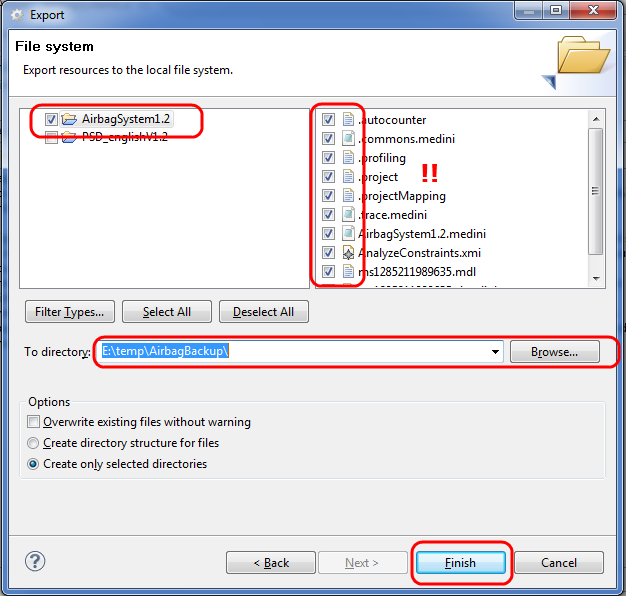
As a result a deep copy of the project will be created at the given location (this involves also the creation of the appropriate sub-folder structure used by medini analyze).
In case of an export of the Preferences you must only specify the name of the target file into which the preferences shall be written. All user specific settings made using "Windows->Preferences" will be exported. A selective export of single preferences is not supported.
Exported projects and preferences can be transferred to any other computer e.g. by using media, a network or by sending via email. Moreover, after exporting a project, it can be deleted safely from the medini analyze workspace too (this includes the removal of all files).
Please note that this section describes the generic import of projects using the default Eclipse Export/Import-wizard. This wizard provides a number of options and features which can not be applied to medini analyze projects. We recommend to use the direct MPRX file import/export. In case you have a good reason to use the standards wizards, please follow the instructions in this section carefully in order to avoid any problems.
With the Import-Operation a previously exported project can be included into the workspace of medini analyze. The operation is started by selecting "File->Import...". Again a wizard will come up to guide through the import operation.
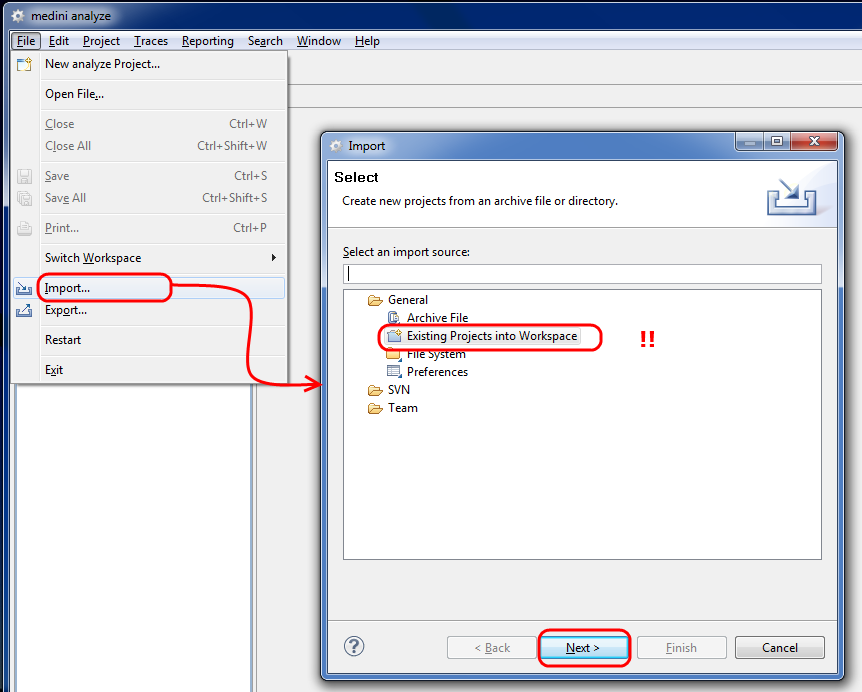
Please note in the current version of medini analyze only the import of "Preferences" and the import of "Existing Projects into Workspace" are supported.
After selecting the import of an existing project the following page will be shown by the import-wizard:
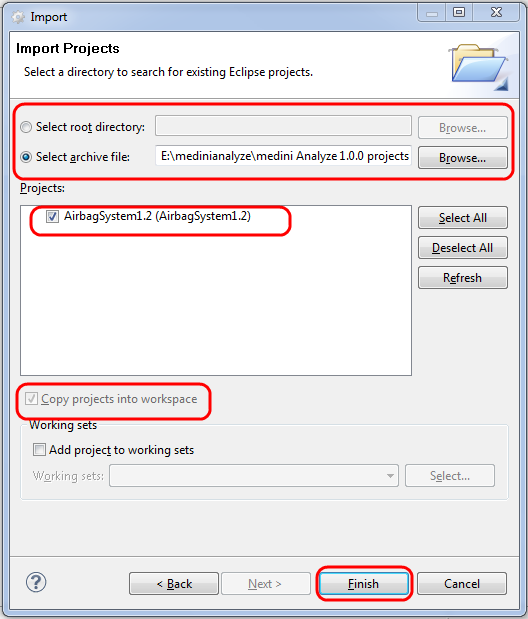
In case of importing a project from the file system you have to select the first option ("Select root Directory") and to provide the root-directory which contains the project that shall be imported. On the other side, when importing a project from an archive file, the second option ("Select Archive File") must be chosen and the name of the archive file has to be provided.
In both cases all medini analyze projects existing in that directory or archive file will be listed and you can select which one you want to import.
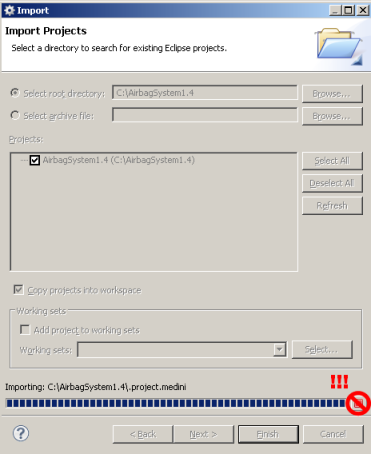
Please note after pressing finish in the Import Projects dialog it is possible to interrupt the import by pressing the stop button:

Do not press this button because it would leave a project in a broken state.
When selecting the option to import Preferences, you will be asked in the next page of the wizard to provide a source file containing the preferences to be imported. With the completion of the import the current preferences will be overwritten by the imported preferences.
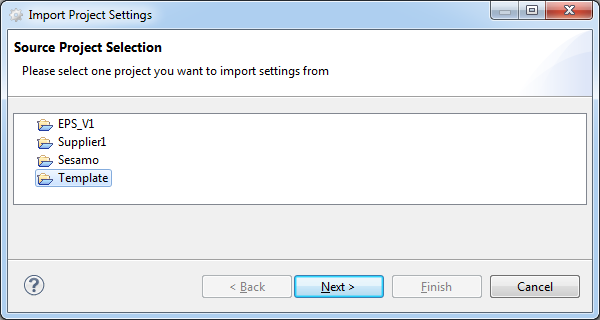
The project settings of medini analyze projects allow to predefine various information and to configure certain features of the tool (see Project Settings). If such information shall be used for another project or if project templates are applied and need to be updated, the project settings can be imported from a project or template.
In order to import project settings, the project from which the settings should be imported needs to be available in the local workspace. The import is triggered from the context menu of the project node in the model browser with the action "Import->Project Settings...". The import is guided via a wizard.

On the first page of the wizard, the project from which the settings should be imported has to be selected. Only projects which are open in the actual workspace are shown.
On the following wizard page you have to select which settings shall be imported. Currently supported are profile settings, dynamic constraints and operational situation catalogs. In addition, the import and update behavior has to be configured.
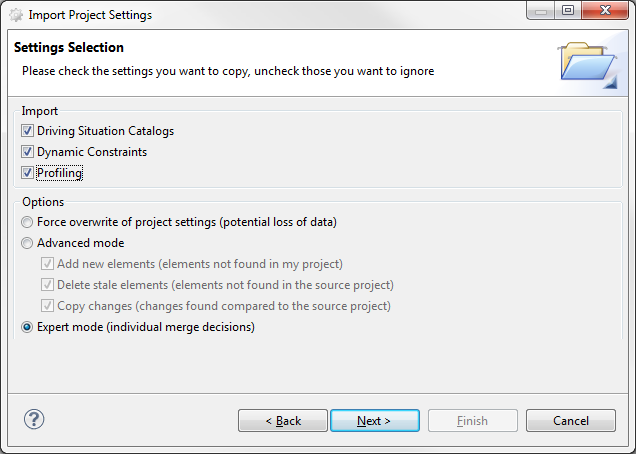
The options on the wizard page have the following meaning:
"Force Overwrite of project settings" - this option should be set, if the imported settings should be enforced on the current project. This will potentially overwrite local settings (or local changes to the settings that have been imported previously). An example could be a once imported profile property which has been explicitly deleted in the project. In case of re-import of the settings with the option on the property will be created again, otherwise it will not be created again.
"Advanced mode" - this option let's you configure the update of the imported settings. The sub-options change the import behavior as follows:
"Add new elements": with this option enabled new settings will be added that are not yet available.
"Delete stale elements": this option removes any settings that are not in the set of currently imported settings. For example, if a profile property was removed from a project template, it is stale in the current project on which the import is triggered. If you want to keep elements that are only in the local project, make sure to disable this option.
"Copy changes": this option determines whether differences between settings in the current project and the imported data are taken or rejected. For example, if a profile property is already present in the project and the imported data has a change in the description, definition of values, etc., enabling this option will lead to an update (i.e. override) of the local property.
"Expert mode" - if the imported data needs to be selectively merged into the current project, this option provides a way to update or reject each setting individually (see further below).
Note, that operational situation catalogs are considered as one element, that means, no individual merge of situation entries inside a catalog is possible. Catalogs are identified based on their internal Id, not on their name, that means they are compared only if they have the same internal Id.
Note, the options for the advanced mode apply in case of operational catalogs always for the complete catalog. "Add" and "Delete" will hence add or delete complete catalogs. "Copy changes" will add new situations to a operational catalog (if any).
Except for the expert mode, the wizard will immediately execute the import by pressing "Next" and bring up the result page, showing all changes made by the importer:
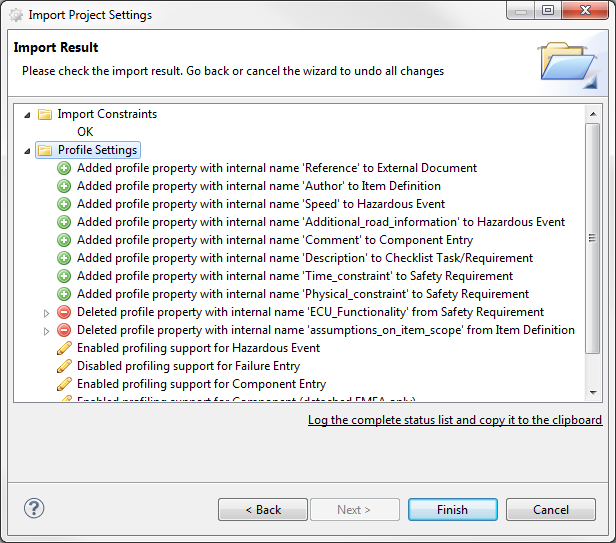
You can observe the results and, in case of unwanted changes, step back or cancel the import at this point.
The expert mode will show additional pages in the wizard depending on the selected settings for import so that you can make individual decisions about which elements shall be added, updated, and/or removed. For each imported settings, a separate page will show up in a common structure as explained in the following (i.e. one for profile properties, one for constraints, etc.). The wizard page for profile import looks for example like:
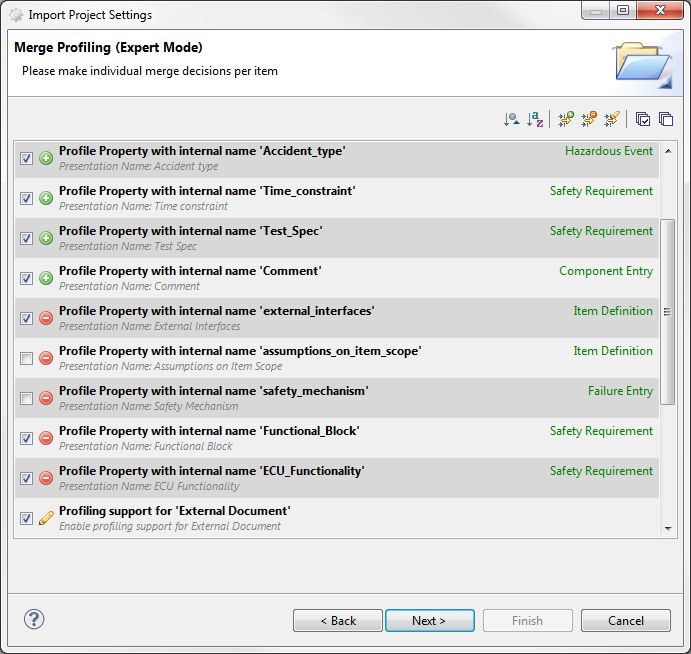
All entries of the settings to be updated are listed with an indicator of the change to be performed. Each entry consists of a brief outline of the imported data. A "plus" symbol means that the element will be added, a "minus" symbol that it is going to be deleted, and a "pencil" symbol that an existing setting will be changed. The check-box of each entry can be used to apply the change or skip it. Note that the actual changes will be done later when all choices are made.
The list of setting entries on the wizard page supports a number of filters and buttons for quick selection of elements:

This button bar contains the following functions (in the order from left to right):
"Sort by group": A list entry might be associated to a group, which shows up on the right side of the entry (green font). For example, profile properties are grouped by the corresponding meta-class they extend. This button enables sorting according to the group information.
"Sort alphabetically": As the name implies, all entries will be sorted alphabetically.
"Hide additions": Filter to hide all additions, i.e. entries existing in the imported data, but not locally.
"Hide deletions": Filter to hide all deletions, i.e. all entries which exist in the local project, but not in the imported data.
"Hide changes": Filter to hide all changes, i.e. all entries which will be updated.
"Check all visible items": Marks all entries visible in the list with a tick.
"Uncheck all visible items": Removes the tick of all visible entries in the list.
Note that the filtering is only a function of the wizard page to work with the list of entries that will not affect the behavior of the import. That means that only the checked entries will be imported, even if they are filtered out when pressing "Next".
In order to enable the reuse of artifacts of safety projects done with other tools medini analyze supports to import such results using the CSV-format (comma-separated-value data file) or an direct import of data from an Excel table. The CSV-format is supported by a variety of tools that capture structured data in form of tables or lists (among others spreadsheet applications like Excel and data bases like Oracle).
Please note that the CVS and the Excel import are done via almost the same steps at the same UI - there are only minor differences between the two.
In the current version of medini analyze the CSV/Excel-import is e.g. available for the following kind of activities:
Import of hazard tables into the Hazard Analysis and Risk Assessment package
Import of operational situations into a selected operational situations catalogue
Import of goal and requirements specifications into the Safety Goals and Requirements Package
Import of part list into a selected System/Function Model
Import of an FMEA Excel sheet into an FMEA model (see Import of FMEA data (Excel) for details)
Import of safety mechanisms into a selected safety mechanism catalog
Import of checklists into the Checklist editor for a checklist template
Import of failures (hazards, malfunctions, failure modes, errors) into failure collection tables
Please note CSV/Excel-data are always imported into an existing medini analyze data-structure (e.g. hazard table or requirement model) - you either have to create first a new empty data structure for that purpose or just import the data into any existing data structure.
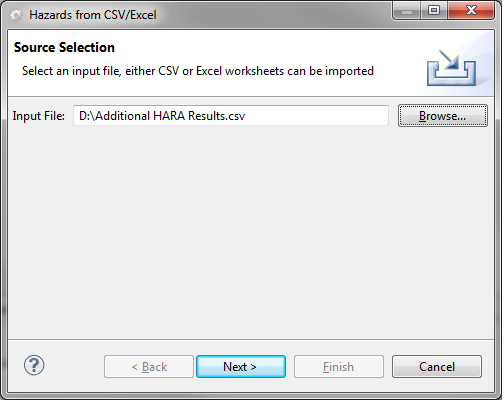
The CSV/Excel-Import wizard is started on choosing the entry "Import -> ... from CSV/Excel" from the context menu of an element in the Model Browser which supports the data import or by clicking on the "Import" button in case of catalog or checklist data import when the catalog/checklist is already open in the project settings dialog.
The import process is performed via a wizard. On the first page of the wizard, the file to be imported (either CSV or Excel format) is selected.
The following wizard page differs between Excel and CSV, as the Excel sheet may contain multiple sheets and for CSV some details have to be specified. All other wizard pages are identical and do not depend on the format of the imported file.
CSV Import Configuration
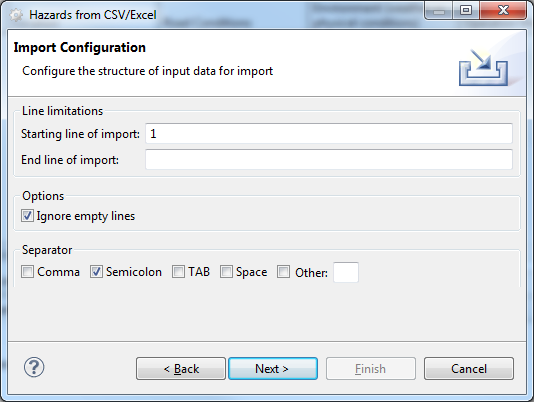
On the configuration page of the wizard you have to provide general information for the CSV-import:
Starting line of import: as the input file may contain also a title, column header descriptions or other text, you can specify at which line of the file the "real" data start. If unsure you can leave this field at the default setting and change it later after a preview of the import.
End line of import: here you can define the last line in the CSV-document, which should be imported. If no end line is specified, the document will be imported from the starting line until the end of the document.
Ignore empty lines: By choosing this option, empty lines are ignored and will not be imported, even if they exist between starting and end line.
Separator: here you can specify the separator which is used to mark the different data fields in the input file. Which separator is applied usually depends on the tool which produced the CSV-file. Choose one or more of the proposed separators or enter a separator character manually in the "Other"-field.
File encoding: here you can configure the text encoding of the CSV-file for the case that the file has been created with an encoding different from the local platform encoding.
Excel Import Configuration
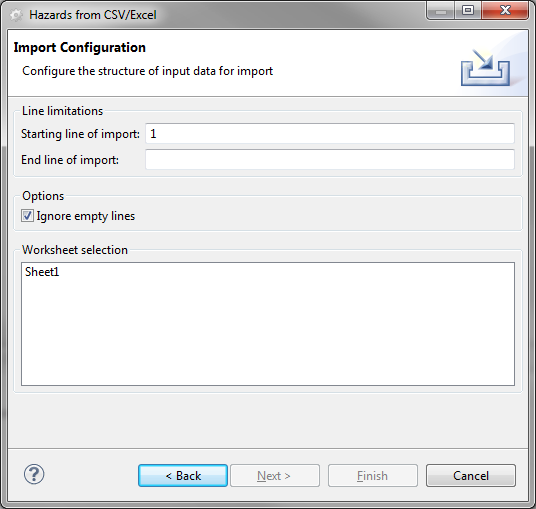
On the configuration page of the wizard you have to provide general information for the Excel-import:
Starting line of import: as the input file may contain also a title, column header descriptions or other text, you can specify at which line of the file the "real" data start. If unsure you can leave this field at the default setting and change it later after a preview of the import.
End line of import: here you can define the last line in the Excel-document, which should be imported. If no end line is specified, the document will be imported from the starting line until the end of the document.
Ignore empty lines: By choosing this option, empty lines are ignored and will not be imported, even if they exist between starting and end line.
Worksheet selection: In case the Excel file contains multiple worksheets you may choose which of them to import. Multiple selection is possible but please note, if the style of the worksheets is not identical, it may not possible to apply a common mapping (see following description) and therefore it might be necessary to import the worksheets separately.
After clicking on "Next" you will be given a preview on the imported data. There you can review whether all required data fields have been recognized by the wizard (each data field should be a separate column). Moreover, you can also see whether superfluous data at the beginning or end of the CSV/Excel file are shown here. Please go back to the previous page by clicking on "Back" if the preview is not according to your expectations and modify the separator and/or starting/end-line values.
Note, it is recommended that you keep at least the column heading row (if available ) in the preview until you completed all the data mappings in the wizard as it may help to identify the columns in the original data file.
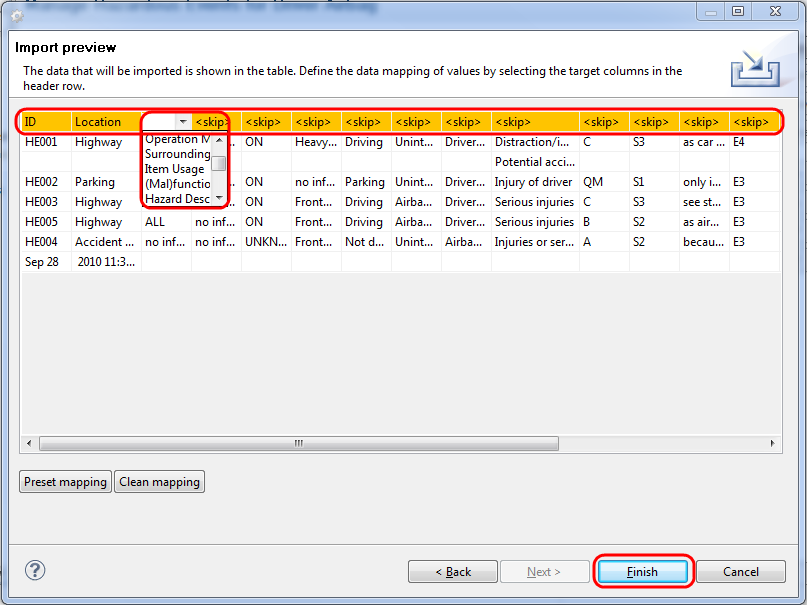
The data mapping is performed in the Preview page of the CSV/Excel-import wizard. Just click into the colored header cell at the preview and select into which column of a medini analyze table the column data shall be written. The drop-down list will always show all columns of a medini analyze table which have not yet been used for a data mapping. If you select the entry <skip>, the column will be ignored during the import.
Note: In order to adjust the column width so that it is able to show the mapping target, the auto size functionality can be used. To invoke, click right into a cell of the table header and select "Auto-Size Columns".

In case it is necessary to import information for which no mapping target in the current configuration of medini analyze can be found, it is possible to apply the profile mechanism to enhance the available mapping targets on the fly. In order to create a new profile property and use it as mapping target, the name of the new property can be directly entered in the mapping target header as to be seen in the figure below. In this example, a property "New Column" is created. The new property is created as a profile property of the model element which is imported. In this case it is the model element Hazardous Event.Please note that this feature is not available for the import of FMEA worksheets.
For details on the profile mechanism in general see Profiling mechanism. For the possibility to store and re-use data mappings see Storage of the mapping in CSV/Excel import.
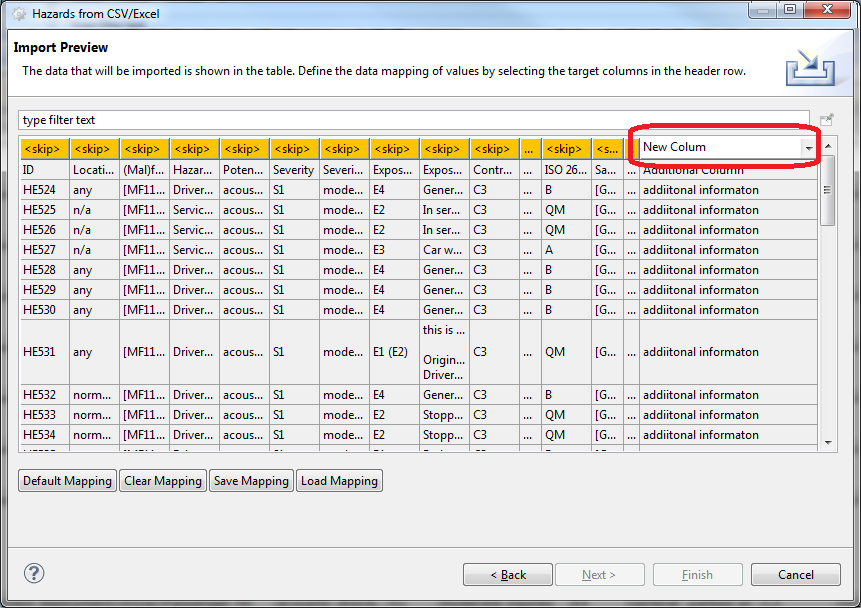
Please note using the button "Default Mapping" you can also apply a default mapping of all columns according to the order of columns in medini analyze. "Clear Mapping" on the other side will remove all mappings and set each column to <skip> again.
After completing this task you can - depending on what kind of data you import - either click on "Finish" to complete the CSV/Excel-import or click on "Next" to perform a detailed data value mapping.
As the CSV/Excel file contains text and numbers only, the data mapping has to be used, to map special text in selected columns to enumeration type values used in medini analyze. This concerns for example:
Safety integrity levels, for example the ASIL values (i.e. QM, A, B, C, and D) or enumeration values (severity, exposure, etc.),
Types of requirements (like HARDWARE or SOFTWARE),
Status of requirements (like PROPOSED or REVIEWED).
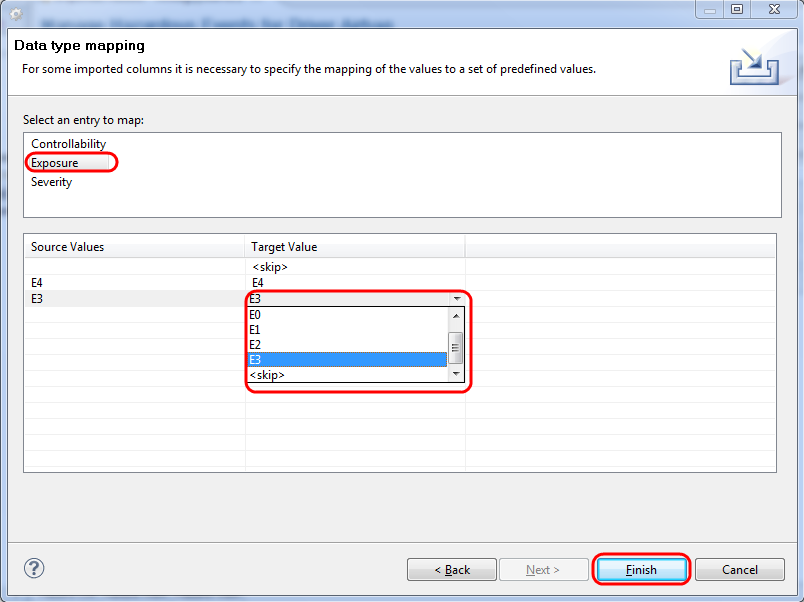
On top of the Data mapping page of the wizard the list of all types which require a mapping are shown. After selecting an entry there, the table below shows the mapping assumed by medini analyze. In the column "Source Values" all different values recognized in the CSV/Excel-file for the selected type are shown. The column "Target values" shows the default mappings performed by medini analyze. Click into any cell in the "Target Value" column to change the default mapping by selecting a different target value from the drop-down list.
Please note you can also choose to ignore some values during the import by selecting <skip> from the drop-down list as target value.
Clicking on "Finish" will complete the import and write the imported data into the medini analyze table according to the settings made previously.
During the CSV/Excel import, the imported data needs to be mapped to the data structure of medini analyze into which it is imported. For details of how to define the mappings, please refer to Using the CSV/Excel import wizard.
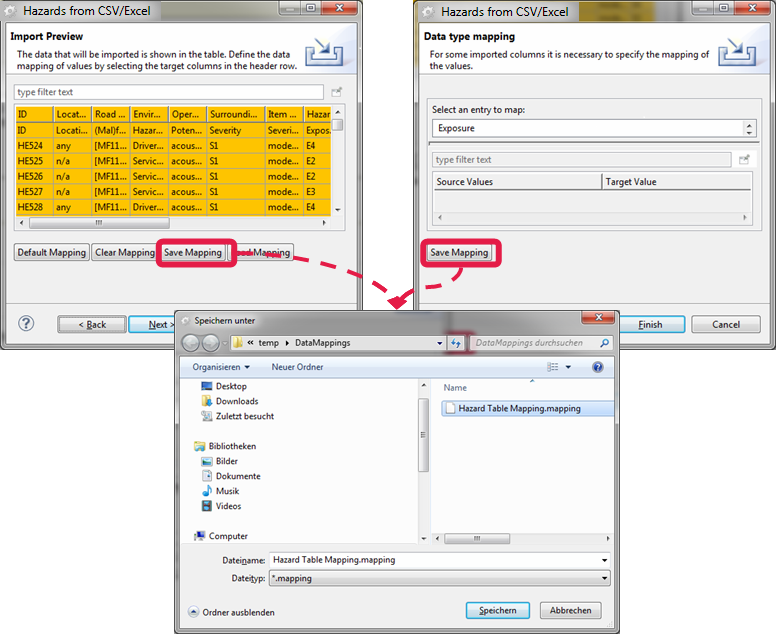
If multiple CSV or Excel sources of the same kind should be imported, the mapping may be defined once and re-used in the subsequent import procedures.
In order to store a mapping for a later re-use, the "Save Mapping" button on the column mapping page and on the value mapping page of the import wizard is used. The mapping is stored in a file in an arbitrary location which you may choose. For that purpose, the ordinary file save dialog appears.
Note, that no matter from which wizard page the mapping is saved, it will always contain both the column as well as the value mapping information.
An available mapping can be loaded while performing an actual import process. This is achieved via the "Load Mapping" button from the column mapping page of the import wizard. Via a file-selection dialog a previously saved mapping has to be selected. The loaded mapping information will be used for both the column and the value mapping.
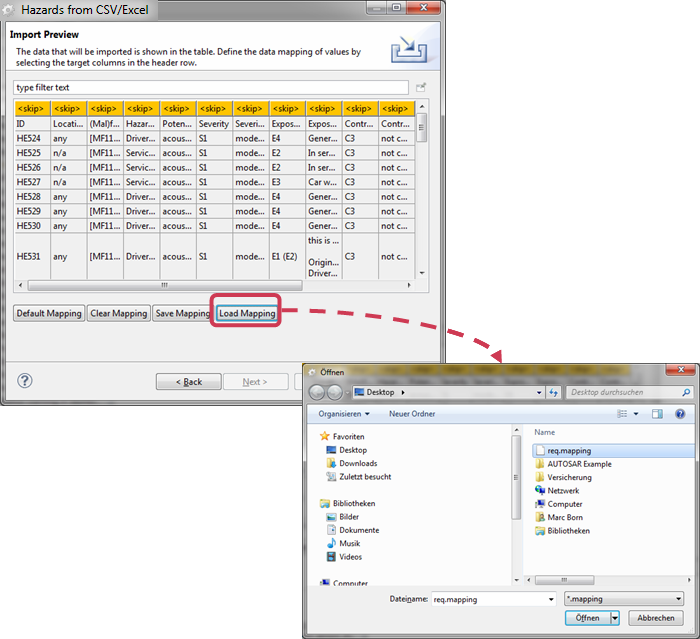
Please note that manually added mapping information will be completely overwritten by a load process and is not longer available.
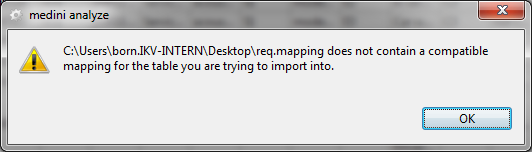
If the saved mapping file contains mapping information for profile properties, this information will be applied in the case that the same profile properties exist in the import context. Otherwise, this information is ignored.
If a mapping file is selected which contains mapping information for another model element (e.g. for requirements instead of hazard tables) it will not be applied and you are warned.