


When a project does not contain a job definition that reflects the type of job you want to run, you can create a new job by selecting a task definition template and defining the job settings provided by the template.
To create a new job from a task definition template:
Go to the Projects page and open the project in which you want to create a job.
Use the breadcrumb trail to display the Jobs page.
On the toolbar above the jobs list, click the Create drop-down and select . The Create Job wizard is displayed:
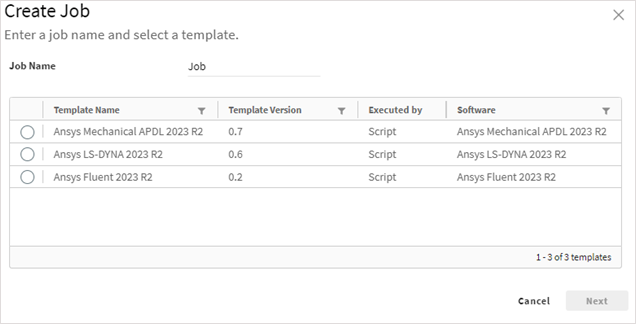
Specify a Job Name and select a task definition template. The template defines the task to be performed including the application to be used for the simulation.
Click to begin setting up the job.
The input and output files, execution method, and hardware requirements are pre-populated according to the task definition template that you chose. However, you can add, edit, and remove files and edit execution properties and requirements as required for the job.
In the Input Files section you can add and edit input files for the job:
To upload input files, click
 or click anywhere in an input row and browse to select files. Or, drag and drop
files into the input rows.
or click anywhere in an input row and browse to select files. Or, drag and drop
files into the input rows.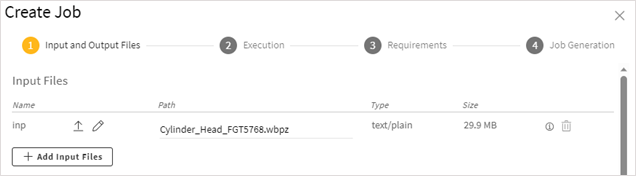
To edit the content of a text-based file, click
 . The content is displayed in an onscreen editor.
For example:
. The content is displayed in an onscreen editor.
For example: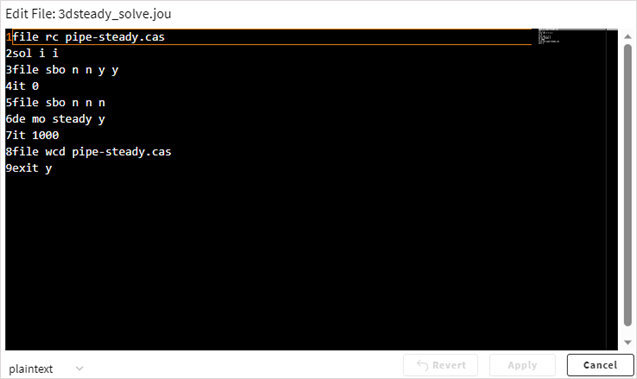
If you make changes to the content but then decide that you do not want to proceed with those changes, click to undo them. Otherwise, to proceed with the modified file, click .
To delete an input file, click
 .
.To add more input files, click and select the desired file(s).
In the Output Files section you can edit, add, or remove output files as needed.
You can specify the following for each output file:
Name. A name to identify the type of output file. This could be the file extension such as 'rst' or a common name such as 'transcript'.
Path. The filename to which the output file is written.
In paths for both input and output files, wildcard characters are supported. This allows Ansys HPC Job Manager to read and store files with file paths varying in different runs, such as random directory names, file names, and file extensions. You can use the common asterisk (*) and question mark (?) wildcard characters to collect solver log files, images, error logs, and other files that do not have fixed names.
In the path file*.err, for example, an asterisk is used to recursively search subdirectories to collect all error files that start with file.
Type. The type of data contained in the file: Binary, Image, or Text. Binary file types store data as a sequence of bytes, some of which may be intended to be interpreted as something other than text characters (for example, a graph), while text file types store data as a sequence of characters in human-readable format.
Store File per Job. Specifies whether to permanently store the file for every job. When enabled, you use the Collect Interval option to specify the interval in seconds at which to collect the current state of the file and upload it to the server so that the latest information is available for clients to fetch.
Monitor File Content. Specifies whether a file can be opened while the evaluation is running. For a solver job, rather than being blind to what is going on during the evaluation, selecting this check box for the solver log file (solve.out, for example) provides you with live monitoring capabilities. While the evaluation is running, you can open the solver log file to see solution progress and how far it is from reaching convergence. Once the evaluation is completed, the solver log file is deleted.
Click to view Execution settings.
The execution method, context, and environment are pre-determined by the task definition template chosen for the project. You can accept the settings or edit them to suit your needs.
The available Execution Context and Environment settings vary per solver. Settings such as additional_args and mpi_type are common to many solvers, while other settings are solver-specific. For Mechanical APDL, for example, you can see an amfg setting that can be used to enable the additive manufacturing capability in Mechanical simulations.
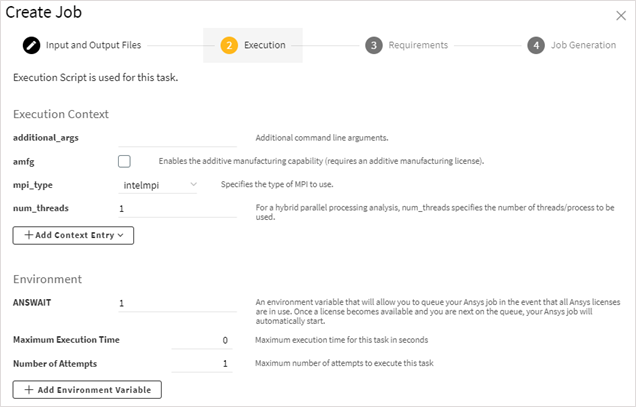
The following Environment settings are available for all jobs:
- Maximum Execution Time
Maximum time in seconds for executing the task. A value of 0 means that there is no time limit. If a time limit is set, and an evaluation is not completed within the time limit, the evaluator assumes something is wrong and stops, changing the status of the job to timeout. For more information, see Job Lifecycle and Evaluation Status.
- Number of Attempts
Maximum number of attempts to make to evaluate the task. The default is 1. However, if you expect that job failures are related to licensing issues on a particular evaluator, you can increase the number of attempts so that a failed job automatically goes from failed to pending, allowing it to then be picked up by another evaluator. In a job's details you can see if the evaluation is running in the first attempt, second attempt, or so on.
To add an environment variable, click and then specify the variable's name and value:

Click to view Requirements. Here you can view and modify properties related to the system and hardware requirements that an evaluator must have to pick up the job.
- CPU
Minimum number of CPU cores that an evaluator must have
- Memory
Minimum amount of random access memory (RAM) in megabytes that the evaluator must have (specifying a value is optional)
- Disk Space
Minimum amount of free disk space in megabytes that the evaluator must have (specifying a value is optional)
- Platform
The platform on which the job can run (Linux, Windows, or Any)
- Distributed
Enables distributed parallel processing
HPC Resource Requirements
These settings apply when submitting a job to an HPC cluster:
- CPU per Node
Total number of CPU cores per compute node.
- GPU per Node
Number of GPU accelerator devices per compute node. While the CPU handles most operations for a simulation, it can offload certain time-intensive parallel operations to a GPU for faster performance.
- Exclusive
If set to true, compute resources will be used exclusively by this job and will not be shared with other running jobs.
- Queue
Name of the job scheduler queue.
Custom Requirements
To add a custom requirement to the job requirements, click , then select the desired format:
- String
A string is a data type that represents text. It is composed of a sequence of characters that can include letters, spaces, and numbers.
- Integer
An integer is a data type used to represent real numbers that do not have fractional values. It is a numerical value that can be positive, negative, or zero.
- Float
A float is a data type that represents a fraction in decimal format.
- Boolean
A Boolean is a data type that has one of two possible values (usually True/False or On/Off).
Enter the key and value.

When all settings have been specified, click .
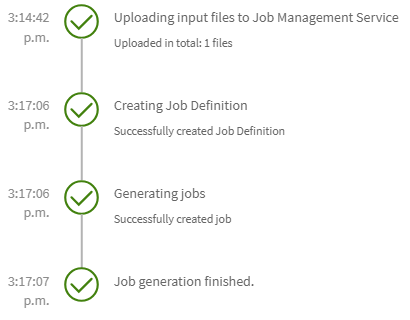
Input files are uploaded, a job definition is created, and a job is generated.
Click . If the job was created successfully, it is now displayed in the jobs list on the Jobs page.
Upon creation, the job has a status of pending, meaning that it is ready to be picked by an evaluator.