


There are two methods for entity creation. One is started by clicking the entity button on the ribbon menu as shown in Figure 1.62: Entity creation from the ribbon menu. The creation dialog will then be opened as shown in Figure 1.63: Entity creation dialog. If all required parameters are defined, the and buttons are activated to allow you to finish the creation operation. All entities in the ribbon menus can be created in this way.

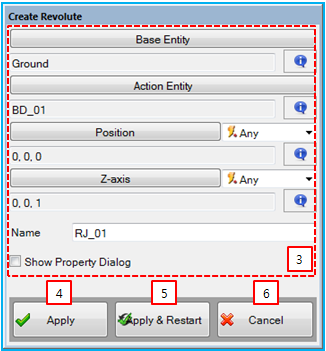
Figure 1.64: Creation operations for an entity
| Property | Description | ||||
| 1. Click Tab | Display an entity button by clicking the tab of the category on the ribbon menu to which the entity belongs, as shown in Figure 1.62: Entity creation from the ribbon menu. For example, the general contact entity belongs to the Contact category. | ||||
| 2. Click Entity | Open the creation dialog by clicking the entity button as shown in Figure 1.62: Entity creation from the ribbon menu. | ||||
| 3. Creation Parameters |
Set the parameters required for the entity creation. Most entities have common parameters as follows.
| ||||
| 4. Apply | Create the entity and close the dialog. | ||||
| 5. Apply & Restart | Create the entity and restart the creation operation for another entity. | ||||
| 6. Cancel | Close the dialog without creating the entity. |
The other creation method starts from the sub-entity window. All sub-entities can be created in this way. For more information about sub-entity creation, see Sub-Entity Creation.