


If you are using Step 4a: Create a System Coupling Python Run Script:
To start the System Coupling simulation, open a command line prompt (Windows) or a shell terminal (Linux), and navigate to your working directory.
Execute the following command:
Windows:
call "c:\Program Files\ANSYS Inc\v242\SystemCoupling\bin\systemcoupling.bat" -t<n>
-R <python_script.py>
Linux:
sh $HOME/ansys_inc/v242/SystemCoupling/bin/systemcoupling -t<n>
 -R <python_script.py>
Where <n> is a positive integer specifying the number of processes
you wish to run this simulation (for example, -t8 specifies 8
processes), and <python_script.py> is the Python script you created
in Step 4a: Create a System Coupling Python Run Script.
Note: The above commands assumed default installation of Ansys applications. If you installed Ansys to a different location, please revise the directory in these commands.
Note: Once you correctly prepare the working directory and the content within, the procedure of running a System Coupling simulation is essentially the same on Windows and on Linux. There is just a slight difference in the formats of the commands to start the run, as shown above.
Very often, multiple processes are needed to run the System Coupling simulation. The
number of processes used by the run is specified using the -t option on
the command line. By default, this is the maximum number of processes used by all
the participants during the simulation. For example, if you specify -t8
in the command, both Forte and the other participant will use 8 processes to run
when their turn arrives, respectively.
Note: When one participant is running, the other participant is in the waiting or
sleeping mode. So, with -t8, only 8 processes will be consuming CPU
at any one time. You may see 8 Forte and 8 Fluent processes, but only 8
processes are consuming CPU; the other 8 will be sleeping.
In some situations, you might want one participant to run with just a fraction of
the total processes requested. This setting is helpful when one participant has a
much smaller element (or mesh) size than the other. In this case, you might want to
run with fewer processes for this participant for optimal performance, because using
too many processes to discretize a small mesh could slow down the simulation. To
specify fewer processes for one participant, add the following command utilizing the
ParallelFraction option to your Python script:
# Fluent will run on 1 process, while Forte will run on 8 processes if -t8 is used
DatamodelRoot().CouplingParticipant[fluent].ExecutionControl.ParallelFraction = 0.125
The ParallelFraction is a real number typically between 0.0 and 1.0.
If unspecified, it is assumed to be 1.0, meaning that this participant will utilize
all the processes specified by the -t option. In this example, the
ParallelFraction option is set as 0.125 for Fluent, so that Fluent
will use an 8th of the processes specified by the -t option. Since 8
processes are requested (-t8), Forte will use 8 processes and
Fluent will use 1 process.
Tip: You must use at least 2 MPI processes when using Forte. Therefore, ensure
that you specify enough MPI processes using the -t option and the
appropriate fraction via ParallelFraction so that Forte will be
using at least 2 MPI processes.
When using a cluster queuing environment for your System Coupling run, such as Altair
Grid Engine, you do not need to use the -t option on the command line
to specify the number of processes since those will be allocated by your cluster
environment.
For more information about queuing systems, refer to Distributed Parallel Using a Queuing System and the Platform Support page on the Ansys website: https://www.ansys.com/content/dam/it-solutions/platform-support/2024-r1/ansys-2024-r1-job-schedulers-queuing-systems-support.pdf.
If you are using Step 4b: Use the System Coupling Graphical User Interface:
You may click the Start Solve button  in the toolbar to start the simulation. Alternatively, you may
extend the Outline pane, right-click Solution and select
Solve.
in the toolbar to start the simulation. Alternatively, you may
extend the Outline pane, right-click Solution and select
Solve.
To do a parallel simulation using multiple processes, before you start the simulation, review the settings by right-clicking Coupling Participant and selecting Parallel solve setup. The Parallel Partitioning dialog shows up as in Figure 9.8: Parallel Partitioning dialog in the System Coupling Graphical User Interface.
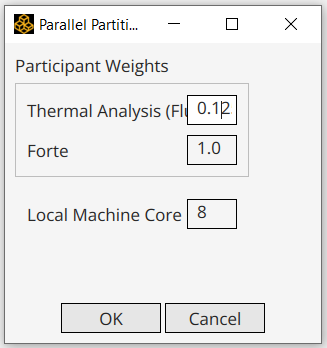
Here, you may specify the number of Local Machine Core, which
is the maximum number of processes used by all the participants during the
simulation. It is the same as what we would specify with the -t option
in CLI System Coupling.
You could let one participant run with just a fraction of the total processes requested. To do so, specify Participant Weights to each participant. In the example, since we apply 0.125 as the weight for Fluent and 1.0 as the weight for Forte, Fluent will use 1/8th of the 8 processes and Forte will use all of the 8 processes
For more information about the -t option, parallel fraction, and
other more advanced parallel computing settings, refer to Coupling Participant Parallel Options in the System Coupling Settings and Commands Reference.