


The following topics are included in this section:
EnSight is designed to be an engineering post-processor, and has a number of data readers with support for data formats used in popular engineering simulation codes as well as support for common data formats. Yet EnSight's many features can be used in other disciplines as well. EnSight has been used to visualize and animate results from simulations of diesel combustion, cardiovascular flow, petroleum reservoir migration, pollution dispersion, meteorological flow, as well as results from many other disciplines.
In general, EnSight reads node and element definitions from the geometry file and groups elements into an entity called a Part. A Part is simply a group of nodes and elements (the Part can contain different element types) which all behave the same way within EnSight and share common display attributes (such as color, line width, etc.). And EnSight reads variable values located at each of the nodes or elements.
EnSight allows you to read multiple datasets and work with them individually in the same active session. Depending on the EnSight reader, all the datasets together can be read into one new case, or each dataset can comprise a new case and can be handled by its own server process and can be added by using EnSight's main menu Case → Add....
EnSight runs a client process for display and a server process for data reading and for calculations.
Note: If the client and the server are each on different computers, then the data
directory path is that seen from the server. Each server process has its own computer
console window and the output from the data read is directed to this console. On
Windows it is sometimes helpful to enlarge the default
buffer size on the server window to accommodate the sometimes large amount of output.
Right-click the top left of the server window (named at top
C:\WINDOWS\System32\cmd.exe) and choose Screen Buffer
size to be Width of 120 and
Height of 9999, and Window
size of Width
120 and Height of 40.
Then when you save it, save it for all windows of this name and every time the server
window is opened it will have these defaults and to see all of the server console
output.
Reading and then Loading Data into EnSight can be done from Simple, Advanced, or Multiple file interface.
Note: When loading a file with its full path greater than 260 characters on
Windows, the loading fails and generates the following error:
cvf_dir_list: couldn't get info on \Path\to\file. This is due to
an OS problem with Windows. In order for you to be able to use
a path/file name that is over 260 chars, you have to enter
\\?\ in front of it.
The simple interface allows you to select a dataset which is read by the EnSight server and then have all parts loaded and displayed on the Client. This is quick but it does not allow control of which parts to load, nor does it allow you to control the visual representation. Also, the simple interface only works for files mapped in the ensight_reader_extension.map file found in the $CEI/ensight242/site_preferences and/or in the EnSight Defaults Directory which is located
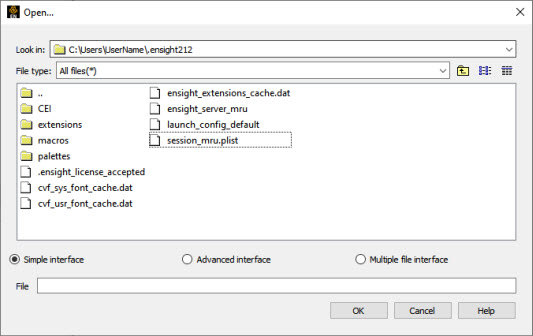
at %HOMEDRIVE%%HOMEPATH%\(username)\.ensight242 commonly located at C:\Users\username\.ensight242 on Windows 10, ~/.ensight242 on Linux, and in ~/Library/Application Support/EnSight242 on the Mac) directories.
Look in
This field specifies the directory (or folder) name that is used to list the files and directories in the list below.
File type
Limits the directory content list to the file type chosen. The default is to show all files.
File/Directory Manipulation Buttons
|
 |
Changes the Look in directory to be one up from the current. |
|
 |
Show the content of the Look in directory in list view. In this view the directory and file names are listed in alphabetical order. This is the default. |
|
 |
Show the content of the Look in directory in detail view. This view will show all directories and file names in alphabetical order and also show size, type, date, and read/write attributes. |
Content List
Shows the content of the Look in directory/folder. Single click to select a file. This will insert the file name with full path as described in the Look in field in to the File field. If you double-click a file name, the file will be inserted into the File field and the button will execute. If you double click on a directory/folder name, you will change the Look in filter.
File
Specifies the file name that will be read once the button is selected. As some file formats require more than one file (geometry and results potentially) any associated files will also be read according to the ensight_reader_extension.map file. Don't use outlier filename characters such as $, &, %, nor * in the filename nor the path.
Click to read the file (and associated files) specified in the File field and close the dialog.
Click to close the Open... dialog without reading any files.
(For a step-by-step tutorial, see Read Data).
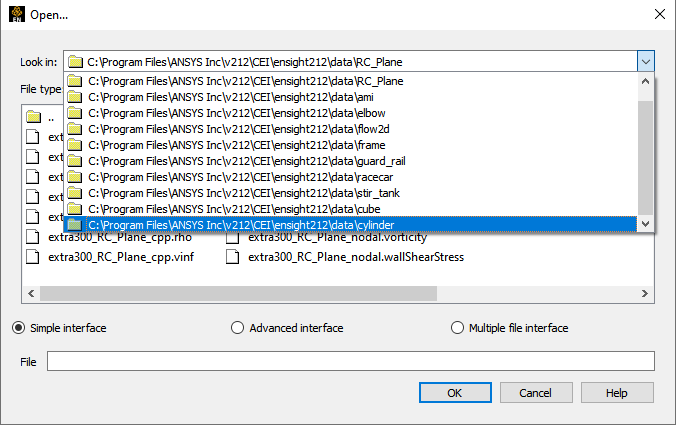
The EnSight File Open Dialog now contains a history of the last ten locations where datasets were read from. The history is obtained by clicking on the turn down button in the Look in field at the top of the → dialog. Since the directory listing in this dialog is relative to the EnSight Server machine, if the paths do not exist on your current EnSight Server machine, this list may be culled down to show up to the 10 directory paths which do exist.
At this point, (provided the association is successful and the data is readable), all parts of the model will be loaded into EnSight and will appear in the graphics screen and in the Parts list. If the association is not successful, an error message will result.
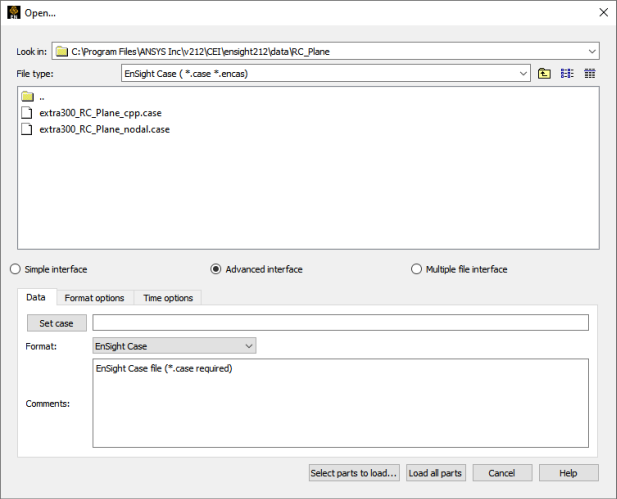
The advanced interface allows you to select a dataset which is read by the EnSight server and then select which parts out of the dataset you wish to load and display on the Client. You can control the format option, extra user interface options that may be defined for your data file format and time settings.
Look in
This field specifies the directory (or folder) name that is used to list the files and directories in the list below.
File type
Limits the directory content list to the file type chosen. The default is to show all files.
File/Directory Manipulation Buttons
|
 |
Changes the Look in directory to be one up from the current. |
|
 |
Show the content of the Look in directory in list view. In this view the directory and file names are listed in alphabetical order. This is the default. |
|
 |
Show the content of the Look in directory in detail view. This view will show all directories and file names in alphabetical order and also show size, type, date, and read/write attributes. |
Content List
Shows the content of the Look in directory/folder. Single click to select a file and then click and will fill in a second, matching, results file if necessary, and will choose the correct reader for the Format. This will insert the file name with full path as described in the Look in field in to the field. If you double click a file name, the file will be inserted into the File field and the button will execute with a matching Format Reader. If you double click on a directory/folder name, you will change the Look in filter.
Data Tab
Contains settings for file format and file names.
Set
The name for this field will depend on the file format. For example, for EnSight it is Set case while for CTH it is Set spcth*. This field describes the file name used to read the dataset. Depending on the file format, there may be two (or possibly more) Set fields. The use of the second (or third) set field depends on the file format and is described in the Comments section of the dialog.
Format
Specifies the Format of the dataset. This pulldown will vary depending upon what readers are installed at your local site, and what readers are made visible in your preferences.
Note: You can start up EnSight with the -readerdbg flag to
view verbose information on the readers as they are loaded into EnSight.
Comments
Helpful information that is reader-specific will appear here, such as what file types are entered into what fields.
Format Options Tab
Contains format specific information.
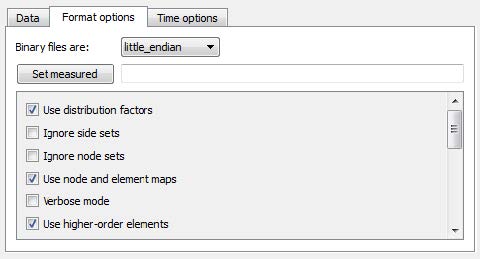
Binary Files Are
This is typically checked automatically by the reader, and therefore usually there is no need to use this toggle. If the file is binary, sets the byte order to the following:
Big endian - byte order used for HP, IBM, SGI, SUN, NEC, and IEEE Cray.
Little endian - byte order used for Intel and alpha based machines.
Native endian - sets the byte order to the same as the server machine.
Set Measured
Name of an EnSight 5 format measured results file (typically .mea file). Measured data is read independently of the reader and is entered here for all readers except Case file format. For Case file format, this field is not used and the measured data filename is entered into the Case file. The measured data filename is always optional. Clicking the button inserts the file name shown in Selection field and also inserts path information into Path field. File names can alternatively be typed into the field.
Other Options
Each data reader may have its own set of format options.
Time Options Tab
Contains Time specific information.
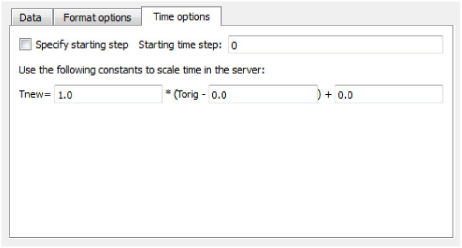
Time Settings
Specify starting time step. If not specified, EnSight will load the last step (or whatever step you have set in your preferences, see Edit → Preferences → Data). This section also allows you to shift, scale and/or offset the original time values according to the values entered into the equation.
SOS Options Tab
If connected to an SOS server, this tab will be available and controls how the servers will behave when handling data as well as what resources will be used.
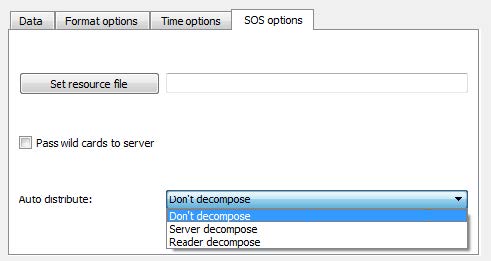
Set Resources
Sets a filename to be used for SOS and Server resources.
Pass Wild Cards to Server
This toggle will pass wildcard filenames on to the server as opposed to resolving them on the SOS. The usefulness of this toggle is entirely dependent on the specific reader in use.
Auto Distribute
How to decompose and distribute the data to each of the servers.
Don't
Data is already stored on disk decomposed.
Server
Use the server to automatically partition the data.
Reader
Use the reader to automatically partition the data.
Load All Parts
Click to read and load all of the parts associated with the file names specified and close the dialog.
Select Parts to Load
Click to read the data files specified, close the dialog and show the parts in the Parts list as loadable (grayed out) parts. These parts can be loaded by performing a right-click operation.
Cancel
Click to close the Open... dialog without reading any files.
(For a step-by-step tutorial, see Read Data).
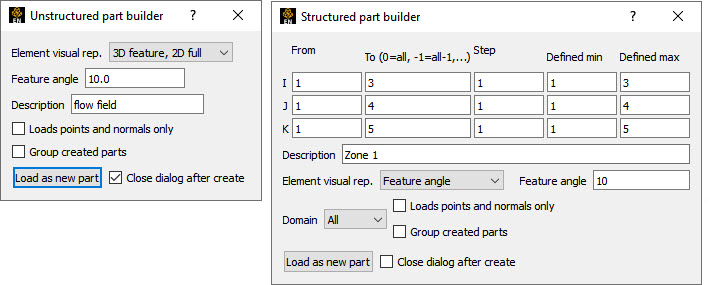
If you right-click on a grayed out part in the Parts list you can load (that is, read it on the server and show its element visual representation on the client). When you load the part you can also specify the part description (if desired) as well as specify the element visual representation. There are two basic part loader windows. Details of these windows will be discussed below, and variants from these windows will be discussed under each specific reader format.
All Parts or some of those available on the server may be loaded to the client and their visual representation can be chosen. The Data Part Loader may be reopened at a later time and additional or duplicate parts loaded as desired.
Unstructured Data
If the part(s) in the Parts list is unstructured you will see the Unstructured Part Builder dialog as shown above.
Structured Data
If the part(s) in the Parts list is structured you will see the Structured Part Builder dialog.
Element Visual Rep.
Parts are defined on the server as a collection of 0, 1, 2, and 3D elements. EnSight can show you all of the faces and edges of all of these elements, but this is usually a little overwhelming, therefore EnSight offers several different visual representations to simplify the view in the graphics window.
Note: The visual representation only applies to the EnSight client - it has no affect on the data for the EnSight server.
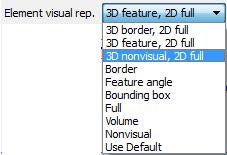
3D Border, 2D Full
In this mode, load the designated parts, show all 1D and 2D elements, but show only the unique (non-shared) faces of 3D elements.
3D Feature, 2D Full
In this mode, load the designated parts, but show the 3D elements in Feature angle mode (see Feature Angle), and show all of the 1D and 2D elements.
3D Nonvisual, 2D Full
In this mode load the 3D parts but do not display them in the graphics window (see Nonvisual) and load all the 1D and 2D elements.
Border
In Border mode all 1D elements will be shown. Only the unique (non-shared) edges of 2D elements and the unique (non-shared) faces of 3D elements will be shown.
Feature Angle
When EnSight is asked to display a part in this mode it first calculates the 3D Border, 2D Full representation to create a list of 1D and 2D elements. Next it looks at the angle between neighboring 2D elements. If the angle is above the angle value specified in the Feature Angle field, the shared edge between the two elements is retained, otherwise it is removed. Only 1D elements remain on the EnSight client after this operation.
Bounding Box
All part elements are replaced with a bounding box surrounding the Cartesian extent of the elements of the part.
Full
In Full representation mode all 1D and 2D elements will be shown. In addition, all faces of all 3D elements will be shown.
Volume
Volume render all 3D elements and ignore all other elements.
Nonvisual
This specifies that the loaded part will not be visible in the Graphics Window because it is only loaded on the server. Visibility can be turned on later by changing the representation (at which time the elements of the selected representation will be sent to the client).
Use Default
This specifies that the part(s) should be loaded in the visual representation as defined by the reader mapping file for the format specified.
Load Points and Normals Only
If toggled on, only the vertices of the element representation, with normals, will be loaded to the client.
Group These Parts
If more than one part is selected, they can be grouped into a single entity. The name of the group will be according to the New Part Description field and the individual parts will receive the names shown in the part list.
New Part Description
This allows the user to name the part. If nothing is entered here, then the part is named from the partlist.
Load as New Part
Loads parts selected in the Parts list to the EnSight server. The parts are subsequently loaded to the EnSight client using the specified visual representation.
Domain
Specifies the general iblanking option to use when creating a structured part. If the model does not have iblanking, InSide will be specified by default.
Inside Iblank value = 1 region
Outside Iblank value = 0 region
All Ignore iblanking and accept all nodes
Using Node Ranges
From IJK
Specifies the beginning I,J,K values to use when extracting the structured part, or a portion of it. Must be >= Min value.
To IJK
Specifies the ending I,J,K values to use when extracting the structured part, or a portion of it. Must be <= Max value.
Valid values for the From and To fields can be positive or negative. Positive numbers are the natural 1 through Max values. Negative values indicate surfaces back from the max, so -1 would be the max surface, -2 the next to last surface etc. There are therefore two ways to indicate any of the range values; the positive number from the min towards the max, or the negative number from the max toward the min. The negative method is provided for ease of use because of varying max values per part. (Zero will be treated like a -1, therefore it is another way to get the max surface)
1, 2, 3,... ---> <--- ...-3, -2 ,-1
|---|---|---|---|---|---|---|---|---|---|---|---|---|---|---|
min max
(always 1) (varies per zone)
Step IJK
Specifies the step increment through I,J,K. A Step value of 1 extracts all original data. A Step value of 2 extracts every other node, etc. Therefore step values greater than 1 give a coarser resolution.
Min IJK
Minimum I,J,K values for Part chosen (for reference).
Max IJK
Maximum I,J,K values for Part chosen (for reference).
Part Description
Text field into which you can enter a description for the Part. If left blank a default will be used.
Load as New Part
Extracts the data from the data files and creates a Part on the server (and on the client unless Nonvisual has been specified for representation) based on all information specified in the dialog.
If only one part is highlighted, the values shown in the From and To fields (as well as the Min and Max fields) are the actual values for the selected part. Using the From and To fields you can control whether an EnSight part will be created using the entire ijk ranges or some subset of them. The Step field allows you to sample at a more coarse resolution.
If more than one part is highlighted, the values shown in the From and To fields are the combined bounding maximums of the selected parts. The same basic functionality described for a single part selection applies for multiple part selection, with one part being created for each selected part in the dialog. If the specified ranges for the multiple selection exceed the bounds of a given part, they are modified for that part so that its bounds are not exceeded.
You use this portion of the Part Loader dialog to further extract iblanked regions from structured parts which were created either as inside, outside, or all portions of the model.
(For step-by-step instructions see Read Data).
For large datasets, you should try to reduce the amount of information that is being processed in order to minimize required memory. Here are some suggestions:
When writing out data from your analysis software, consider what information will actually be required for post-processing. Any filtering operation you can do at this step can greatly reduces the amount of time it takes to perform the post-processing.
For each part you do load to the client, a representation must be chosen. This visual representation can be made very simple (through the use of the Bounding Box or Feature Angle option, for example), or can be made more complex (by using the border or full elements). The more you can reduce the visual representation, the faster the graphics processing will occur on the client (see Node, Element, and Line Attributes in Parts Quick Action Icons).
Load to the client only those Parts that you need to see. For example, if you were post-processing the air flow around an aircraft you would normally not need to see the flow field itself and could load it non-visual, but you would like to see the aircraft surface and Parts created based on the flow field (which remains available on the server).
If you have multiple variables in your result file, activate only those variables you want to work with. When you finish using a variable, consider deactivating it to free up memory and thereby speed processing Variable Selection and Activation.
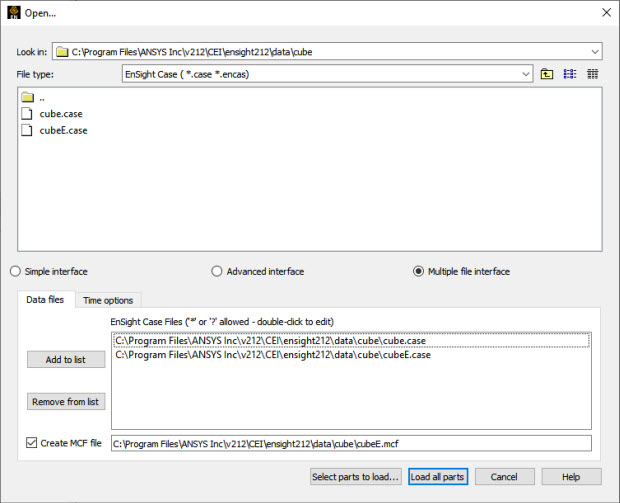
The Multiple Case File (MCF) interface on the data reader dialog allows you to interactively select and read multiple EnSight Case Gold files in one EnSight Case. This might be useful if the datasets were part of a spatial decomposition, each representing a portion of a solution. Or it might be of interest to load several similar analyses to allow parts and variables to interact more closely. In order to use this capability, all datasets must have the global attributes exactly the same (for example, they must all have the same geometry changing-status, node and element id status the same, etc.) or the load will abort.
The File type: filter will display file suffices supported by EnSight Case Gold because MCF only supports this format. Use the file browser to navigate to the path where your EnSight Case Gold files are located. Select the file(s) of interest and use the controls below.
File/Directory Manipulation Buttons
|
 |
Changes the Look in directory to be one up from the current. |
|
 |
Show the content of the Look in directory in list view. In this view the directory and file names are listed in alphabetical order. This is the default. |
|
 |
Show the content of the Look in directory in detail view. This view will show all directories and file names in alphabetical order and also show size, type, date, and read/write attributes. |
Whatever file(s) are selected in the top window are added to the list of files in the data file window below, for loading into EnSight.
Note: You can simply double-click on a filename in the top browser window and it will be added to the lower Data files window.
Select file(s) in the list window below to remove them.
Edit in Data files window
Double-click on a filename in the Data
files window and edit the filename by adding wildcard characters. Add an
asterisk *, or a question mark ? to any
location in the file or path in order to match any number of characters or a single
character, respectively. If you add wildcard characters, make sure your wildcard does not
inadvertently include additional files that you did not intend, or files that are not
readable by the EnSight Case Gold reader (for example, non .case and non
.encas files) as non-readable files will abort your entire
read.
Create MCF file
When you toggle this on, and edit the filename (please use .mcf extension) then click or , then the Multiple Case File (MCF) file containing all of your full filenames (including your wildcard patterns) in your Data files window is saved, after all the case file(s) are successfully loaded Multiple Case File Format.
Load all parts
After a successful load, all of the Case Gold datasets will be in one EnSight Case; you can work on all the parts and variables as if they were read from one dataset.
Once you've successfully loaded your data, your MCF file will be saved. The next time that you load this same data you will not use the Multiple Case File interface. Rather, go under the Advanced interface tab, choose the EnSight MCF reader and pick your .mcf file and EnSight will load all your case filenames contained in the .mcf file into one EnSight Case as from the MCF interface (see How To Read Data).
EnSight parallel
When running EnSight in parallel, the user steps for loading your multiple Case Gold datasets are the same as described above. EnSight Enterprise (formerly HPC or Gold) supports the automatic distribution of the multiple Case Gold datasets loaded either using this interactive interface, or using a .mcf file to your multiple Servers currently running in parallel (for details, see How To Use Server of Servers).
| Problem | Possible Causes | Solutions |
|---|---|---|
|
Data loads slowly |
Loading more Parts than needed |
For some models, especially external fluid flow cases, there is a flow field Part which does not need to be visualized. Try loading this Part non-visual. |
|
Too many elements |
Make sure the default element representation for Model Parts is set to 3D Border/2D Full before loading the data. In some cases it is helpful to set the representation to Feature Angle or 3D feature, 2D full, before loading. | |
|
Client is swapping because it does not have enough memory to hold all the Parts specified. |
Try loading fewer Parts or installing more memory to handle the dataset size. | |
|
Server is swapping because it does not have enough memory to hold all of the Parts contained in the dataset. |
Install more memory in your Server host system, reduce the number of variables activated, or somehow reduce the geometry's size. (If you can get the data in, you can cut away any area not now needed. What is left can then be saved as a geometric entity and that new dataset used for future post-processing.) | |
|
Query → Dataset shows that you have far too many elements in EnSight for the Case Gold datasets that you loaded via MCF. |
Did you perhaps make the mistake of putting too many asterisks in your Data file window in the data reader dialog? With 20 data*.case files in /path, you may find you've loaded 40 datasets from the window below: | |
|
/path/data*.case /path/data*.case | ||
|
Error reading data |
Incorrect path or filename |
Reenter the correct information. Remember, the Path is on the server. |
|
Incorrect file permissions |
Change the permissions of the relevant directories and files to be readable by you. | |
|
Temporary file space is full |
Temporary files are written to the default temporary
directory or the directory specified by the environment variable
TMPDIR for both the client and server. Check file space by
using the command | |
|
Format of the data is incorrect |
Recheck the data against the data format definition.
(Can use | |
|
EnSight format scalar (or vector) data loads, but appears incorrect. Often range of values off by some orders or magnitude. |
Scalar (or vector) information not formatted properly in data file |
Format the file according to examples listed under
EnSight Variable Files (see Preference and Setup File Formats). (Can use
|
|
Extra white space appended to one or more of the records |
Check for and remove any extra white space appended to each record |