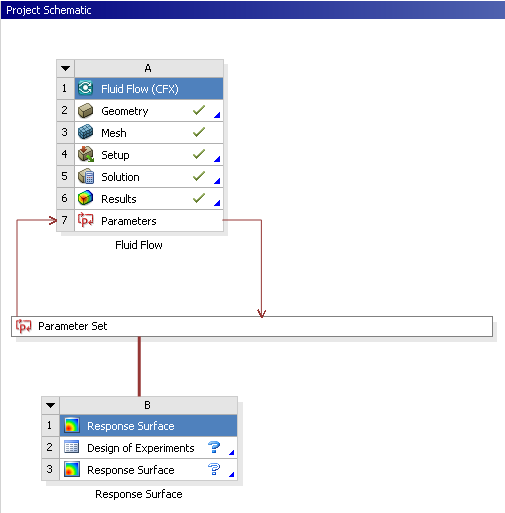
Design Exploration enables you to modify the geometry and physics of your project so that you can determine the influence of selected design parameters defined in your model. You do this by declaring design input parameters in CFX-Pre (see Outline Tree View Shortcut Menu Commands in the CFX-Pre User's Guide) and input parameters and output parameters in CFD-Post (see Expressions Tree View in the CFD-Post User's Guide), then running a Design Exploration study with Ansys CFX in Ansys Workbench.
You can apply a DesignXplorer study to a converged project by opening the project in Ansys Workbench and double-clicking a Design Exploration system from the left pane. This displays the design exploration system under the Parameter Set bar in the Project Schematic.

Note:
A sample tutorial describing how to use design exploration in Ansys CFX is available.
For more information on using design exploration in Ansys Workbench, see DesignXplorer User's Guide.
The following sections contain tips for the use of parameters and design exploration:
By default (depending on the Solution cell property Cache Solution Data, described in Properties Pane), only data associated with the current Design Point is stored, whereas data associated with non-current Design Points is not.
For information on accessing data associated with non-current Design Points, see Retaining Design Point Data and Exporting Design Points to New Projects in the Workbench User's Guide.
During a parametric study, the original set of files used to set a problem up is copied for each Design Point, using file space. To minimize the use of file space, minimize the number of unnecessary Design Points.
When working with exported Design Points, you should limit the Project Schematic only to systems that are involved in the Design Point changes. Having other systems (for example, a CFX system) in the project that are not involved in the Design Point update will mean duplication of these systems' database/results files for every exported Design Point, and this can use a significant amount of disk space.
If you generate a large number of Design Points in a Design of Experiments (DOE), it is possible that a small proportion of them will fail to update, preventing the DOE cell from becoming up-to-date. In such a case, you cannot continue with the rest of this design exploration analysis. The DOE can be modified to remove these failing Design Points by selecting Design of Experiments > Type > Custom and then manually deleting the Design Points that failed to update successfully. Provided that sufficient Design Points remain for adequate analysis, then the DOE can be updated and you can continue with the analysis
When running Design Points with a CFX system with a specified solver maximum residual criterion, you should always set the minimum solution iterations to at least 3 in the Solver Control panel. If this setting is left at the default "1", the solver may stop after one or two iterations, falsely believing convergence has been reached.
If you have selected the solution to Update from Current Solution Data (default setting), you may need to choose the input parameter values wisely for the Current Design Point because it will be the starting solution for all other Design Points. To avoid this situation, set Update from Initial Conditions as an Initialization Option in the CFX-Solver Manager before updating the Design Points.
In a Design Points study, if you have set the CFX-Solver to Background mode[1], none of the Design Points will become up-to-date until all the solver jobs have finished. This is not the case when the CFX-Solver has been set to Foreground mode (the default setting), where each Design Point becomes up-to-date before the next one commences updating. The former option, though, can prove more efficient in terms of speed, especially in the case of long runs on multi-core configurations.
Note: When the Licensing Interconnect sharing mode is used, the Update of Design Points in background mode will not work.
Although the names of design parameters can be modified using the Parameter Manager within Ansys Workbench, this is not recommended, because the new names will not be reflected within the CFX application user interfaces.
In a design points study, when you have some up-to-date design points, you should avoid editing the Results cell and running CFD-Post interactively. Most editing and viewing actions result in an underlying state change and therefore make the design points appear out-of-date, requiring another update.
If an input parameter is defined in CFX-Pre directly in the physics setup (that is, not using an expression) then it should be removed by clearing the parameterization check box next to the parameter setting before any physics changes are made that would make the parameter not applicable. If it is not removed, then any attempt to change the value of this parameter through Workbench, or run multiple design points, will result in a physics error of the form: "
The parameter
                                <parameter name> is present in the object <path> but it
                                is not physically valid.
", referring to the parameter that was set as a Workbench input parameter. If this occurs, then one way to remove the input parameter is to enter the following into the Command Editor:delete /PARAMETERIZATION/INPUT FIELD: <parameter name>where<parameter name>is the input parameter name. Once the parameterization has been removed, the new physics settings can be re-applied in CFX-Pre to remove the physics error and allow the design point update to complete successfully.When running a design point study, the User Location Regeneration setting is effectively set to
All, meaning that all parameterized user locations are updated for each design point. For details, see Solver Tab in the CFX-Pre User's Guide.


