
TAU Flex Meshing
TAU Flex is designed for guaranteed mesh success, and may also reduce meshing time. It provides a mesh even for complex and “dirty” geometry model without any preliminary geometric healing or repair.
TAU Flex is a multi-domain, priority mesher which provides more efficient and reliable meshing. The priority mesh generation is driven by solver requirements for materials (metal/non-metal), boundary conditions (ports, radiation,...), conduction paths, and so forth. The constraint-tolerant meshing method gives the TAU Flex mesher flexibility to excuse mesh difficulties in lower-priority regions so that the resulting mesh can still provide acceptable simulation results.
The consolidation of surfaces into a conformal mesh is skipped for dynamic and tolerant meshing, including for light weight geometries. This can lead to overlapping surfaces in SBR+ simulations. The user should carefully avoid overlapping surfaces or objects as SBR+ can produce unexpected results.
Steps for Using TAU Flex
- Navigate to the Initial Mesh Settings window.
- Click the Advanced tab and select Use Flex meshing for TAU volume mesh.

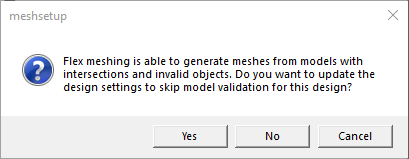
Selecting this option opens a dialogue. Select [Yes] to continue.
To get the full benefits of TAU Flex, especially for complex or "dirty" models, follow these recommended steps:
- On the General tab of the Initial Mesh Settings window, select TAU.

- Click
- On the Set Material Override tab, select Enable material override.

This activates TAU’s priority meshing method based on metal/non-metal materials.
- Still in the Design Settings window, click the Validations tab and select Perform minimal validations.

This reduces pre-processing time for complex models, and allows simulation of "dirty" geometry for which TAU Flex can provide a mesh.
- Because TAU Flex is a parallel mesher for many processes, you should specify multiple cores in HPC and Analysis Options to speed up the meshing process. Access the Analysis Configuration window one of two ways:
- Select the Simulation tab on the ribbon and click Analysis Config.
- Use Tools > Options > HPC and Analysis Options or select the Simulation tab on the ribbon and click HPC Options. Then double-click a configuration.
The Analysis Configuration window appears.
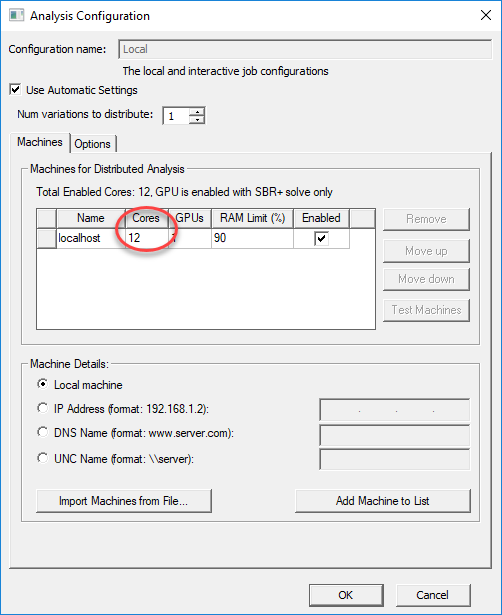
Specify the number of cores to use.
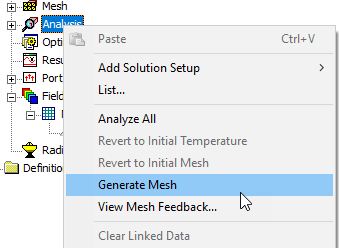
- In most cases, TAU Flex can provide mesh as accurate as TAU or Classic, but not always. Therefore, we recommend that you Generate Mesh without solving, and that you review the mesh before proceeding the simulation.
TAU Flex Warning Messages
In cases where TAU Flex has difficulty making a strict mesh on some objects, mesh warnings are given for those objects. You should review the mesh on those objects before proceeding to the simulation. You can exercise discretion in deciding whether a given mesh issue needs to be addressed (for example, critical antenna geometry) or can be ignored (for example, a small "leak" in a dielectric substrate far from the source).
There are three types of warnings:
- "Mesh Leak" – The most severe warning. A body does not have any mesh element, or it has mesh elements with a significant mismatch of surface area between the mesh and geometry – larger than 10% of planar area, or 20% of curved area.
- "Major Mesh Repair" – A body has major surface area mismatch between the mesh and geometry – larger than 5% of planar area, or 10% of curved area.
- "Minor Mesh Repair" – The least severe warning. A body has minor surface area mismatch between the mesh and geometry – less than 5% for planar area, or 10% for curved area.
Reviewing TAU Flex Mesh Warnings
TAU offers three ways to view mesh warnings.
- Message Manager – Immediately after the mesh generation is done, if a tolerant mesh is given, warnings display in the Message Manager. If the window is hidden, click Show Messages.

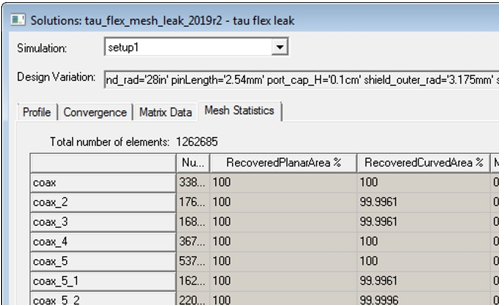
- Mesh Statistics – On the Results tab of the ribbon, click Solution Data to open a Solutions window.
On the Mesh Statistics tab of the Solutions window, if a tolerant mesh is generated, the surface area difference between the mesh and geometric model at body level is listed as "RecoveredPlanarArea" and "RecoveredCurveArea". 100% means that the body has a strict mesh. You can click the surface area tab to sort the body list and see the tolerant mesh bodies first.
- Model Analysis – To view the details of the tolerant mesh, click Modeler > Model Analysis > Show Analysis Dialog > View Mesh Feedback to launch the Model Analysis window.
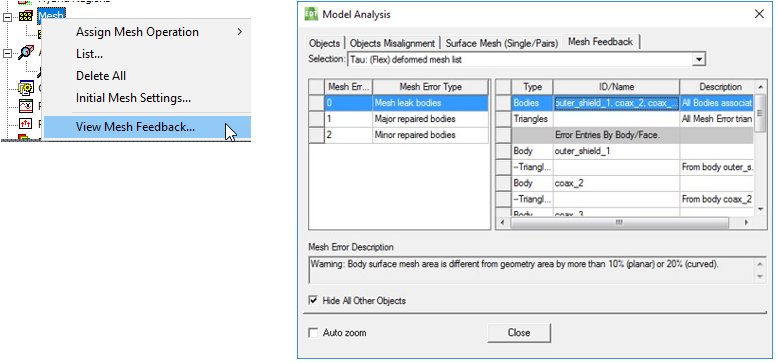
Click on the top list to display objects that have tolerant mesh.
Click the "Triangles" to display the mesh on the tolerant objects.
Individual objects are listed under "Error Entities By Body/Face". You can select one or multiple bodies to view the mesh at a more detailed level.
Addressing TAU Flex Mesh Issues
In cases where TAU Flex has difficulty making a strict mesh on some objects, you can address the problem using one of the following techniques:
- Redraw the geometry in question in the native modeler.
- Heal the geometry, either with integrated healers or perhaps in SpaceClaim.
- If the object has curved or true surfaces, consider applying a localized surface mesh operation which creates a finer than default mesh.
- Remove difficult objects that are not critical to the simulation.