


The compare functionality supports 2-way and 3-way difference analysis of projects. For background on the functionality, see 2-way vs. 3-way compare. The comparison can be used to visualize the changes that were applied to a project in relation to older versions of the same or another project. It is the basis for teamwork when reintegrating independently evolved copies of the project.
Start a difference analysis from the context menu of project(s) in the Model Browser. Select Compare With... to open the following dialog:

Use the Browse... buttons to navigate to each project you want to compare. If you are linked to a server, any loaded projects are also displayed in the Project Selection dialog. Note that only open or loaded projects are listed.
Tip: You can select up to three projects in the Model Browser and then select Compare With.... The number of selected projects pre-populates the Compare Projects dialog accordingly.
The comparison dialog allows the selection of all projects to be analyzed for differences. In addition to source and target projects, a baseline can be specified if a 3-way comparison is desired. Note that the merge/integrate functionality is only available for a three-way diff (see Integrate and Merge). The fields in detail are:
Target: You are usually working on the local copy. In the difference browser, any changes in this project show up as "outgoing changes", with difference arrows pointing from left to right. If a merge is triggered, the target project is the one into which all changes are merged.
Source: Usually the remote copy of the project with changes that were applied by someone else. Changes in this project show up as "incoming changes" in the difference browser. The changes are labeled with arrows pointing from right to left. In case of a merge, the selected project serves as a "source" and is not touched.
Baseline (Ancestor): The selection of a baseline is optional for difference analysis and is only required for a 3-way diff. Here the common ancestor of source and target projects is chosen to get the maximum of information for the differences. For more information, see 2-way vs. 3-way compare. If no baseline is available when a 3-way diff is performed, the target project can serve as baseline to simulate a 3-way comparison. Note that the baseline is required to execute a subsequent auto-merge (integration).
Each line of controls for source, target, and baseline supports the selection of (loaded) projects in the workspace (Project in the left drop-down list) or from an external ZIP file (External). In both cases, the Browse... button can be used for convenient selection. Use the double-arrow buttons to toggle the project positions as source, target, or ancestor. Then click the Compare button to start the comparison process. The tool switches into the "Difference" perspective (see Differences perspective).
Note that when you compare a project against an older project version, the older project should be selected as source, otherwise a merge could modify the old version (which is probably not intended). If you only want to do a comparison, however, the source/target selection can be arbitrary.
You can access the preferences of the compare and merge functionality with the global compare preferences link at the bottom of the dialog, or by using the global preferences (Window > Preferences) . The Preferences page looks as follows:
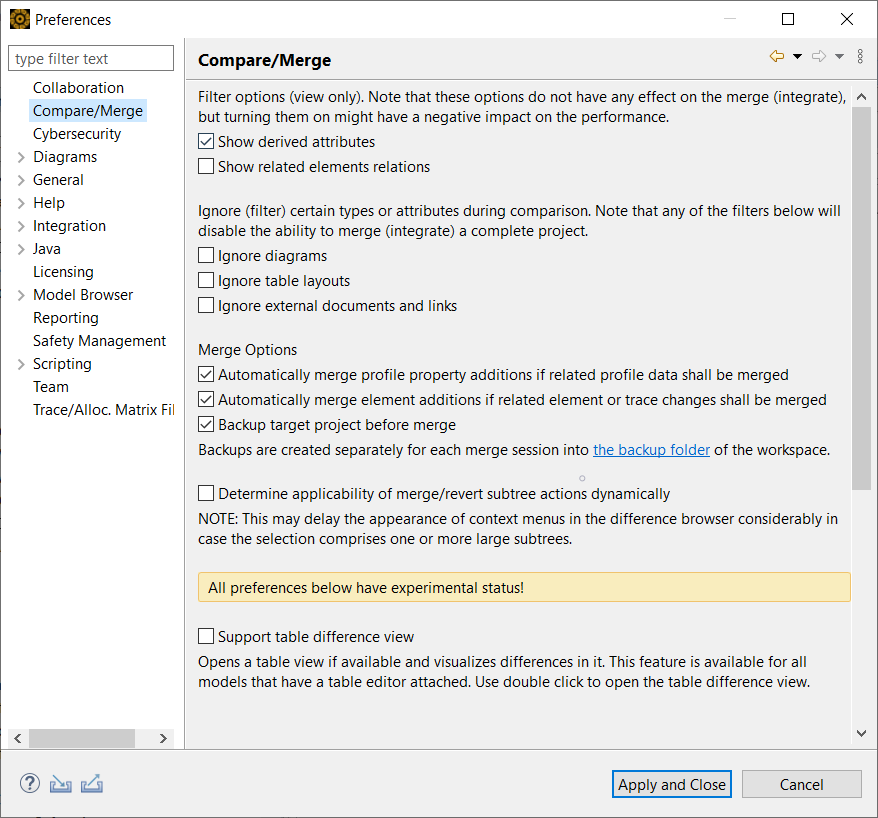
There are three sections of options. The first set of options is purely view-related, to filter the differences for some model information. The options have no effect on the merge behavior.
Show derived attributes: Derived attributes are properties that are computed based on other data in the project, hence they do not hold a value but aggregate other information. For example, the total failure rate and SPF/LF metrics are derived attributes. If this option is disabled, this information does not appear in the difference views
Show related elements relations: This option refers to references usually shown in the Related Elements menu (see Element Relationships) or the dependency viewer. These relations are usually for convenient navigation and are in some cases derived from other references, such as traces. Independently of this option, the references in a project such as traces, cause/effect links of failures, and requirements contributions, are always shown since they constitute essential model information.
The second set of options suppresses the difference analysis of certain artifacts and hence has implications for merging. To avoid inconsistencies, selecting any of these options leads to a deactivation of the merge feature:
Ignore diagrams: When enabled, all diagrams are skipped during difference analysis.
Ignore table layouts: When enabled, all visual settings related to tables, such as column ordering or header renaming, are ignored.
Ignore external documents and links: When enabled, all external documents, such as Excel, Word, or PDF files, as well as links managed in the project are skipped during difference analysis.
The purpose of these options is to streamline the difference analysis. When these options are selected, the algorithms exclude the corresponding information. In addition, there are a number of "live" filters to show/hide differences based on their type, such as addition or deletion, as explained in Differences perspective.
The third set of options automates merge operations.
Automatically merge profile property additions...: When enabled, a merge of profile data also includes profile property additions.
Automatically merge element additions...: When enabled, a merge of element or trace data also includes element additions.
Backup target project before merge: When enabled, the target project is backed up. If the merge does not go as expected, you can retrieve the target project in its pre-merge state.
When you set the Determine applicability of merge/revert subtree actions dynamically checkbox, medini analyze determines whether there are subtree changes to merge or revert in a 3-way diff. If so, the Merge Subtree Changes or Revert Subtree Changes menu items appear in the context menu. For large projects, this calculation can take some time. Note that when the checkbox is left unchecked, the commands appear in the menu whether or not there are changes to merge/revert.
The compare and merge functionality is available in the "Differences" perspective. This perspective automatically opens after a comparison is done (see Configuring and starting project comparison). The "Differences" perspective contains three main views:
Difference Browser: This tree-based browser uses a similar project structure to the normal Model Browser, but with a combined view on source and target projects. This combined view shows all added, deleted, changed, or conflicting elements, indicated by a corresponding icon. It also shows some additional nodes, such as for traces, project settings, or table layout files which are normally only seen by dedicated dialogs/views.
Difference Details: The difference details view is a property view that lists the attributes and references. It has four columns:
An icon indicating the type of difference
Name of the attribute or reference
Target value
Source value
Difference Visualization Editors/Views (experimental): A table view of the details is provided to see the elements including their differences in their normal editor. For example, the HARA or FME(D)A editors show the differences with a change indication as shown in the screenshot.
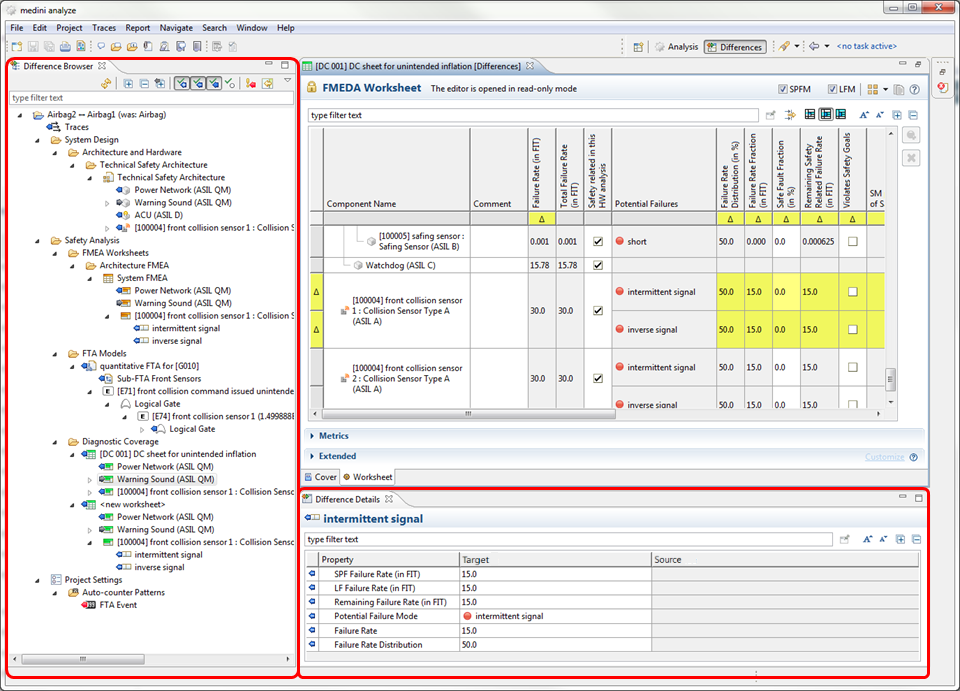
The difference browser constitutes the entry point of the difference analysis. Double-clicking a difference opens the "Difference Details" view.