The teamwork capabilities for all projects are based on the compare and merge functionality. In general, a project that is manipulated in a local workspace can be shared with colleagues for parallel work. Multiple users apply their changes to (local) copies of the originally shared project and these changes are integrated at a later stage. This integration step is automated by the tool, except for conflicts that may occur due to changes on the same artifacts (see further below). The basic workflow for two users is shown in the following figure:
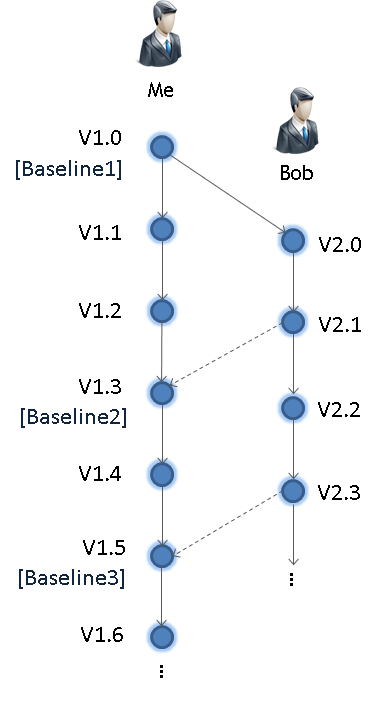
When starting with concurrent work, an initial project must be shared between the users (V1.0 in the figure). This version is literally the baseline where parallel work starts, but this does not mean it necessarily has to be a "baseline" in the configuration management solution (CMS) used. Because medini analyze connects to an existing CMS, the sharing implementation may vary depending on the system used. For example, if a Subversion (SVN) repository is used, users can work on separate branches and commit changes for some time without interfering with other users (e.g. V.1.1 to V1.3). Working on a single branch--or even without a CMS, by exchanging the project as plain file--is also possible (see details below). Afterwards, all users apply changes to their copies of the project as required.
At some point, the parallel work needs to be synchronized by integrating (merging) changes into a single project. This integration step is done at one of the projects that is further maintained as the "master" or "main" project (lifeline V1.x in the figure). If multiple users have worked in parallel, the integration is repeated for each user. The workflow shows two integrations, the first from V2.1 -> V1.3 and a second from V2.3 -> V1.5. As shown, after the integration users can continue to work on their project copies and then integrate again.
To integrate, medini analyze uses a difference analysis of the individual changes (i.e. 3-way comparison) and a subsequent semi-automated merge. This step requires you to have the baseline of the project available, because the tool uses it to detect which user has changed exactly what. Without the baseline, the tool can only perform a comparison between the two projects, so integration becomes a manual and cumbersome task. If a CMS is used, the baseline project can be easily located in this system. If working without a CMS, the baseline can be maintained manually, for example as a project archive on a file share. In any case, the most recent baseline has to be used, i.e. in the example flow "Baseline1" for integration of V2.1 -> V1.3 and "Baseline2" for integration of V2.3 -> V1.5.
Note: We recommend performing integrations frequently. Project copies can evolve very quickly, increasing the number of changes in each step.
Technically the tool implements a 3-way-diff and merge which is described in the next section, 2-way vs. 3-way compare. The difference analysis is the key to understanding the merge and integration functionality.
This section explains the theoretical background of the difference analysis implemented in medini analyze. The concepts are explained here to help you better understand the compare and merge functionality used especially for teamwork.
The easiest comparison is a direct difference analysis of two projects and is called "2-way-diff". The analysis algorithm looks into projects and identifies elements which are (supposed to be) the same. The first step here is to try matching elements that are the same in both projects, which in general requires some sort of identity criteria. By default, medini analyze maintains unique identifiers internally (not seen in the user interface) that allow for an accurate identification and matching. For some elements, user IDs or names are used. After the matching has identified the elements, an analysis of the differences is performed to determine which elements were added, deleted or changed. Changes might appear at all attributes and references depending on the kind of element and could also imply a move of the element, if a change of the container happened.
A drawback of the 2-way-diff is that the direction of changes and conflicts cannot be determined. This might not be intuitive immediately, so we'll look at an example that makes this clearer. Let's assume the following situation:

Your baseline project contains two malfunctions, MF1 and MF2. This project is shared with a colleague (let's call him Bob). Now, assume you are going to rename a malfunction (MF1 to MF7) and add another one (MF3). On the other side Bob is deleting the malfunction MF2. Triggering a 2-way difference analysis on the latest of the two versions yields the following results:
MF1 <> MF7: Based on the internal identifier, the change in the name of the malfunction is (correctly) detected.
MF3: The difference analysis detects that MF3 is in your project and not in Bob's project.
MF2: Even though MF2 was deleted, the tool can only detect that MF2 is in your project, but not in Bob's.
From this scenario, you'll recognize that the 2-way-diff cannot distinguish additions from deletions, since there is no information about the history of the project. The same is true for the change of the name for MF1/MF7: it is unclear which of you has the "correct" name, namely the name that should go into an integrated version. Without looking at the starting point, there is no way to derive on which side a change happened.
This gap can be filled with a "3-way diff". This type of difference analysis takes the common baseline into account and analyzes each delta with respect to the common ancestor version. From this analysis, the following additional information can be derived:
MF1 <> MF7: Since the name MF1 in Bob's project is the same as in the baseline, the change must have happened in your project. Therefore the tool can determine that it is a local change not performed by Bob.
MF3: In comparison with the baseline and Bob's project, MF3 cannot be found there, so it must be an addition in your project.
MF2: On the contrary, MF2 can be found in the baseline and in your project, so it must be a deletion in Bob's project.
As can be seen from this small example, the 3-way difference analysis can determine on which side a change happened. This is especially important if changes happened to the same set of elements, leading to actual conflicts. With a 2-way diff, conflicts cannot be detected as shown from the following modified example:
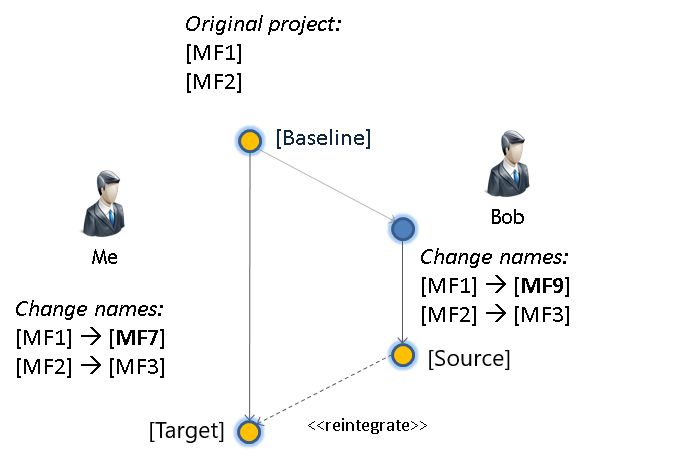
Let's assume this time you and Bob renamed the same malfunction MF1 as shown to different values (MF7 and MF9). Moreover, both of you changed the name of malfunction M2 to the same new value MF3. The difference in the for 2-way and 3-way comparison would be as follows:
From a direct comparison of the two projects (2-way) the former malfunction MF1 has different names (M7 <> MF9). Since the original value is not known in this case, it is interpreted as a "normal" delta. By taking into account the baseline (3-way), the tool can detect that both of you changed the value in relation to the baseline. Therefore the tool can indicate a conflicting change.
The renaming of MF2 to MF3 is not seen in a direct comparison (2-way), since both of you have the same value. Thus, this difference will not show up. In relation to the baseline, however, a 3-way diff can figure out that even though there is no difference between your project and Bob's, there is a difference compared to the baseline. This type of difference is called a "pseudo conflict", because both projects changed the same data without actually producing a conflict.
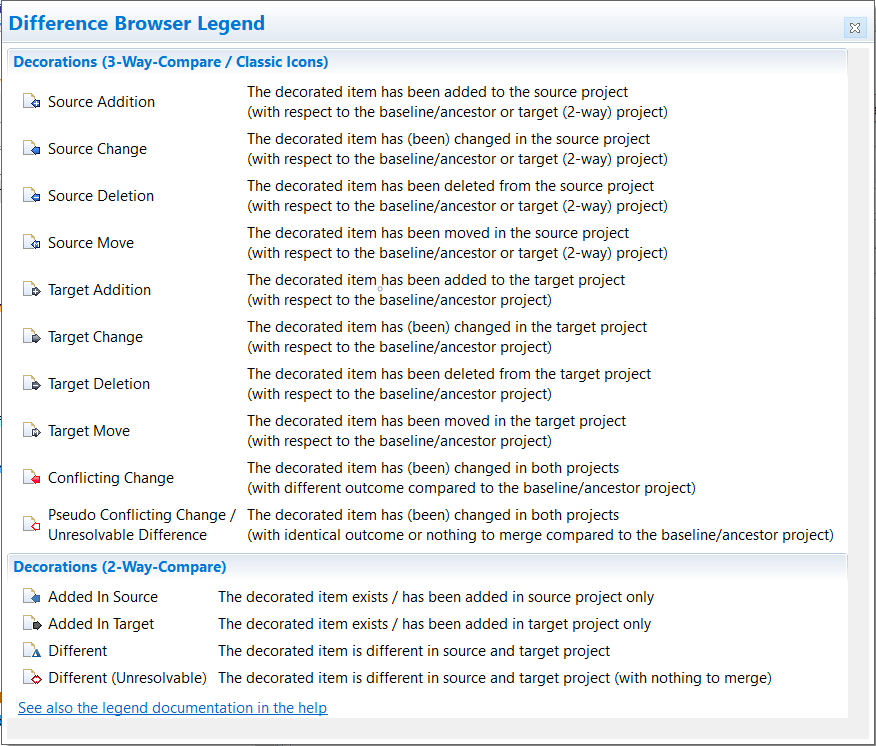
To better visualize the different 2-way and 3-way changes during a comparison, the tool uses the following set of icons (overlays) to indicate the various difference types: