


(Part A) Learn how to install and configure the working environment for the Rocky Solver SDK (Software Development Kit).
(Part B) Learn how to use the Rocky Solver SDK and working environment we set up in Part A to build a simple custom module.
The purpose of this tutorial is to learn how to install and configure the working environment for the Rocky Solver SDK.
The Rocky Solver SDK includes the runtime libraries, simulation information, and compilation mechanisms you need to create your own custom modules
Custom modules are separate pieces of code, built using the Solver SDK, that attach to the solver code in Rocky and expand its capabilities
For example, you can create custom modules that apply unique models, laws, and other special functionality to your Rocky simulations
In Part A of this tutorial, you will learn how to:
Download and install the Rocky Solver SDK package
Obtain the tools and settings necessary for working with the Solver SDK files
Make other recommended settings for best usage
Later in Part B you will learn how to use the Solver SDK to make your own example module.
Before you begin this ADVANCED tutorial, ensure that you have satisfied the following prerequisites:
You are familiar with the Rocky 2025 R2 user interface (UI), have a good understanding of the common setup and post-processing tasks, and grasp firmly the concept of Modules.
If you do not already have this level of familiarity, it is recommended that you complete at least Tutorials 01- 05 before beginning this one.
You have working knowledge of both the Python and C++ programming languages.
The system upon which you intend to use the Rocky Solver SDK has at least one of the following supported operating systems installed:
64-bit Windows 10 or 11
64-bit Linux (Rocky 8.10 or 9.4, Red Hat 8.10 or 9.4, SLES 15 and Ubuntu 20.04 or 22.04)
The first step to building your own custom modules is to install the necessary files and set up the required components, which are defined below:
Rocky Solver SDK Files: A package of libraries that translates the module code including what values are entered into the module UI by the Rocky end user to the solver. This simplifies the custom code development and compilation.
Important: The Rocky Solver SDK you use must have the same release version as the Rocky program you intend the modules to be run upon. This means that if you intend to create modules for Rocky 2025 R2, for example, you must install the 2025 R2 Rocky Solver SDK.
Solver SDK Files Environment Variable: Points to the folder location of the unzipped Solver SDK files.
CUDA Toolkit: Provides the development environment necessary for GPU processing compatibility.
Note: This toolkit is required whether or not you plan on using GPUs for processing simulations that will make use of the custom modules.
CUDA Files Environment Variable: Points to the folder location of the installed CUDA Toolkit files. For Windows, this variable is created automatically; for Linux, we will create it manually.
Build Tools: The tools required for compiling the C++ scripts. For Windows, Visual Studio build tools will be used; for Linux, we will use Miniconda 3 (or Miniforge 3) to install some packages.
In addition to the required steps, the following steps are also recommended:
(OPTIONAL) Creating a separate folder for working on your custom modules.
(OPTIONAL) Setting an environment variable to point to the folder location of your compiled module.
Instructions for all setup items will be detailed in this tutorial, separated by the type of operating system you are using:
For Windows instructions, proceed to the next section.
For Linux instructions, skip ahead to Working Environment Setup for Linux 64-bit.
STEP 1: Download and unzip the SDK and Modules package for the operating system and Rocky version for which you want to create custom modules.
Tip: The SDK and Modules package contains the 2025 R2 Solver SDK and modules, and is available in Ansys Customer Portal.

Download the SDK and Modules package for Windows.
Reminder: The Solver SDK version you install allows you to make modules only for the same version of the Rocky product. This means that modules made from the 2025 R2 Solver SDK, for example, will work only in Rocky 2025 R2.
Extract the files, and copy (or cut) and paste the sdk folder into a folder of your choice. (For example, within your %HOMEPATH%/Documents/Rocky/Modules folder.)
STEP 2: Create an environment variable called RockySDK_DIR
From the Windows Search bar, type Edit the system environment variables, and then open the Control Panel result that appears.
From the System Properties dialog, on the Advanced tab, click the Environment Variables... button.
From the Environment Variables dialog, from the System variables box, click the New... button.
From the New System Variable dialog, define the Variable name as RockySDK_DIR and the Variable value with the folder path of the SDK subdirectory (as shown), and then click OK.
Note: The folder path should be the folder were the SDK files were extracted in Step 1.

The environment variable will now be listed in the System variables section.
STEP 3: Install and configure the CUDA Toolkit 12.8.
Important: The 2025 R2 (and later) versions of the Rocky Solver SDK are compatible only with version 12.8 of the CUDA toolkit.
Open the CUDA Toolkit 12.8 Archive page from the NVIDIA official website and download the installer for your operational system.
Open the downloaded *.exe, and then extract the installation files as instructed.
Follow the NVIDIA Installer using the Custom (Advanced) options.
On the Custom installation options step, under the CUDA component, ensure that the Runtime, Development and Visual Studio Integration checkboxes are selected.
Follow the installer instructions to complete the installation.
STEP 4: Ensure that an environment variable called CUDA_PATH_V12_8 was created.
Confirm the location of the installed CUDA Toolkit on your system.
Tip: This is typically C:/Program Files/NVIDIA GPU Computing Toolkit/CUDA/v12.8
Follow the instructions on SDK VARIABLE CREATION (WINDOWS) to ensure that a CUDA_PATH_V12_8 environment variable was automatically created and correctly defines the path to the installed CUDA Toolkit.
STEP 5: Download and install Visual Studio Build Tools.
Go to Microsoft | Visual Studio official website and download Build Tools for Visual Studio 2022 LTSC 17.6.17.
From the Microsoft official website, access the Visual Studio 2022 page.
On the page that opens, roll down until you find Visual Studio downloads list, and access the Tools for Visual Studio drop-down list and click the long term servicing baselines (LTSCs) link.
From the page that opens, access the Release History for version 17.6.
From the Fixed version bootstrappers list, find the 17.6.17 Version (click Ctrl + F and search for 17.6.17) and click the link to download the .exe installer for the Build Tools.
Open the downloaded .exe.
From the Installing screen:
Select Desktop development with C++ (under Desktop & Mobile on the Workloads tab)
Ensure that build tools, Windows SDK and C++ CMake tools for Windows (under Optional on the Installation details panel) .
Click Install and finish installation accordingly.
Go to the C:\Program Files\NVIDIA GPU Computing Toolkit\CUDA\v12.8\extras\visual_studio_integration\MSBuildExtensions folder and copy its files.

Go to the C:\Program Files (x86)\Microsoft Visual Studio\2022\BuildTools\MSBuild\Microsoft\VC\v170\BuildCustomizations folder and paste the files you just copied.
STEP 6: (OPTIONAL) Create a Working Folder for your custom modules.
Create a new folder where you will work on your custom modules. (For example, %HOMEPATH%/Documents/Rocky/Compiled_Modules)
Note: Your custom module will be compiled in your working folder.
However, to display the module within the Rocky UI, the compiled files must reside in the %HOMEPATH%/Documents/Rocky/Modules folder.
To have Rocky to recognize your module after it is compiled, you can do either of the following:
Copy and paste the compiled files out of your working folder and into the %HOMEPATH%/Documents/Rocky/Modules folder each time you make an update.
Create an environment variable called ROCKY_PLUGINS_PATH that defines the path to the compiled files. (PLUGIN VARIABLE SETUP (WINDOWS))
STEP 7: (OPTIONAL) Create an environment variable called ROCKY_PLUGINS_PATH
Follow the instructions on SDK VARIABLE CREATION (WINDOWS) to create a new ROCKY_PLUGINS_PATH environment variable that points to the folder location where the compiled module files will be created. (For this tutorial, it is the %HOMEPATH%/Documents/Rocky/Compiled_Modules folder.)

Note: Later in Part B, we will take steps to ensure that the compiled files are created in this location.
STEP 1: Download and unzip the SDK and Modules Package for the operating system and Rocky version for which you want to create custom modules.
Download the package for Linux.
Reminder: The Solver SDK version you install allows you to make modules only for the same version of the Rocky product. This means that modules made from the 2025 R2 Solver SDK, for example, will work only in Rocky 2025 R2.
Extract the files into a folder of your choice (for example, within your ~/.Rocky/Modules folder).
STEP 2: Create an environment variable called RockySDK_DIR in the bashrc file.
From the terminal, enter
sudo vi /.bashrcFrom the vi editor that opens, press the a key to edit and define the environment variable (as shown).
Press the esc key and then type
:wqto save and exit (as shown).
To refresh your environment variables, enter
source
              /.bashrc
Enter
envto print the environment variables. The variable you just defined will be listed (as shown).
STEP 3: Install and configure the CUDA Toolkit 12.8.
Important: The 2025 R2 (and later) versions of the Rocky Solver SDK are compatible only with version 12.8 of the CUDA toolkit.
Open the CUDA Toolkit 12.8 Archive page from the NVIDIA official website and download the installer for your operational system.
Run the following commands:
$ bash {INSTALLERFILENAME} --silent --nox11 --override --no-man-page --toolkit
--toolkitpath={INSTALLATIONPATH}cuda/v12.8
$ echo "export CUDA_PATH_V12_8={INSTALLATIONPATH}cuda/v12.8" >> $HOME/.bashrc
$ source $HOME/.bashrc
where {INSTALLERFILENAME} is the name of the downloaded file and {INSTALLATIONPATH} is the desired installation path.
STEP 5: Download and install Miniconda 3 or Miniforge 3 and enable the required make, cmake, and gxx_linux-64 packages.
Download Miniconda 3 or Miniforge 3.
Navigate to the folder where you downloaded the installer, open a terminal and execute it as in the example below, and continue the installation.
bash -Miniforge3-Linux-x86_64.shActivate the environment, as in the example below.
source ~/miniforge3/bin/activateInstall the three required packages by entering the following commands:
conda install -c anaconda makeconda install -c anaconda cmakeconda install -c anaconda "gxx_linux-64>=11,<12".The conda prompt now contains a minimum set of tools required to build Rocky modules.
STEP 6: (OPTIONAL) Create a Working Folder for your custom modules.
Create a new folder where you will work on your custom modules. (For example, ~/.Rocky/Compiled_Modules)
Note: Your custom module will be compiled in your working folder.
However, to display the module within the Rocky UI, the compiled files must reside in the ~/.Rocky/Modules folder.
To have Rocky to recognize your module after it is compiled, you can do either of the following:
Copy and paste the compiled files out of your working folder and into the ~/.Rocky/Modules folder each time you make an update.
Create an environment variable called ROCKY_PLUGINS_PATH that defines the path to the compiled files. (Shown below)
STEP 7: (OPTIONAL) Create an environment variable called ROCKY_PLUGINS_PATH
Follow the instructions on SDK VARIABLE CREATION (LINUX) to create a new ROCKY_PLUGINS_PATH environment variable in the bashrc file that points to the folder location where the compiled module files will be created. (For this tutorial, it is the /user/.Rocky/Compiled_Modules folder.)

Note: Later in Part B, we will take steps to ensure that the compiled file are created in this location.
This completes Part A of this tutorial.
For further information about setting up your working environment for the Rocky Solver SDK, we suggest searching the Rocky Solver SDK Manual.
To access it, from Rocky Help menu, point to Manuals, and then click Solver SDK Manual.
During this tutorial, it was possible to:
Download and install the Rocky Solver SDK, CUDA Toolkit, and build tools for both Windows and Linux machines.
Define required and optional environment variables to make compiling the custom modules easier.
What's Next?
Now that you have successfully set up your working environment, you are ready to move on to Part B and learn how to use the Solver SDK to create an example module.
The main purpose of this tutorial is to learn how to use the Rocky Solver SDK and working environment we set up in Part A to build a simple custom module.
The module we will create enables end users to define a region of spherical shape inside the simulation domain and then mark all particles located inside this region with a custom property.
In Part B of this tutorial, you will:
Review files that define the module, which includes:
Understanding each file's purpose and role in the module's function
Learning how and when to make use of the Rocky Solver SDK
Seeing how custom code communicates with the Rocky solver
Compile the module (separate Windows and Linux instructions provided)
Test the module in the Rocky User Interface (UI)
Before you begin this ADVANCED tutorial, ensure that you have satisfied the following prerequisites:
You are familiar with the Rocky 2025 R2 user interface (UI), have a good understanding of the common setup and post-processing tasks, and grasp firmly the concept of Modules.
If you do not already have this level of familiarity, it is recommended that you complete at least Tutorials 01- 05 before beginning this one.
You have correctly configured your working environment to build custom modules through the Rocky Solver SDK. If this is not the case, please refer to either of the following resources:
Part A of this tutorial
The 1.1 Prerequisites section of the Rocky Solver SDK Manual
You have working knowledge of both the Python and C++ programming languages.
Based upon on the core processes of a standard DEM simulation, you can add or modify Rocky behavior through the different Solver SDK models included in the Rocky Solver SDK.

We will make use of the Custom Scalars API for our example module, called Spherical Region.
The main purpose of the Spherical Region module is to:
[Setup]: Allow users to define a region of spherical shape inside the simulation domain. They will accomplish this by defining the X Y Z coordinate values of the sphere's center point, as well as the sphere's radius.
[Processing]: For each individual timestep, instruct Rocky to mark any particles that come within that spherical region.
[Post-Processing]: Enable users to isolate those marked particles at any given timestep using a new particle variable called Inside Sphere Flag, which will have a value of 1.0 when the particle is inside the region, and 0.0 otherwise.
We will use this example as a framework for understanding how to make best use of the Rocky Solver SDK.
The first step is to understand the files required for defining a custom module.
A custom module is composed of five files, each one having a specific objective as explained below:
Info file (.plugin): Exposes the name and other relevant information about the custom module to the Rocky UI.
Python file (.py): Responsible for linking the custom module to the Rocky user interface (UI) and also for making Rocky aware of the Dynamic Link Library (DLL).
CUDA file (.cu): The core of the module. All the calculations and loop instructions are located here. It is coded in C++.
CMake file (.txt): Contains all instructions necessary for compiling the custom module. Basically, the compilation process consists of pointing the CUDA file (.cu) to the compiler. A DLL (for Windows) or a .so (for Linux) will be generated as a result of this process.
PDF file (.pdf): This is an optional Help file for the modules. If you choose to include it, this file will be accessible via the module's interface in the Rocky UI.
To start building your Spherical Region module, you need to create a special folder to use as your preferred working directory.
Reminder: In Part A, we created a working folder for this purpose called Compiled_Modules.
Tip: The SDK and Modules package contains the 2025 R2 SDK and modules, and is available in Ansys Customer Portal.
From the package files you downloaded, go to the Source Codes folder, and then to the Simple Modules one.
Extract the contents from the spherical_region-1.0.0-sdk... folder.
Then within your working directory, paste the spherical_region folder. Your folder structure should now look similar to the screenshot below.
spherical_region/
    CMakeLists.txt
    spherical_region.cu
    spherical_region.pdf
    spherical_region.plugin
spherical_region.py Your module's Info file (spherical_region.plugin) enables you to define the following kinds of information:
Name: Specifies the name of the module as you want it to appear in the Rocky UI.
Module: Lists the name of the module's compiled library file.
Note: We will cover how to generate this artifact later in the tutorial.

The items under [Documentation] will be displayed in the UI on the Info tab for the module:
Author and Website: Specifies the company information you want associated with the module.
Version and Description: Provides further identifying information for the module.
Note: If you want to make a multiline Description you must indent the lines after the first one (as shown).


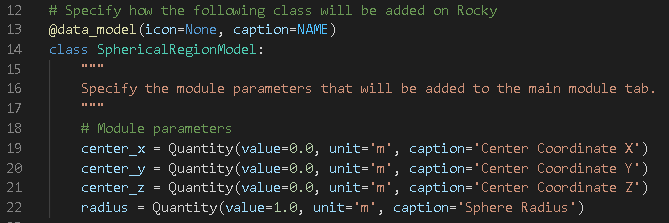
Your module's Python file (spherical_region.py) specifies which are the module parameters that must be displayed in the Rocky UI.
From this file, Rocky extracts the following two primary instructions:
The initial value and location of custom user input parameters.
Whether or not the module should override any of Rocky's built-in models.
All the information within this file is organized through various methods and classes that offer different functionality depending upon the module's purpose.
Tip: All available methods and classes are described in the Rocky Solver SDK Manual.
Key parts of this file are explained below.
[Lines 2-6] Import the Solver SDK utilities necessary for specifying the module data.
[Line 9] Defines the name of the module that Rocky must show in the UI.

[Lines 12-22] Define the auxiliary class SphericalRegionModel, which includes the definition of the module parameters. The Rocky Solver SDK provides a special class called Quantity for this purpose, which includes the capability of associating units to each variable.
[Line 26] Defines the SphericalRegionSpecs class, which itself defines the specifications of the module. This function is used to tell the Rocky UI which components are affected and/or replaced by the module, such as contact models or material interaction properties.
[Line 31] The module's name (name).
[Line 34] The components affected (model), which in this case includes only the specification of the parameters previously included in the SphericalRegionModel class.
[Lines 38-39] The module's path (CreateAddin method), which handles the loading of the compiled library file for the module when the simulation starts.

[Line 43] Includes the SphericalRegionModule class, which defines the module as a new Rocky plugin and hooks the module specifications to Rocky.
[Lines 44-45] Implement only one method in this class, get_addin_specs, which makes available all the specifications made previously in the file.

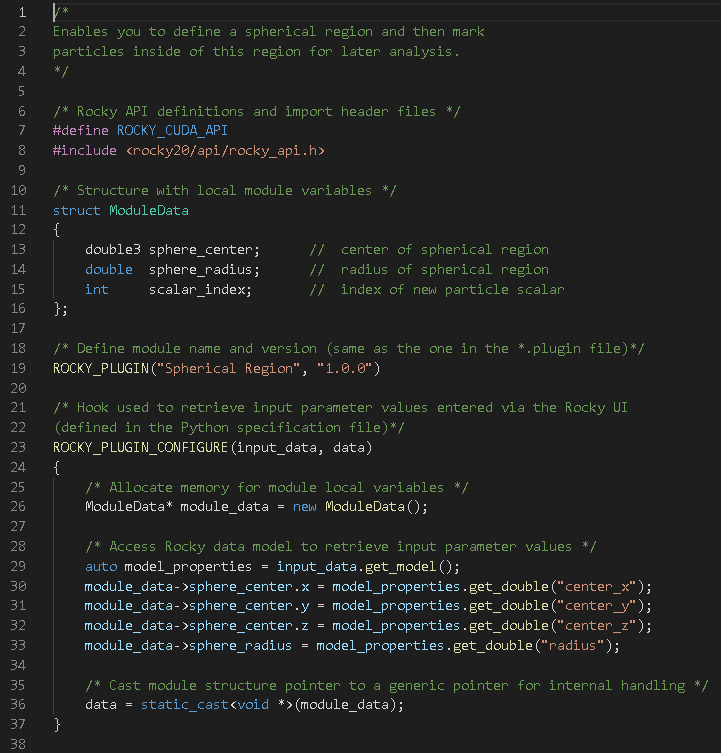
Your module's CUDA file (spherical_region.cu) includes all the C++ code that implements the module's intended functionality during the simulation.
The functions defined in this file must be connected or hooked into the solver at strategic points during simulation processing (see also ROCKY SOLVER SDK OVERVIEW) by using one or more of the following types of hooks:
Start/Termination Hooks: These are called only once during the simulation: either when the simulation initializes or when it terminates.
Iteration Hooks: These are called once per iteration during the simulation loop (a loop is where motions and models are solved, and the state of particles is updated as a result, for a new time level. The iteration of many loops makes a full simulation).
Important: All iteration hooks of this type requires to include a function call to finalize the hook: {function name}_END()
Tip: The full list of hooks is provided in Chapter 3 of the Solver SDK Manual.
Key parts of this file are explained below.
[Line 7] ROCKY_CUDA_API: Enables the execution of the module in single or multi-GPU configurations.
[Lines 11-16] struct ModuleData: Creates a structure to save the user parameters defining the spherical region.
[Line 19] ROCKY_PLUGIN(): Initializes the plugin, defining the name and version. This is a mandatory definition.

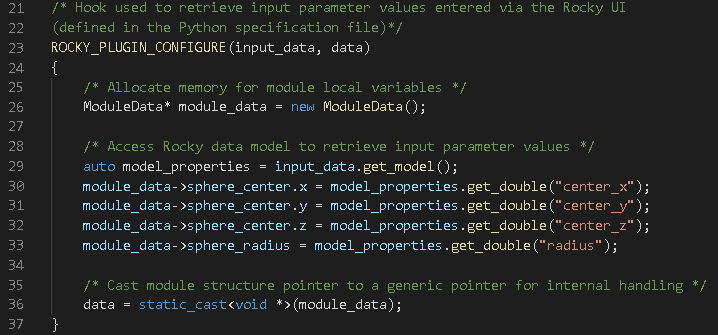
[Lines 23-37] ROCKY_PLUGIN_CONFIGURE(): Hook used to acquire the inputs for the module that will appear in the Rocky UI, the definition of which includes:
[Line 26] An instance of the custom struct ModuleData is allocated and the corresponding pointer is named module_data.
[Lines 29-33] Recover the values of module variables entered through the Rocky UI, as defined in the SphericalRegionModel class in the python file (STEP 3: REVIEW PYTHON FILE). Those values are assigned to the corresponding variables in ModuleData.
[Line 36] This pointer is converted to a void pointer in order to assign it to the function argument data, which Rocky will store and make available in the subsequent stages of the simulation.
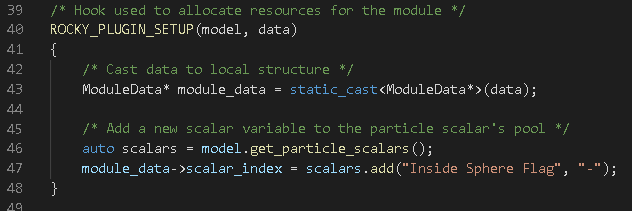
[Lines 39-47] ROCKY_PLUGIN_SETUP(): Hook used to allocate resources for the simulation, which in this case defines only a particle scalar variable that will be used to mark particles inside the spherical region. Specifically:
[Line 43] In order to have access to the data stored previously, the void pointer must be converted back into a ModuleData pointer.
[Line 46] The object that handles operations with particle scalars is defined.
[Line 47] The custom particle scalar is specified. The two arguments in the add function are the label that must be associated to the particle scalar in the Rocky UI, and the unit.
[Lines 51-61] ROCKY_PLUGIN_NON_DIMENSIONALIZE(): Hook used to nondimensionalize all the custom parameters previously defined, in order to use them in operations involving data coming from the Rocky solver, which are dimensionless.
In this example module, all parameters are lengths, which means they are nondimensionalized using the length factor provided by the corresponding method of the model argument.

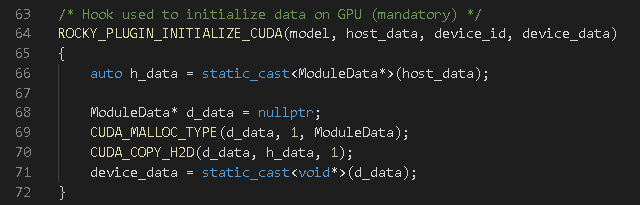
[Lines 64-72] ROCKY_PLUGIN_INITIALIZE_CUDA(): Hook used to copy module data to the GPU. This kind of operation is mandatory when a module is intended for execution in single or multi-GPU configurations.
[Lines 76-98] ROCKY_PLUGIN _POST_MOVE_PARTICLES(): Hook executed inside a loop (time iterative) over the active particles in the simulation, after the position and velocities of the particles were updated in Rocky.
[Lines 88-91] The distance between the centroid of the current particle and the center of the spherical region is calculated.
[Lines 94-97] Sets the variable Inside Sphere Flag to 0.0 or 1.0 depending upon whether the distance is higher or lower than the radius of the sphere region.
[Line 100] ROCKY_PLUGIN_POST_MOVE_PARTICLES_END(): Mandatory function to be defined after ROCKY_PLUGIN_POST_MOVE_PARTICLES(). Similar close-out functions are required for any hooks executed during the time iterative loop.

[Lines 103-107] ROCKY_PLUGIN_TEAR_DOWN(): Performs any end-of-simulation actions required, such as to de-allocate memory or output any final/cumulative values.
[Lines 110-114] ROCKY_PLUGIN_TEAR_DOWN_CUDA(): In this hook the module must free the memory allocated for custom data in the GPU devices during the execution of ROCKY_PLUGIN_INITIALIZE_CUDA().
[Line 117] ROCKY_PLUGIN_END: Mandatory for finalizing the module's declaration.


Your module's (optional) PDF file (.pdf) enables you to provide usage instructions and/or technical references for the module's end users.
Note: The placeholder .pdf file (spherical_region.pdf) is provided for tutorial illustration purposes only.
If added, the PDF will be automatically linked to the module in the Rocky UI and can be opened by clicking a question mark icon (as shown).
After you create the PDF, it is required that you save the file with the same name as the module's folder, and place it in the same folder as the .plugin and .py files.

The purpose of your module's CMake file (CMakeLists.txt) is to manage the module's build process.
It includes all the instructions regarding the location of the Rocky Solver SDK and CUDA files.
Key parts of this file are explained below.
[Line 4] Package name of module is defined. This variable needs to be updated according to the module's name.
Important: It is assumed that all files (.py, .plugin, .cu, .pdf) have been named the same as the module.
[Line 10] The default installation folder is defined by the ROCKY_PLUGINS_PATH environment variable that we created earlier in Part A.
Because this environment variable points directly to the working directory, and we've set the module's files to be compiled there, the Rocky UI will automatically know about this new module whenever it is compiled.
If you want the module to be installed in another folder, for any other reason, uncomment this line and set a location manually.

When developing a module with Solver SDK functions, you can enable auto-complete in Visual Studio Code for editing your CUDA files. This feature will help you quickly access function suggestions, making module development faster and more efficient.
Ensure you have Visual Studio Code installed, open it and open your module folder (in this example, the spherial_region).
Click Ctrl + Shift + P and select C/C++: Edit Configurations (JSON). It will create a .vscode folder and a c_cpp_properties.json file inside your working directory.
From this new .json file, include the path to Rocky SDK (
"${env:RockySDK_DIR}/include",) inside IncludePath option, as shown.If there is a configurationProvider option, delete the line and save the file.

Click Ctrl+Shift+P and select Reload Window.
The auto-complete is configured.

Now we are going to compile our custom module, which involves all of the following steps:
Execute the build commands: For Windows, this will be done using a special Visual Studio command prompt or in Visual Studio Code; in Linux, this will be done using the terminal.
Verify the compiled files: During compilation, Rocky will within the working directory, automatically make a folder named with the Rocky version and then within that new folder, place the resulting module.
Separate build instructions will be provided for each operating system.
From the Windows Search bar, type x64 Native Tools Command Prompt for VS, and then open the App result that appears.
From the x64 Native Tools Command Prompt for VS window, navigate to your working directory (as shown).

Within the command prompt, execute separately the following three commands:
cmake -DCMAKE_GENERATOR_PLATFORM=x64 spherical_region
cmake --build . --config Release
cmake -P cmake_install.cmake
Tip: You can configure the Visual Studio Code to build modules (no need to type the three commands every time).
To set the environment to compile your modules through Visual Studio Code, follow the procedure below:
Ensure you have Visual Studio Code installed and open it.
From the Extensions panel, search for the CMake Tools extension and install it.
Access the Extension Settings and enable the Status bar visibility (make visible).
Open your working directory (from File | Open Folder... open the module folder, for example spherical_region).
The CMake Tools status bar will show up in the bottom of the screen with the options you need to set up, as described below.
For the active kit, select the amd64 version.
For the build variant, select Release.
Change the default build target from ALL_BUILD to install.
Click Build.
Note: For the opened directory, settings will be saved, but when opening a different one, you must follow the steps 5-7 again before compiling the module.
Using the terminal, navigate to your working directory.
Note: This tutorial defines the working directory as ~/user/Documents/Rocky/Compiled_modules
Execute separately the following two commands:
cmake spherical_region
make install
Using the file structure below as a guide, navigate through your working folder to verify that the compiled content of the spherical_region module is now available in the version folder that matches the Solver SDK you have installed (For example, the 25.2.0 folder).
Note: On Windows machines, compilation will generate two new files (*.dll and *.lib). On Linux machines, only one new file will be generated (*.so).
Windows:
25.2.0/
    spherical_region/
        spherical_region.dll
        spherical_region.lib
        spherical_region.pdf
        spherical_region.plugin
        spherical_region.py
Linux:
25.2.0/
    spherical_region/
        spherical_region.pdf
        spherical_region.plugin
        spherical_region.py
spherical_region.soThe easiest way to check if your module built correctly is to just open Rocky, and then start a new project.
Tip: If Rocky was open while you were compiling, you must close Rocky and open it again to refresh the Modules folder.
When you select Modules from the Data panel, a checkbox for your new module should appear in the Data Editors panel (as shown).

After you select that checkbox and then expand the Modules entity on the Data panel, you can select your new module, and then see the parameters you can set for it in the Data Editors panel (as shown).

To test setting the module's parameters, you can use the simulation example presented in Tutorial - Transfer Chute.
Tip: If you have not yet completed this tutorial, you can download and extract the
dem_tut01_files.zip folder from here .
Then from the tutorial_01_A_pre-processing folder, open tutorial_01_A_pre-processing.rocky.
Enable the new Spherical Region module (as specified on OPEN ROCKY) and then define the parameters (as shown).
Process the simulation as usual.
After the simulation completes, you will be able to visualize what particles are inside the defined region by viewing the Inside Sphere Flag property on a 3D View window.

All the particles that enter the spherical region specified by the Spherical Region module will be assigned with Inside Sphere Flag equal to 1.

This completes Part B of this tutorial.
For further information about the Solver SDK structure and its usage, refer to the Rocky Solver SDK Manual.
To access it, from Rocky Help menu, point to Manuals, and then click Solver SDK Manual.

During this tutorial, it was possible to:
Understand the files involved in building a custom module
Learn how and when to make use of the Rocky Solver SDK
See how custom code communicates with the Rocky solver
Compile the module
Test the module in the Rocky User Interface (UI)
What's Next?
If you completed this tutorial successfully, then you are ready to move on to next tutorial.