Update the mesh sizes.
> Pre-Mesh Params
 > Update Sizes
Ensure that Update All is selected for Method.
Select Run Check/Fix Blocks.
Click .
Enable Pre-Mesh.
 >
> The Mesh dialog box will appear, asking if you want to recompute the mesh. Click .
Examine the quality.
> Pre-Mesh Quality Histogram

Disable SOLID in the display tree.
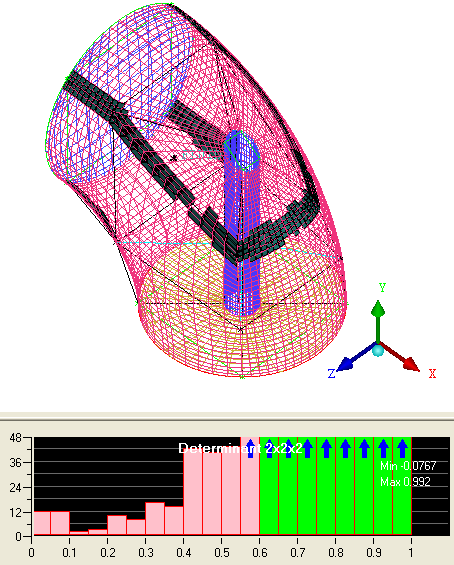
> Ensure that Determinant 2×2×2 is selected in the Criterion drop-down list.
Retain the values of
0for Min-X value and1for Max-X value.Retain the values of
0for Max-Y height and20for Number of bars.Ensure that Only visible index range is disabled.
Enable Active parts only.
Click (Figure 124: Pre-Mesh Quality Histogram).
Select the lower value bars (<0.6) to see the skewed cells (Figure 125: Skewed Cells (Below 0.6) in the Pre-Mesh).
These cells can be corrected using the Ogrid tool.
Right-click in the histogram window and select Done.
Disable Pre-Mesh.
> Enable SOLID.
> Note: These elements are skewed because a mapped block is being fit to a curved shape. At the mesh corners, projection to the curved shape opens up the element’s internal angle to approach 180 degrees. The finer the mesh, the closer the angle to 180 degrees and the worse the quality of the element. The Ogrid tool re-configures the blocking topology by inserting blocks aligned with the wall and moving this H-Grid corner inward to avoid the projection issue. The Ogrid tool is very robust and can be used to improve the quality on simple models like this or form quality boundary layers for much more complex models. It is also ideal for better capturing the physics of the boundary layer profile (viscous wall). At other times it is advantageous to layer elements normal to the curved wall.