


If you have many simulations to process on a particular computer or server, you can use the Rocky Scheduler to set up batch processing.
What would you like to do?
See Also:
Rocky Scheduler is a separate program that enables you to have multiple simulation projects set to process sequentially even when you are not physically at your computer to start them. Once one simulation completes processing, the next one in the list begins processing, and so on.
The Rocky Scheduler uses resources you set to specify the hardware, for example, your CPU or GPU(s), that you want to use for processing. In order to process a job using the Rocky Scheduler, you must have at least one resource assigned to it. Each resource used will require one instance of the Rocky solver to be used for processing. So even though you can set as many resources as you like, you are limited by your Rocky license as to how many jobs you can process at once.
Most users have a single-instance Rocky license and can therefore process only one job at a time (Figure 1). Only those users with unnumbered Rocky licenses, which allows multiple instances of the Rocky solver to be used simultaneously, can use multiple resources to process many jobs at the same time (Figure 2). Rocky Scheduler currently does not make any validations about the license, so if you assign a set of resources that are incompatible with your license, jobs will still try to run but might result in errors. If you are not sure what kind of Rocky license you have, please Submit a Support Request or contact your Rocky representative for assistance.
Important When choosing to processes very long or complex cases over a network, it is important to periodically check the status of your simulation to ensure that loss of connectivity or other issues haven't stopped it from processing. (See also I get a "Failed to write the log" message while processing my simulation.)
Use the figures and tables below to understand how to set up and use the Rocky Scheduler.
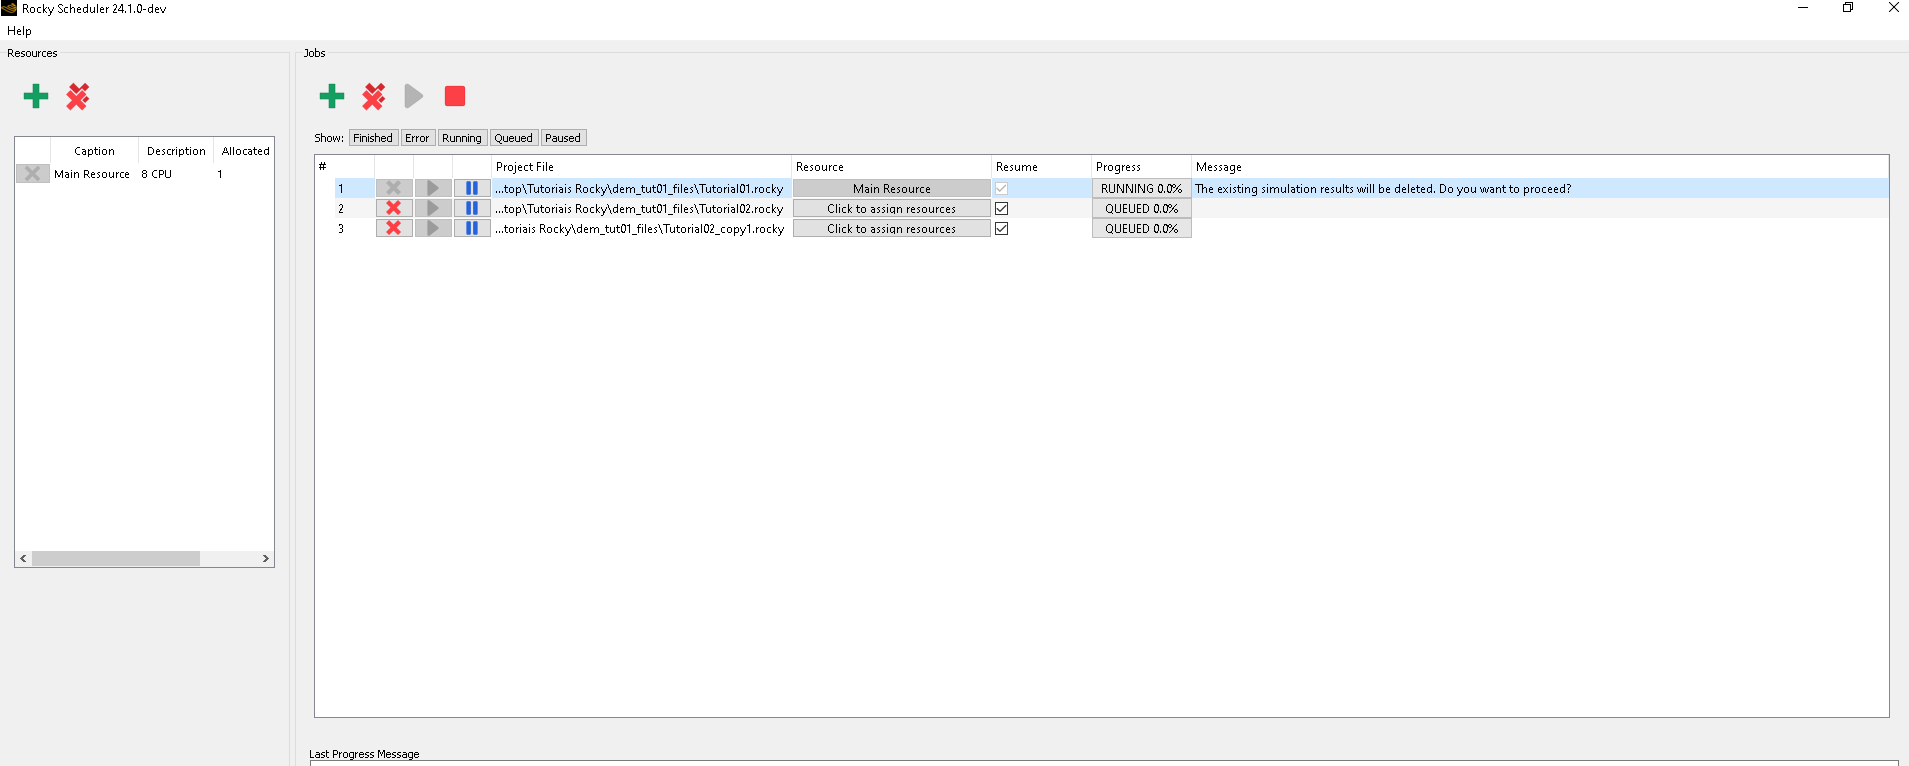
Figure 4.3: Rocky Scheduler with 2 cases running simultaneously and one in the queue (unnumbered license)
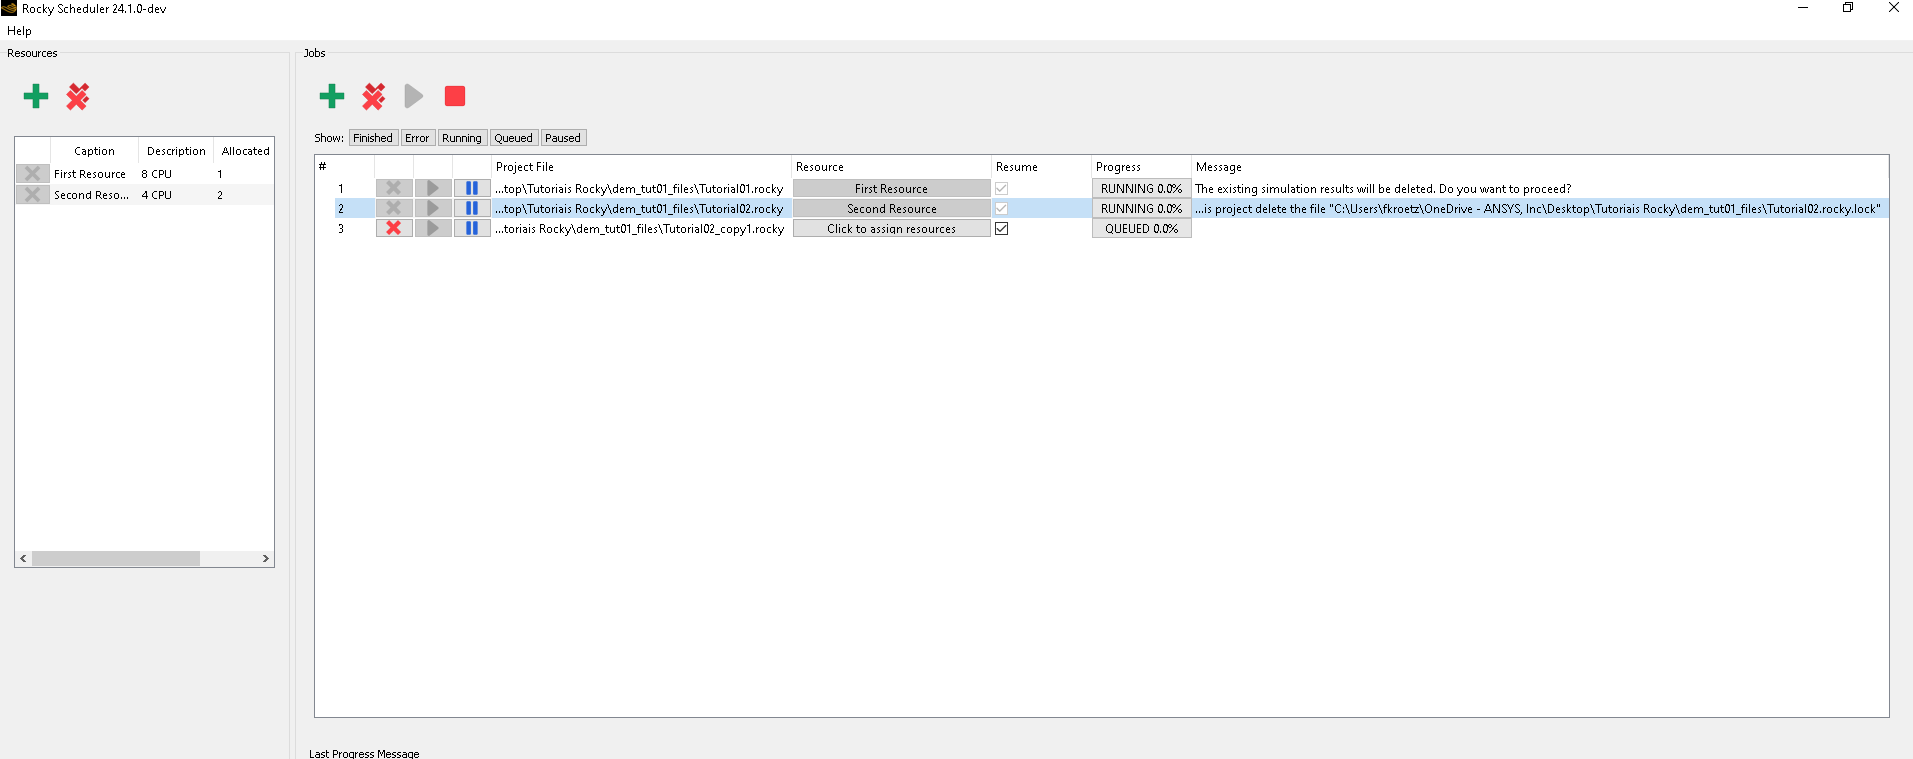
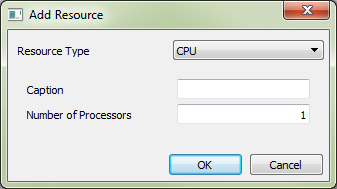
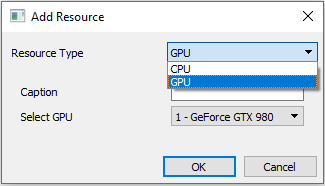
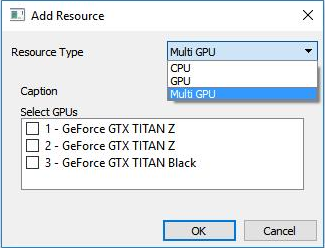
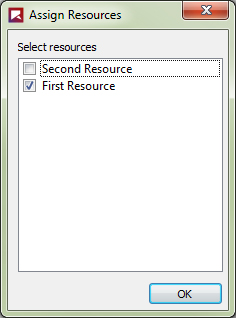
Table 1: Add Resources dialog options
Setting | Description | Range |
|---|---|---|
Resource Type | Enables you to select what computer resource, including CPU and GPU(s), to use for processing. | List automatically generated based upon your computer's resources |
Caption | Enables you to provide a unique name for the resource so that you can apply it to the jobs you want later. | Any value |
Number of Processors | When CPU is set for Resource Type this sets the number of computer processors (threads) the resource will use. In general, the more processors used, the faster the simulation will complete. It is recommended that you set this number equal to the amount of available cores (both physical and virtual) for which you have Rocky licenses. Notes:
| Any positive value |
Select GPU | When GPU is set for Resource Type, this enables you select a single GPU that the resource will use. | List automatically generated based upon your computer's resources |
Select GPUs | When Multi GPU is set for Resource Type, this enables you select one or more GPUs that the resource will use. | List automatically generated based upon your computer's resources |
Table 2:Rocky Scheduler Column Descriptions
Column | Description |
|---|---|
Resources | |
Remove Resource | Provides a button that when clicked, removes the resource from the group of available resources. Tip: To clear the entire Resources list, click the Remove All Resources button. |
Caption | Lists the unique name you provided for the resource. |
Description | Lists the number of cores and the resource type (CPU or GPU) that you set. |
Allocated by | Lists the job number (#) by which the resource is currently being used. |
Jobs | |
# | The sequential number assigned to the job by the Rocky Scheduler program. This number will determine the order in which the jobs are processed based upon resource availability and license type, and will be referenced in the Allocated by column. |
Remove Job | Provides a button that when clicked, removes the job from the group of jobs to be processed. Note: You can only remove jobs that are not currently being processed. To remove a job that is currently being processed, first click the Pause Simulation button, and then click the Remove Job button. Tip: To clear the entire Jobs list, click the Remove All Jobs button. |
Project File | Location and name of the .rocky project file set to be processed. |
Resource | When clicked, enables you to assign one or more resources to use when processing the project. Notes:
Tip: To assign the same Resource to multiple jobs, first multi-select the jobs you want (hold Shift or Ctrl and then click), and then holding the Shift button, double-click one of the selected Click here to assign resources bars. Note: Even when you choose to process your project with one or more GPUs, Rocky will still use at least 1 CPU core to complete certain pre-processing tasks related to Particle Inputs. After these tasks are complete, Rocky will process the simulation using only the resources you assigned. |
Resume | When selected, enables a partially processed simulation to begin processing from the last saved point. When cleared, simulations that have been paused will start processing over from the beginning. |
Progress | Shows the processing status and percentage complete of the project file.
Tip: To filter the Jobs list by progress type, click the button you want after Show. To turn off a filter, click the same button again. |
Message | Shows progress details similar to the Rocky Title bar or error details if the simulation cannot continue. |
Last Progress Message | Shows the most recent progress message or error information for the selected job. |
What would you like to do?
See Also:
Note: Only one instance of the Rocky Scheduler program can be open at one time.
Instructions for opening the Rocky Scheduler program on both Windows- and Linux-based platforms are provided below.
From the Programs list on the Windows Start menu, click Ansys 2023 R1, and then click Rocky Scheduler 2023 R1.
Do one of the following:
From a Linux command line, navigate to the same folder from which you run Rocky, and then run
./RockySchedulerFrom a Linux file explorer, navigate to the same folder from which you run Rocky, and then double-click the
RockySchedulerexecutable file.
See Also:
Ensure the Rocky Scheduler is open. (See also Open the Rocky Scheduler Program.)
From the Resources section, click Add Resource.
From the Add Resource dialog, choose the Resource Type, enter the Caption, and then do one of the following:
For CPU Resource Type, enter the Number of Processors you want to use.
For GPU Resource Type, select a single GPU from the Select GPU list.
For Multi GPU Resource Type, select one or more GPUs from the Select GPUs list.
4. Click OK. The new resource shows in the Resources list.
See Also:
Ensure the Rocky Scheduler is open. (See also Open the Rocky Scheduler Program.)
Ensure that any jobs assigned to the resource you want to remove are not currently processing by doing one of the following:
To stop an individual job from processing, click the Pause Simulation button for that job.
To stop all jobs from processing, click the Stop Scheduler button.
From the Resources section, click the Remove Resource button for the resource you want to remove.
Tip: To clear the entire Resources list, click the Remove All Resources button.
See Also:
Note: Most users have single-instance Rocky licenses and will therefore process jobs with the Rocky Scheduler sequentially, or one at a time. Only those users with unnumbered Rocky licenses will be able to use more than one resource to process multiple jobs in the Rocky Scheduler simultaneously.
Ensure the Rocky Scheduler is open. (See also Open the Rocky Scheduler Program.)
Ensure your Resources list is set the way you want. (See also Add a New Resource to the Rocky Scheduler.)
Under the Jobs section, click the Add Job button.
From the Choose Rocky project file dialog, locate and select one or more .rocky project files you want to process, and then click Open. Each file you selected appears in the list as a new job row.
Tip: Add jobs in the order you want the Rocky Scheduler to process them.
Under the Resource column for the job you just added, click the Click here to assign resources bar.
Tip: To assign the same Resource to multiple jobs, first multi-select the jobs you want (hold Shift or Ctrl and then click), and then holding the Shift button, double-click one of the selected Click here to assign resources bars.
From the Assign Resources dialog, select one or more resources you want to use to process the selected job(s), and then click OK.
Important: Assign only the amount of resources that are compatible with your Rocky license. Otherwise, jobs will still try to process but may result in errors. (See also About Processing Multiple Simulations In Succession.) If you are not sure what kind of Rocky license you have, please Submit a Support Request or contact your Rocky representative for assistance. Note: When multiple resources are selected, the first resource in the list that becomes available will do the processing.
Repeat steps 3-6 for each of the projects you want to process.
Click the Start Scheduler button.
If you have a single-instance Rocky license (most users), then the first job with available resources begins processing. If you have an unnumbered Rocky license, then all jobs with available resources begin processing at the same time.
Tips:
Press a job's Pause Simulation button to prevent that job from processing when it's scheduled to process.
Press a job's Start Simulation button to resume processing a paused simulation when it's scheduled to process.
Press the Stop Scheduler button to stop all jobs from processing.
After clicking the Start Scheduler button, you can minimize the Rocky Scheduler program to work on other tasks.
See Also: