


Cluster-side integration means that you are running in non-SSH mode.
RSM allows you to customize your integration with supported cluster types (LSF, PBS Pro, SLURM, Windows HPC, and SGE) by starting with examples of production code for one of the standard cluster types and then changing command lines or adding custom code where necessary. If an unsupported cluster is being used, the recommended procedure is still to start from the example files for one of the supported clusters.
When customizing files, you must choose a "keyword" that represents your custom cluster type. This is a short word or phrase that you will append to the file names of your custom files, and use when defining an RSM configuration to map the configuration to your custom files. The name is arbitrary, but you should make it simple enough to append to file names. For example, if you are creating a customized version of an LSF cluster, your keyword might be "CUS-LSF". The only requirement is that you consistently use the same capitalization in all places where the keyword is referenced.
For a cluster-side RSM installation, you will need to log into the remote cluster submit host to perform the following steps:
Create a copy of the HPC commands file that most closely matches your custom cluster type, and replace the keyword with your custom cluster type “keyword” (for example, hpc_commands_<keyword>.xml).
Add an entry to the job configuration file that associates your custom “keyword” with the cluster-specific hpc_commands_<keyword> file.
Edit the cluster-specific hpc_commands_<keyword> file to reference the code that you want to execute.
Create a configuration in RSM which will use your customized files.
The following sections discuss the steps needed for custom cluster-side integration:
You may also want to refer to the Configuring Custom Cluster-Side Integration tutorial on the Ansys Help site.
As part of the setup, you must create an hpc_commands file that includes your custom cluster “keyword” in its file name. This is an .xml file that contains the definition of the HPC commands to be used for the job execution. As a starting point, you can create a copy of one of the sample hpc_commands files that are included in the RSM installation.
Note that all the actions listed below should be performed on the cluster installation.
Locate the directory [Ansys 2024 R2 Install]/RSM/Config/xml.
Locate the HPC commands file that pertains to your cluster type (for instance, if you are using PBS Pro, the file is hpc_commands_PBS.xml).
Copy the content of the hpc_commands_<hpcType>.xml file into a new file, and name the new file hpc_commands_<YOURKEYWORD>.xml (where <YOURKEYWORD> is a short word or phrase that you have chosen to represent the custom cluster type). For example, if your keyword for the custom cluster is “
CUS_PBS”, the new file should be called hpc_commands_CUS_PBS.xml.
Note: Do not rename or make changes to the standard templates that ship with RSM (LSF, PBS Pro, and so on). This can cause those standard cluster setups to fail and will make it harder to start over if you need to change something later on. Here we have created a custom cluster type, but used copies of a standard template from which to start. This is the recommended method.
As part of the setup, you must add an entry for your custom cluster keyword in the jobConfiguration.xml file, and reference the files that are needed for that cluster job type.
Note that all the actions listed below should be performed on the cluster installation.
Locate the directory [Ansys 2024 R2 Install]/RSM/Config/xml.
Open the jobConfiguration.xml file and add an entry that follows the pattern shown in the sample code below. This code corresponds to the example in preceding sections which assumes your cluster is most like a PBS cluster.
  <keyword name="YOURKEYWORD">
    <hpcCommands name="hpc_commands_YOURKEYWORD.xml">
    </hpcCommands>
</keyword>An excerpt of the command file prior to the modification is pasted below. While a detailed description of the command is beyond the scope this documentation, it can be noted that the command file provides the information on how actions related to job execution (submit a job, cancel a job, getting the job status) are executed. The file also refers to a number of environment variables.
  <submit>
    <precommands>
      <command name="memory">
        <properties>
          <property name="MustRemainLocal">true</property>
        </properties>
        <application>
          <pythonapp>%RSM_HPC_SCRIPTS_DIRECTORY%/pbsMemory.py</pythonapp>
        </application>
        <arguments>
          <arg>%RSM_HPC_MEMORY%</arg>
          <arg>%RSM_HPC_CORES%</arg>
        </arguments>
        <outputs>
          <variableName>RSM_PBS_MEMORY_AMOUNT</variableName>
        </outputs>
        <condition>
          <env name="RSM_HPC_MEMORY">ANY_VALUE</env>
          <!--Important : We only need to run this pre command for non-distributed jobs because of a
          difference in how pbs wants memory reservation to be formatted-->
          <env name="RSM_HPC_DISTRIBUTED">FALSE</env>
        </condition>
      </command>
    </precommands>
    <primaryCommand name="submit">
      <application>
        <app>qsub</app>
      </application>
      <arguments>
        <arg>
          <value>-q %RSM_HPC_QUEUE%</value>
          <condition>
            <env name="RSM_HPC_QUEUE">ANY_VALUE</env>
          </condition>
        </arg>
        <arg>
          <value>-l select=%RSM_HPC_CORES%:ncpus=1:mpiprocs=1</value>
          <condition>
            <env name="RSM_HPC_DISTRIBUTED">TRUE</env>
          </condition>
        </arg>
        <arg>
          <value>-l select=1:ncpus=%RSM_HPC_CORES%:mpiprocs=%RSM_HPC_CORES%</value>
          <condition>
            <env name="RSM_HPC_DISTRIBUTED">FALSE</env>
          </condition>
        </arg>
        <!-- Caution, memory reservation must always be defined immediately after the core info because
            it is part of the value for the -l argument-->
        <arg noSpaceOnAppend="true">
          <value>:mem=%RSM_HPC_MEMORY%mb</value>
          <condition>
            <env name="RSM_HPC_MEMORY">ANY_VALUE</env>
            <env name="RSM_HPC_DISTRIBUTED">TRUE</env>
          </condition>
        </arg>
        <arg noSpaceOnAppend="true">
          <value>:mem=%RSM_PBS_MEMORY_AMOUNT%</value>
          <condition>
            <env name="RSM_PBS_MEMORY_AMOUNT">ANY_VALUE</env>
            <env name="RSM_HPC_DISTRIBUTED">FALSE</env>
          </condition>
        </arg>
        <arg>
          <value>-l place=excl</value>
          <condition>
            <env name="RSM_HPC_NODE_EXCLUSIVE">TRUE</env>
          </condition>
        </arg>
        <arg>-N "%RSM_HPC_JOBNAME%" %RSM_HPC_NATIVEOPTIONS% -V -o "%RSM_HPC_STAGING%/%RSM_HPC_STDOUTFILE%"
        -e "%RSM_HPC_STAGING%/%RSM_HPC_STDERRFILE%" "%RSM_HPC_STAGING%/%RSM_HPC_COMMAND%"</arg>
      </arguments>
    </primaryCommand>
    <postcommands>
      <command name="parseSubmit">
        <properties>
          <property name="MustRemainLocal">true</property>
        </properties>
        <application>
          <pythonapp>%RSM_HPC_SCRIPTS_DIRECTORY_LOCAL%/pbsParsing.py</pythonapp>
        </application>
        <arguments>
          <arg>-submit</arg>
          <arg>
            <value>%RSM_HPC_PARSE_MARKER%</value>
            <condition>
              <env name="RSM_HPC_PARSE_MARKER">ANY_VALUE</env>
            </condition>
          </arg>
        </arguments>
        <outputs>
          <variableName>RSM_HPC_OUTPUT_JOBID</variableName>
        </outputs>
      </command>
    </postcommands>
  </submit>
The section in bold text is the section that provides the Submit action, which we want to customize in this example. In the original version the Submit command invokes the cluster qsub with arguments determined via environment variables. The actual executable that is submitted to the cluster is determined by RSM during runtime and can be specified via an environment variable named RSM_HPC_COMMAND. For details, see Submit Command.
The example below shows the same section after it is customized to execute the Python file submit_PBS_EXAMPLE.py. In this example, we defined the type of application to execute (runpython, accessed from the Ansys installation) and the name of the Python file to be executed (submit_PBS_EXAMPLE.py).
  <submit>
    <primaryCommand name="submit">
      <properties>
        <property name="MustRemainLocal">true</property>
      </properties>
      <application>
        <app>%AWP_ROOT242%/commonfiles/CPython/2_7_13/linx64/Release/runpython</app>
      </application>
      <arguments>
        <arg>
          <value>%RSM_HPC_SCRIPTS_DIRECTORY%/submit_PBS_EXAMPLE.py</value>
        </arg>
      </arguments>
    </primaryCommand>
    <postcommands>
      <command name="parseSubmit">
        <properties>
          <property name="MustRemainLocal">true</property>
        </properties>
        <application>
          <pythonapp>%RSM_HPC_SCRIPTS_DIRECTORY_LOCAL%/pbsParsing.py</pythonapp>
        </application>
        <arguments>
          <arg>-submit</arg>
          <arg>
            <value>%RSM_HPC_PARSE_MARKER%</value>
            <condition>
              <env name="RSM_HPC_PARSE_MARKER">ANY_VALUE</env>
            </condition>
          </arg>
        </arguments>
        <outputs>
          <variableName>RSM_HPC_OUTPUT_JOBID</variableName>
        </outputs>
      </command>
    </postcommands>
  </submit>
The custom Submit command appears much simpler than the original one. However, the details of the submission are handled inside the Python file, which contains the same arguments used in the original section. The Python file will also contain any custom code to be executed as part of the submission.
Note: The submit_PBS_EXAMPLE.py script is provided in the [RSMInstall]/RSM/Config/scripts/EXAMPLES directory. It can be used as a starting point for a customized Submit command. The script should be copied into the [RSMInstall]/RSM/Config/scripts directory. Alternatively, a full path to the script must be provided along with the name.
Other commands or queries can be overridden using the same procedure. You can find the command name in the cluster-specific hpc_commands file and replace the application that needs to be executed and the arguments needed by the application. Details on how to provide custom commands, as well as the description of the environment variables, are provided in Writing Custom Code for RSM Integration.
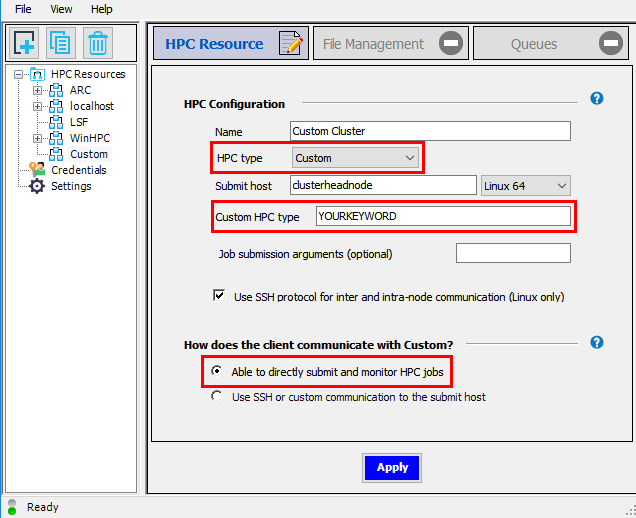
When creating a configuration for a custom cluster in RSM, you must set the HPC type to and specify your custom cluster keyword in the Custom HPC type field.
A “custom HPC integration” means that you are running in non-SSH mode (RSM is able to communicate directly with the cluster). Therefore, when specifying how the client communicates with the cluster, you need to select Able to directly submit and monitor HPC jobs.
For the File Management tab, see Specifying File Management Properties for details on the different file transfer scenarios.