Moving Objects

  1. Click Move in the Edit group on the Design tab.
  2. Select the object(s) that you want to move.
  3. Select the following options:
    • Move grid: Select this option to move the sketch grid.
    • Ruler: Once you select an axis on the Move handle, select this option and click an edge or face to anchor the ruler. The ruler is oriented along the selected Move handle axis. Specify a value to use the ruler to dimension the move.
    • Create patterns: Select this option if you want to create a pattern by dragging selected objects with the Move tool. Dragging creates a copy of the selected object, moves it to a new location, and creates a pattern relationship. Select the Maintain orientation option to keep the initial orientation of the original object when you rotate or translate the pattern. See Creating a pattern.
    • Detach first: Detach the selected protrusions and depressions, move them, and reattach them at the new location.
    • Maintain sketch connectivity: Keeps the connections between a sketch curve and other curves that share its end points. If you deselect this option and move a sketch curve, the curve will move independent of other curves.
    • Remember orientation: Sets the orientation of the Move tool for the object. The orientation is only remembered for the current session. You can change the Move handle orientation by using the Direction tool guide, holding Alt and selecting a reference object, or by dragging a ball on the Move handle's axes. You can select the following options in the dropdown list to the right of the option:
      • Default: The Move handle orientation is determined by the object(s) you select.
      • Global: Saves the current Move handle orientation, and this orientation is used for all objects.
      • Per Object: Saves the current Move handle orientation for the selected object. When you select the object again with the Move tool active, the Move handle will be oriented at its saved orientation.
  4. Click an axis and drag in that direction to move the selected object.
    A line extends from the Move handle axis to indicate the direction you selected for movement.
    If the move fails, the Move handle is repositioned to the last valid location and orientation. If you are trying to move a protrusion surrounded by round faces, you may need to fill the rounds.
  5. You can also Alt + select a plane between Move handles to invoke free drag movement within that plane. Place the Move tool on any movable object and then hold the Alt key. Quarter circle planes appear between the Move handles. Selecting one changes the cursor to a free drag cursor and allows free movement within the plane. Select any Move handle to disable the free drag.
    Note: The cursor does not need to be on the axis to move the selected object. In fact, you may find it easier to control the move if you drag some distance from the entity and the Move handle.

Example:
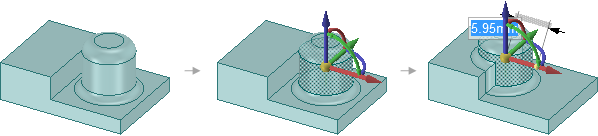
Moving a protrusion with rounds that intersects with a stepped solid with the Detach first option
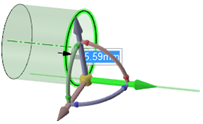
Moving a circular edge along a surface
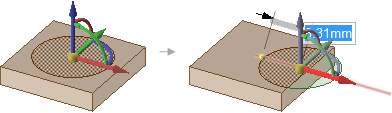
Moving an imprinted face off of a solid face creates a surface.
Moving imprinted edges on a face, and other intersecting imprinted edges are adjusted as needed. The examples above show how the edges are adjusted when the imprinted areas are moved.
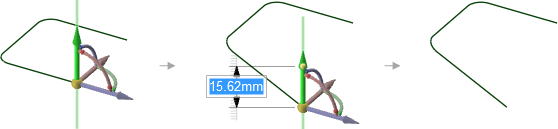
Moving the end point of a line segment that has a tangent arc on its other end changes the arc so that it remains tangent to the line segment as you move its end point.