


This node allows you to register cell ranges selected in the Spreadsheet tab to numerical data types in optiSLang. This integration is done using Microsoft Excel software.
Supported files types are *.xls, *.xlsx, *.xlsm, *.XLS or *.odt.
Parametrization
Scalars
To define a scalar input or output select, the value and if there is a corresponding name next to or above the value, also select it. Drag the selected cells to the appropriate input or output pane. You can also select multiple scalars.
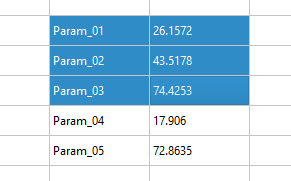
Defining three scalars named Param_01, Param_02 and Param_03:

Defining the same three scalars in vertical order:
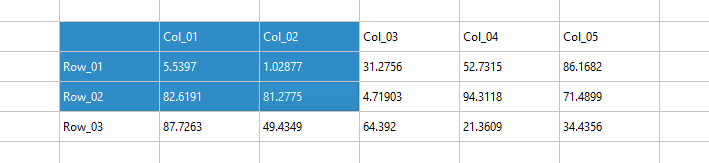
For matrix-like tables, scalars are registered with the name row-name.column-name.
Registering scalars named Col_01.Row_01, Col_02.Row_01, and so on:
Vectors (Response)
To define a vector response select at least two consecutive scalar values beneath or to the right of a name. Drag the selected cells to the output side and let them drop. The selection automatically expands downward or to the right until an empty cell is reached.
Though vectors are registered with a fixed dimension, their size may vary during simulation runs. optiSLang updates the length at each run if it is longer or shorter than the original range that it was registered with.
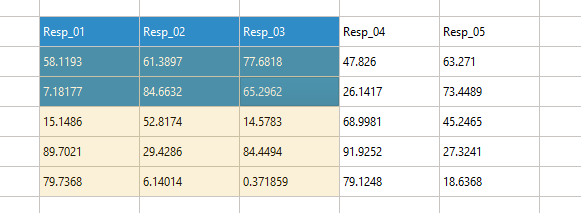
Defining three vectors named Resp_01, Resp_02 and Resp_03:
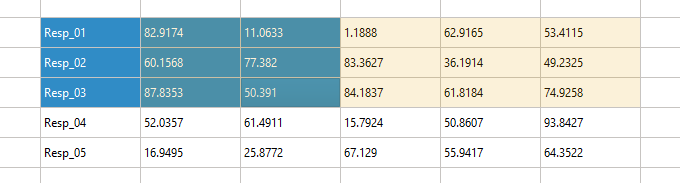
Defining the same vectors in vertical order:
Signals (Response)
To add signals as responses, parametrize the timeline and the values as vectors and add them as internal variables. Switch to the variables tab and add a new variable to contain the resulting signal. Use the calculator function xydata(timeline, values) to construct the signal.
Strings
You can register strings by selecting a single cell that contains the string. Instead of including the name in the selection, you are prompted to enter a name manually.
Registering the string Variant_a:

Existing slots can be dropped directly onto the cells.
Multiselection
Multiselection is available for scalars and vectors.
Scalars: The cells with the parameter names and the corresponding value cells must be direct neighbors. Either the name cells are left or above the value cells. When you select the first name cell, press Shift and select the last value cell. You can add a full parameter block as input or output parameter using drag and drop.
If there are names above and left of the selected value cells, several parameters are added where the name is a combination of the above and left name cell (for example, A1 - empty, B1 - My, A2 - Parameter, B2 - 5 → My.Parameter belongs to value 5).
Note: This does not work with empty cells in between.
Vectors: You can multi-select vectors in the same way as for scalars except that there are more value cells right next to or below the name cells.
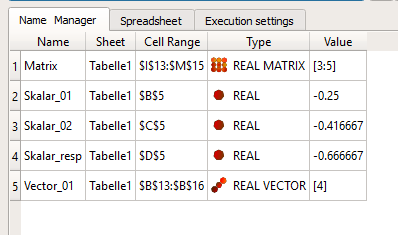
Names Manager
If the workbook contains named ranges the Name Manager tab is displayed by default. You can use this tab to register named ranges to parameters, responses and slots. This creates a faster workflow, instead of manually selecting cell ranges in the Spreadsheet tab. Depending on the dimension of the range, optiSLang converts it to the corresponding data type. If the workbook does not contain any named ranges or if they cannot be read by optiSLang, the Name Manager tab does not appear.
Execution Settings Tab
| Option | Description |
|---|---|
| Macro execution order | If any macros are available and activated in the file, they are listed here. Select the macros to run from the list, they are executed in order from the top of the list to the bottom. To change the order of the macros, you can either drag a macro to a new position in the list, or select it and use the up and down arrows to move it. To perform a test run with all selected macros, click . |
| Run macros in design directory | When selected, changes the macro's working directory to the
current design directory. The directory is only changed during
the macro run and not for the workbook in general. Retrieve the
working directory by using the CurDir
function. |
| Distinct working directory | When selected, creates an extra directory in the design directories for calculations. |
| Save in design directory | When selected, saves the document in the design directory after completing a design. |
| Show Excel window | When selected, Excel is visible during calculations |
| Close document after each design | When selected, the current file is closed after each design calculation. This is useful when deleting design directories. |
| Automatic cell calculation | When selected, cells are calculated and updated automatically. Disabling this setting can improve solver performance for computational-intensive sheets or a high number of parameters. |
Run Options
This node has general Run Options. The number of supported options is individual for each node.
Troubleshooting
If receiving: Run-time error 6068: Programmatic Access to Visual Basic Project is not trusted, see
For Excel 2010, you must activate the following security warning settings for VBA macros.
Enable all macros (not recommended)
http://technet.microsoft.com/en-us/library/ee857085%28v=office.14%29.aspx
Standard Slots
Besides the common integration slots this node has the following slots.
| Slot Name | Slot Type | Data Type | Description | ||||
|---|---|---|---|---|---|---|---|
| In | Out | ||||||
| Path | x | Path to a file with format *.xls, *.XLS or *.odt | |||||
Supported Versions
See the Supported Integration Versions table.
Note: Only the 64-bit version of Excel is supported.