Handling a large number of contacts can be problematic for the implicit solver. This is especially the case when the contact is not bonded but is sliding and moving. The explicit dynamics solver has standard out-of-the-box automatic contact options (trajectory contact) which work very well. Contact will be detected in the model automatically at any point without requiring the user to define specific contact regions. On top of that, the user can specify contacts manually (or generate them automatically) separate from the trajectory contact, which is done similarly to the Contacts feature in the implicit solver.
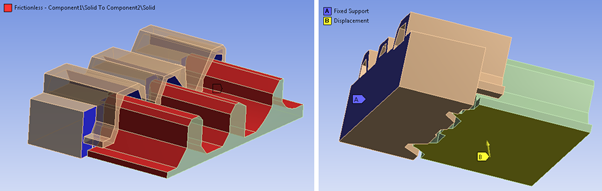
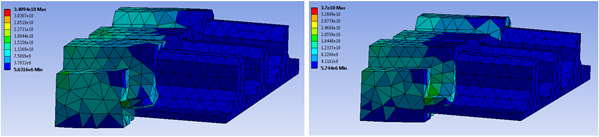
The model shown in Figure 8.4: Model Setup Showing Contact (left) and Boundary Conditions (right) demonstrates this contact issue. The implicit setup has a manually defined frictionless contact consisting of 40 contact and 38 target faces between the two parts. The explicit dynamics model simply has the default frictionless trajectory contact enabled. All other boundary conditions are the same for both analyses: a fixed support and a displacement boundary condition. Both models have the same mesh type and mesh density (the implicit setup does not make use of midside nodes in order to achieve maximum similarity in comparison, since the explicit solver cannot use midside nodes). The implicit model has problems converging while the explicit solve completes without issues. This model exemplifies the possible problematic contact handling in the implicit solver. The model will converge when using a denser mesh; however the differences are clear for comparable mesh size (the implicit solver using midside nodes with the standard mesh size also does not converge). The final stress results can be seen in Figure 8.5: Final Stress Values Comparison Between the Explicit (left, 3.4E10 Pa) and Implicit (right, 3.7E10 Pa) Solvers.
Figure 8.5: Final Stress Values Comparison Between the Explicit (left, 3.4E10 Pa) and Implicit (right, 3.7E10 Pa) Solvers